1. Introduction
This manual provides detailed instructions for the installation, operation, and maintenance of your MOUNTUP Universal Soundbar Mount (MU9122) and Universal Height Adjustable Speaker Stand (MU9132-L) Bundle. Please read these instructions carefully before beginning installation to ensure safe and correct assembly and usage. Keep this manual for future reference.
2. Safety Information
- Weight Capacity: Do not exceed the maximum weight capacity specified for each component. The speaker stands support up to 22 lbs (10 kg) per stand, and the soundbar mount supports up to 13 lbs (6 kg). Exceeding these limits may result in instability and potential injury or property damage.
- Proper Installation: Ensure all components are securely fastened according to the instructions. Improper installation can lead to product failure.
- Wall Type: The soundbar mount is designed for installation on concrete walls or wood studs. It is NOT FOR DRYWALL INSTALLATION without proper reinforcement. Concrete anchors will be shipped if needed.
- Children and Pets: Keep small parts away from children and pets to prevent choking hazards.
- Tools: Use appropriate tools for installation. If you are unsure about any part of the installation process, seek professional assistance.
3. Package Contents
Please verify that all parts are present before beginning assembly. If any parts are missing or damaged, contact MOUNTUP customer support.
- 1 x Universal Soundbar Mount (MU9122)
- 1 x Pair of Universal Height Adjustable Speaker Stands (MU9132-L)
- 1 x Hardware Kit (screws, anchors, washers, anti-slip pads)
- 1 x Instruction Manual
4. Setup and Installation
4.1 Universal Height Adjustable Speaker Stands (MU9132-L)
These stands are designed for most satellite and bookshelf speakers, compatible with brands like Sonos, Klipsch, Samsung, Sony, Bose, Yamaha, Edifier, Vizio, Polk, and more.
- Assemble the Base: Attach the bottom pole section to the base plate using the provided screws. Ensure it is stable and level.
- Attach the Top Plate: Secure the top speaker plate to the upper pole section.
- Connect Pole Sections: Insert the upper pole section into the lower pole section.
- Adjust Height: Loosen the adjustment knob or mechanism to extend or retract the upper pole to your desired height (between 720mm and 950mm). Tighten the knob securely to lock the height in place.
- Place Speakers: Carefully place your speakers on the top plates. Apply the included anti-slip and shockproof pads to the top plate before placing speakers to prevent movement and vibration. Ensure the speaker weight does not exceed 22 lbs (10 kg) per stand.

Image: Assembled MOUNTUP speaker stands with bookshelf speakers, demonstrating typical setup.
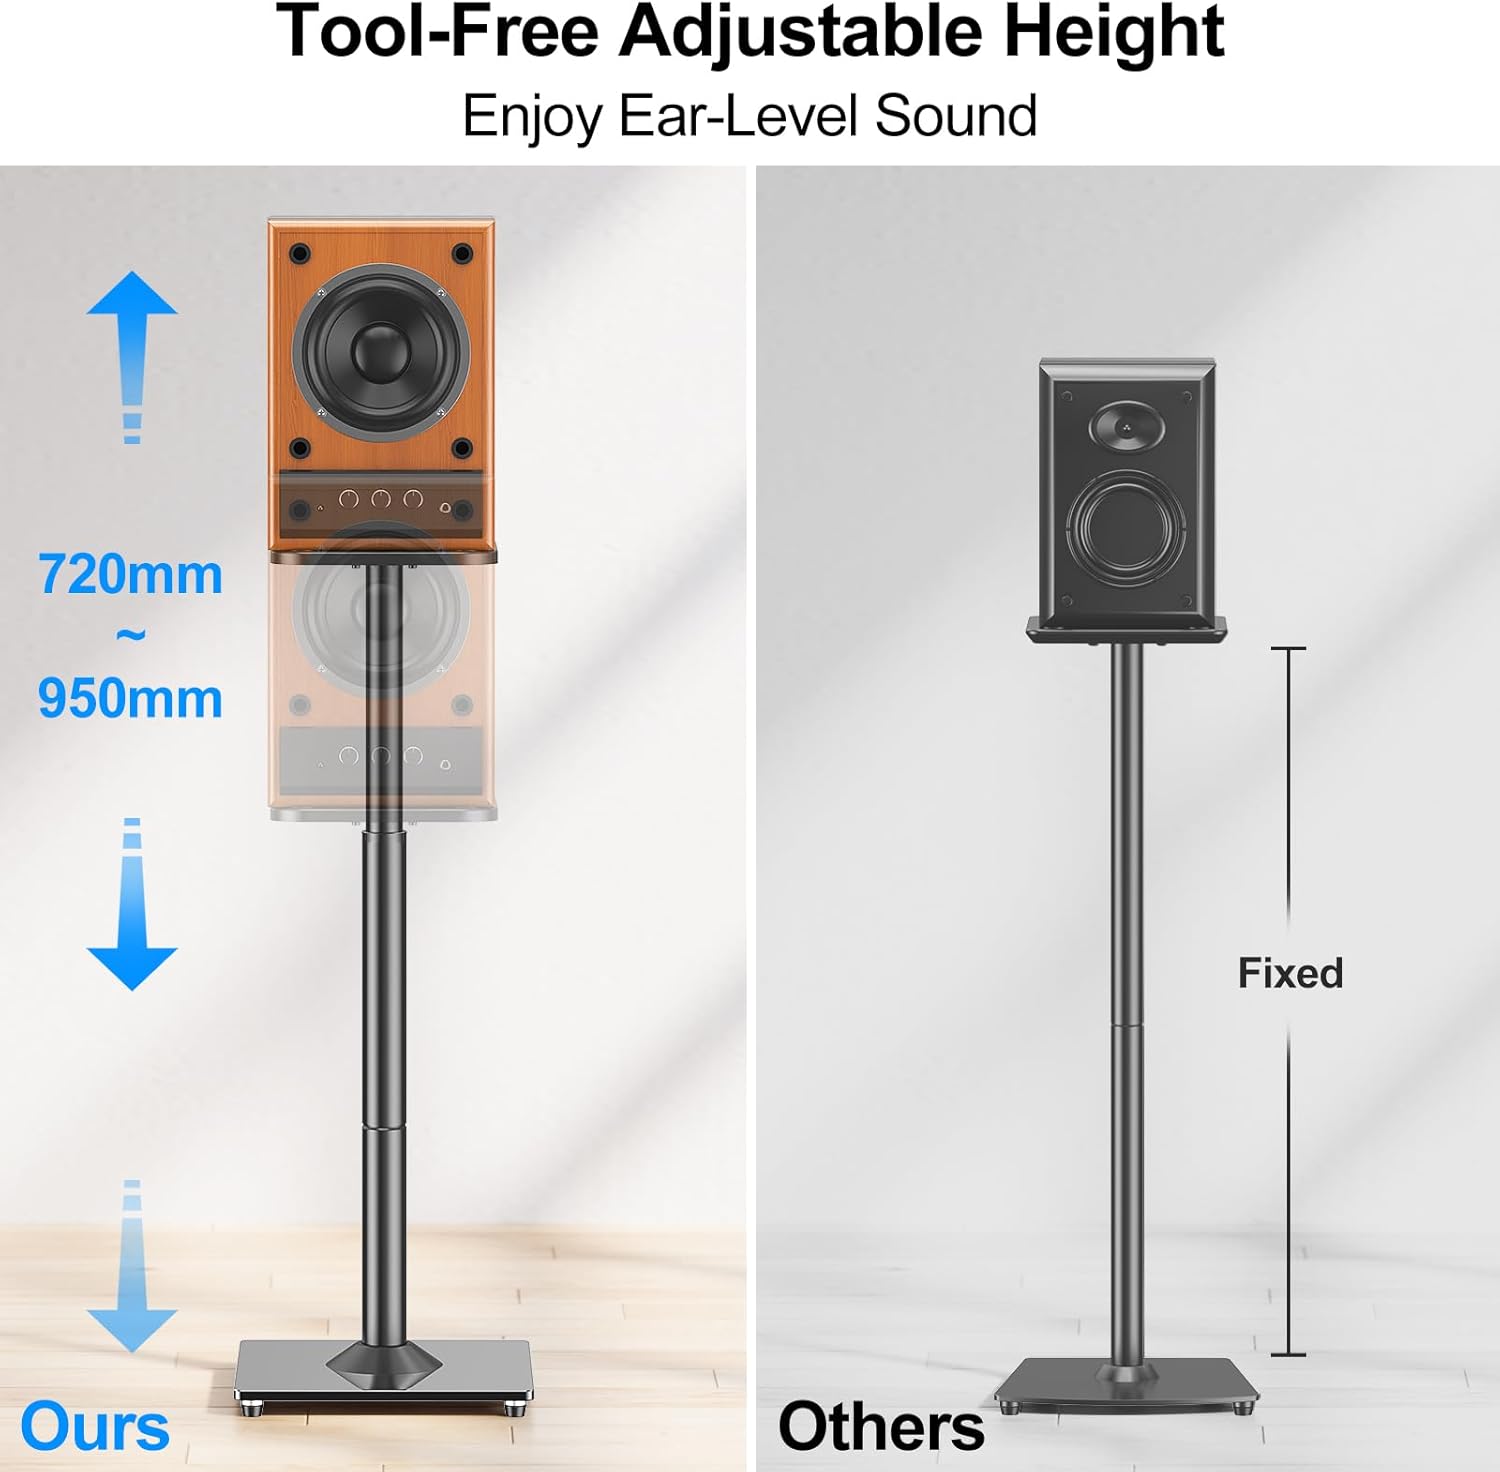
Image: Diagram illustrating the tool-free height adjustment range of the speaker stands, from 720mm to 950mm, for optimal ear-level sound.
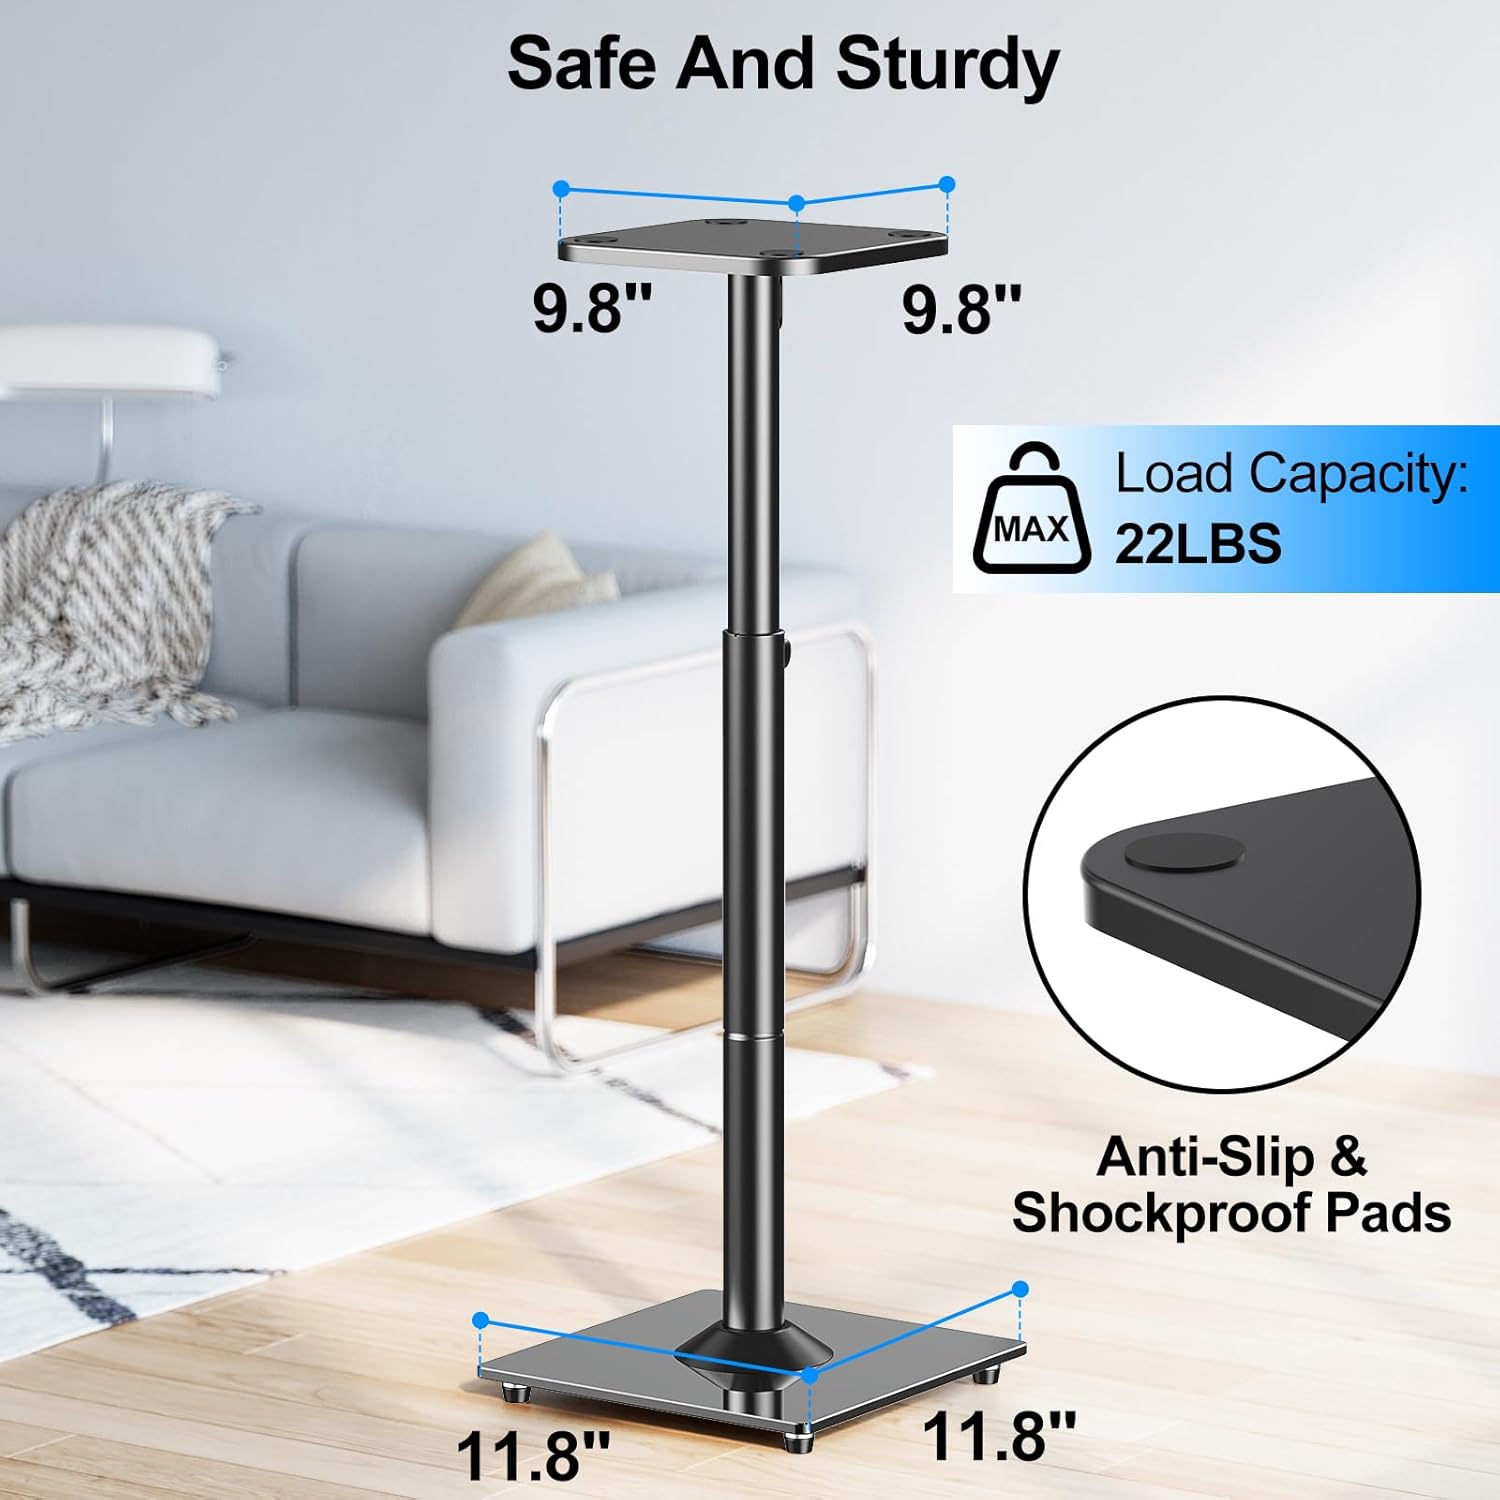
Image: Detailed view of a single speaker stand, highlighting the top plate dimensions (9.8"x9.8"), base dimensions (11.8"x11.8"), and maximum load capacity of 22 lbs (10 kg). Anti-slip and shockproof pads are also shown.
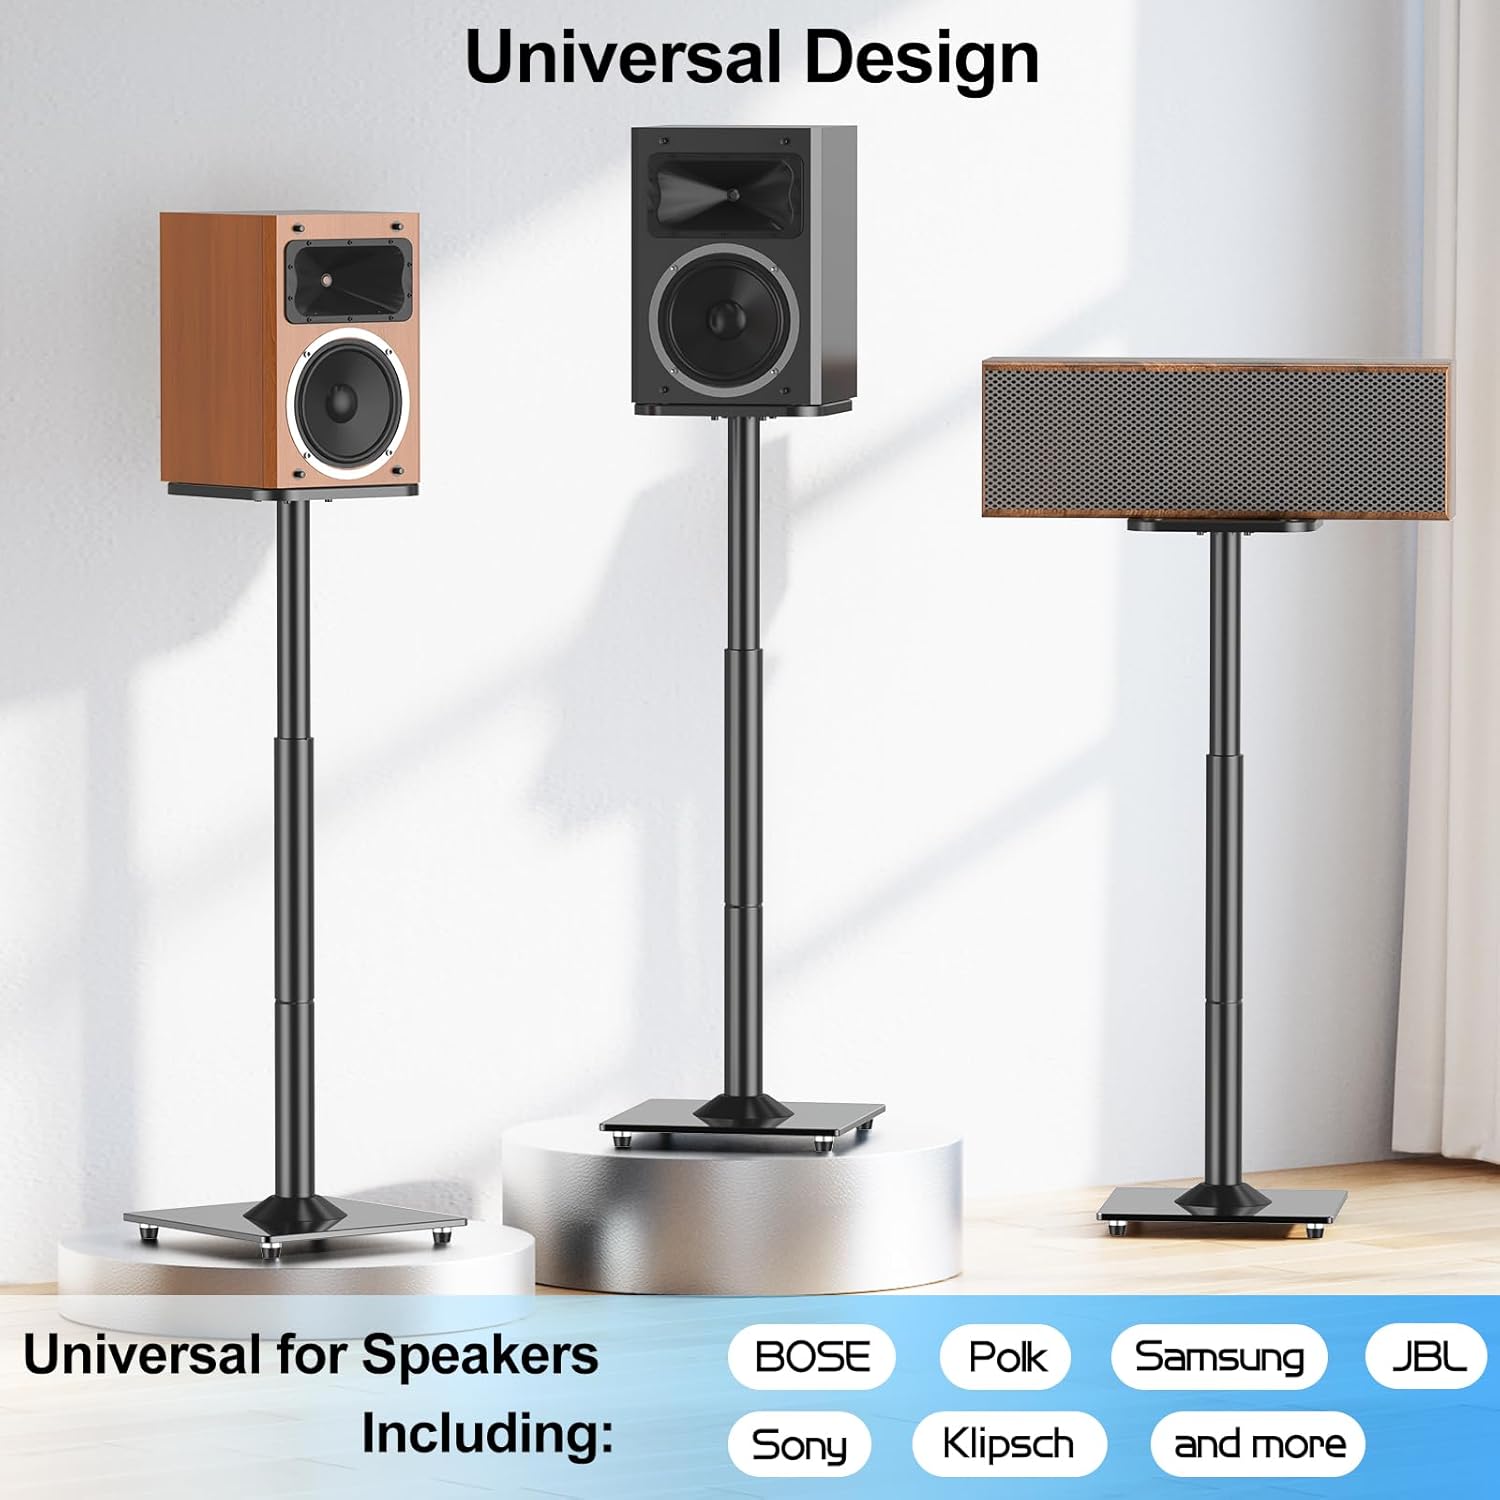
Image: Illustration of the universal design of the speaker stands, showcasing compatibility with various speaker types and brands such as Bose, Polk, Samsung, JBL, Sony, and Klipsch.
4.2 Universal Soundbar Mount (MU9122)
This soundbar mount offers multiple installation options to suit your setup.
- Determine Mounting Location: Decide whether to mount the soundbar above or below your TV, and whether to attach it to a concrete wall, wood studs, or directly to the TV's VESA mounting holes.
- Wall Mounting (Concrete or Wood Studs):
- Mark the drilling points on the wall according to the mount's dimensions.
- Drill pilot holes. For concrete walls, use appropriate concrete anchors (contact support if needed). For wood studs, ensure screws are driven into the center of the stud.
- Secure the main bracket to the wall.
- TV Mounting (VESA):
- Attach the vertical arms of the soundbar mount to the VESA holes on the back of your TV. Ensure the VESA pattern is within the supported range (MAX: 800mm (31.5in), MIN: 200mm (7.87in)).
- The mount supports VESA patterns up to 800mm (31.5in) in height and 860mm (33.86in) in width.
- Attach Soundbar: Once the main bracket is secured (either to the wall or TV), attach your soundbar to the mount using the adjustable arms and screws. Ensure the soundbar's weight does not exceed 13 lbs (6 kg).
- Final Check: Verify that all connections are tight and the soundbar is securely mounted and level.

Image: Components of the MOUNTUP Universal Soundbar Mount (MU9122), showing the main bracket and adjustable arms.

Image: A soundbar securely mounted below a television, demonstrating the aesthetic and functional placement. The mount has a weight capacity of 6 KG / 13 LBS.

Image: Technical diagram illustrating the range of VESA hole compatibility for the soundbar mount, showing maximum 800mm (31.5in) and minimum 200mm (7.87in) vertical spacing, and overall width up to 860mm (33.86in).

Image: Visual guide demonstrating four installation options for the soundbar mount: 1) Mount on concrete wall, 2) Mount on wood studs, 3) Mount above the TV, and 4) Mount below the TV.
5. Operating Instructions
5.1 Speaker Stands
To adjust the height of the speaker stands, ensure no heavy objects are on the top plate. Loosen the locking mechanism on the pole, carefully slide the upper pole to the desired height, and then firmly tighten the locking mechanism to secure it. Always ensure both stands are at the same height for optimal sound dispersion.
5.2 Soundbar Mount
Once installed, the soundbar mount requires no further operation. Ensure the soundbar is securely seated on the mount and all cables are managed to prevent accidental dislodgement.
6. Maintenance
- Cleaning: Wipe the stands and mount with a soft, dry cloth. Avoid using abrasive cleaners or solvents that could damage the finish.
- Periodic Checks: Periodically check all screws and connections to ensure they remain tight and secure. Over time, vibrations or movement may cause fasteners to loosen.
- Weight Limits: Reconfirm that the weight of your speakers and soundbar does not exceed the specified limits.
7. Troubleshooting
- Stands are wobbly: Ensure all screws are tightened securely, especially those connecting the base to the pole and the top plate to the pole. Verify the floor surface is level.
- Soundbar mount feels loose: Recheck all wall or TV mounting screws. If mounted to a wall, ensure it is secured into studs or appropriate anchors. If mounted to the TV, verify VESA screws are tight.
- Difficulty adjusting speaker stand height: Ensure the locking mechanism is fully loosened before attempting to adjust. Do not force the pole.
8. Specifications
| Component | Specification |
|---|---|
| Universal Height Adjustable Speaker Stand (MU9132-L) | |
| Height Adjustment Range | 720mm - 950mm (28.3in - 37.4in) |
| Max Load Capacity (per stand) | 22 lbs (10 kg) |
| Top Plate Dimensions | 9.8" x 9.8" |
| Base Dimensions | 11.8" x 11.8" |
| Universal Soundbar Mount (MU9122) | |
| Max Load Capacity | 13 lbs (6 kg) |
| VESA Compatibility (Vertical) | MIN: 200mm (7.87in), MAX: 800mm (31.5in) |
| VESA Compatibility (Horizontal) | Up to 860mm (33.86in) |
| Mounting Options | Concrete wall, Wood studs, Above TV, Below TV |
9. Warranty and Customer Support
MOUNTUP provides customer support for pre-purchase questions and installation assistance. If you encounter any issues or have questions regarding your product, please contact MOUNTUP customer service.
Important Note: MOUNTUP TV wall mounts (and by extension, the soundbar mount when wall-mounted) are NOT FOR DRYWALL INSTALLATION without specific reinforcement. Concrete anchors will be shipped if needed for concrete wall installations.