1. Introduction
This manual provides essential instructions for the proper setup, operation, and maintenance of your Keeson CU380 JLDK.30.03.20 adjustable bed base remote control. Please read this manual thoroughly before use to ensure correct functionality and to prevent any issues.
2. Setup and Pairing
2.1 Battery Installation
The remote control requires 2 AAA batteries (not included). To install, slide open the battery compartment cover on the back of the remote. Insert the batteries, ensuring correct polarity (+/-). Close the battery compartment cover securely.
2.2 Remote Pairing Procedure
If your remote control is not already paired with your adjustable bed base, follow these steps:
- Step 1: Disconnect the power cord of your adjustable bed base from the electrical outlet. Wait approximately 5 seconds, then plug it back into the outlet.
- Step 2: Within 10 seconds of plugging in the power cord, locate the PAIR button on the back of the remote control. Press and hold this PAIR button. The button will illuminate blue and begin flashing.
- Step 3: Continue holding the PAIR button until it stops flashing and the LED light on the control box of your bed base goes out. Release the PAIR button. The remote is now paired with the adjustable base.
- Step 4: Test all remote functions to confirm successful pairing.

Image: Remote control pairing instructions, illustrating the steps to connect the remote to the bed base.
3. Operating the Remote Control
The remote control provides intuitive buttons for adjusting your bed base. Familiarize yourself with the button layout and their corresponding functions:
- Head Up/Down: Adjusts the head section of the bed.
- Foot Up/Down: Adjusts the foot section of the bed.
- Flat: Returns the bed to a flat position.
- Zero G: Activates the pre-programmed Zero Gravity position, designed to relieve pressure.
- Memory Presets (if available): Some remotes may have programmable memory buttons to save your favorite positions. Consult your bed base manual for specific instructions.

Image: Front view of the Keeson CU380 JLDK.30.03.20 remote control, displaying buttons for head/foot adjustment, Zero G, and other functions.
4. Maintenance
4.1 Battery Replacement
Replace batteries when the remote's response becomes sluggish or stops working. Always use new AAA batteries and dispose of old batteries responsibly.
4.2 Cleaning
To clean the remote control, gently wipe it with a soft, dry cloth. Avoid using liquid cleaners or abrasive materials, as these can damage the remote's surface or internal components.
5. Troubleshooting
5.1 Remote Not Responding
- Ensure batteries are correctly installed and not depleted. Replace if necessary.
- Verify the remote is properly paired with the bed base by following the pairing procedure in Section 2.2.
- Check that the bed base is plugged into a functional power outlet.
5.2 Compatibility Issues
This remote control is specifically designed for Keeson CU380 JLDK.30.03.20 adjustable bed bases. It is not a universal remote. Before purchasing or attempting to use, ensure your bed base's control box model number matches CU380 JLDK.30.03.20.
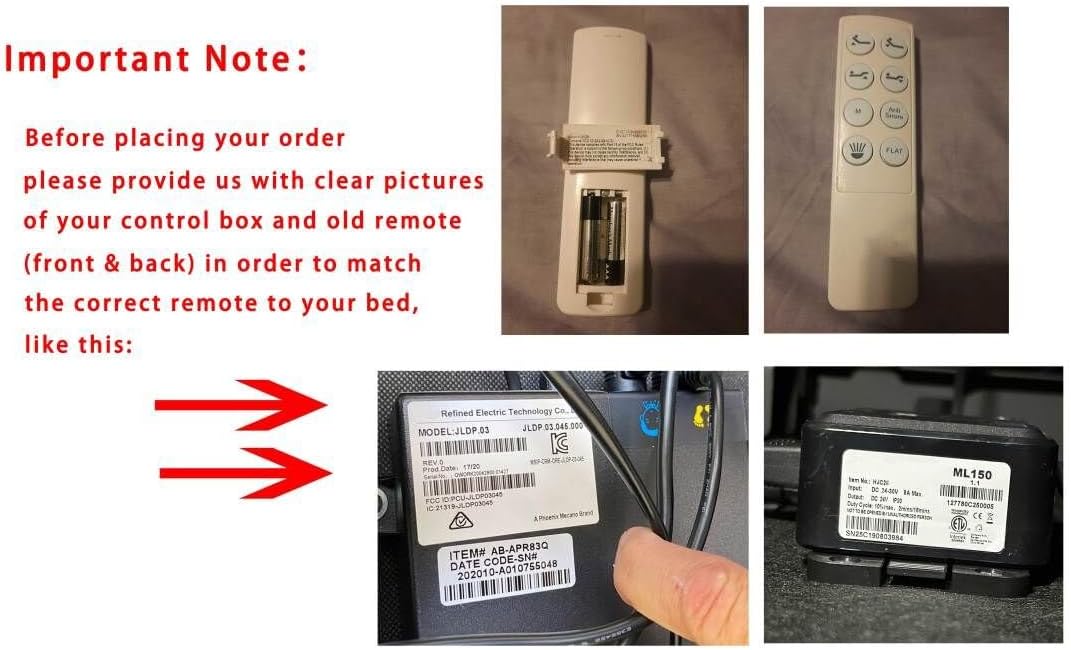
Image: Visual guide emphasizing the importance of verifying the control box model number and comparing it with the old remote for compatibility.
6. Specifications
- Model: CU380 JLDK.30.03.20
- Compatible Devices: Adjustable bed base (Keeson CU380 JLDK.30.03.20)
- Power Source: 2 AAA batteries (not included)
- Color: Black
- Special Feature: Not a universal remote
7. Warranty and Support
7.1 Warranty Information
Specific warranty details for this remote control are not provided in the product information. Please refer to the documentation that came with your adjustable bed base or contact the original seller for warranty inquiries.
7.2 Customer Support
If you encounter issues not covered in this manual or require further assistance, please contact the seller or manufacturer of your adjustable bed base. When contacting support, provide detailed information about your bed base, control box, and the remote control, including any serial numbers or model identifiers.