1. Important Safety Information
Please read all instructions carefully before installation and operation. Keep this manual for future reference. Improper installation or use may cause damage to the device or vehicle, and may void the warranty.
- Ensure the vehicle's ignition is off and the battery is disconnected before starting installation.
- Consult a professional if you are unsure about any installation steps.
- Do not operate the device in a way that distracts you from driving. Always prioritize road safety.
- Avoid exposing the unit to extreme temperatures, direct sunlight for prolonged periods, or excessive moisture.
2. Product Overview
The EagleNav Android 13 Car Radio is a 9-inch touch screen multimedia system designed to upgrade the in-car experience for Chevrolet Spark models from 2013 to 2015. It integrates modern features such as wireless CarPlay, Android Auto, GPS navigation, Bluetooth, and advanced audio processing.
2.1 Key Features
- Android 13 Operating System
- 9-inch High-Definition Touch Screen
- Built-in Wireless CarPlay and Android Auto
- Steering Wheel Control (SWC) Compatibility
- Integrated GPS Navigation
- Wi-Fi Connectivity
- Bluetooth for Hands-Free Calling and Audio Streaming
- FM/AM Radio with RDS
- Digital Signal Processing (DSP) for Enhanced Audio
2.2 Included Components
The package includes the main head unit and various accessories necessary for installation and functionality. Please verify all components are present upon unboxing.

Figure 2.2.1: EagleNav Car Radio and Included Accessories
- 9-inch Head Unit
- Power Cable
- Antenna
- CANBUS Decoder
- Crowbar Tool
- Screwdriver
- RCA Cable Set
- Antenna Adapter Cable
- Microphone
- GPS Antenna
- External Speaker (for warning sounds)
- Reversing Line
- USB Cables (x2)
- Rear Camera (as per product specifications)
3. Installation Guide
This section provides general guidance for installing the EagleNav car radio. Professional installation is recommended. Ensure compatibility with your Chevrolet Spark model (2013, 2014, or 2015) by checking the dimensions and shape of your vehicle's center console before proceeding.
3.1 Pre-Installation Check
- Verify all components listed in Section 2.2 are present.
- Confirm the unit fits your vehicle's dashboard opening.
- Disconnect the vehicle's battery to prevent electrical shorts.
3.2 Removal of Factory Radio
Carefully remove the existing factory radio and trim pieces. This typically involves:
- Using the provided crowbar tool to gently pry off dashboard trim panels.
- Unscrewing the mounting screws holding the factory radio in place.
- Disconnecting all wiring harnesses and antenna cables from the rear of the factory radio.
3.3 Wiring Connections
Connect the new EagleNav unit using the provided wiring harnesses. Ensure all connections are secure.
- Power Cable: Connect the main power harness to the vehicle's wiring.
- CANBUS Decoder: Connect the CANBUS box as per the vehicle's specific wiring to ensure proper communication for steering wheel controls and other vehicle functions.
- GPS Antenna: Mount the GPS antenna in a location with a clear view of the sky, typically on the dashboard or under the windshield.
- Wi-Fi/Bluetooth Antenna: Connect the Wi-Fi/Bluetooth antenna for optimal signal reception.
- USB Cables: Route the USB cables to an accessible location for connecting external devices.
- Rear Camera: If installing the included rear camera, connect the video input cable to the unit and the power/ground wires to the vehicle's reverse light circuit.
- External Speaker: Connect the external speaker if your vehicle's warning sounds are lost after connecting the CANBUS.
3.4 Unit Installation
Once all wiring is connected, carefully mount the EagleNav unit into the dashboard opening and secure it with screws. Reattach all trim panels.
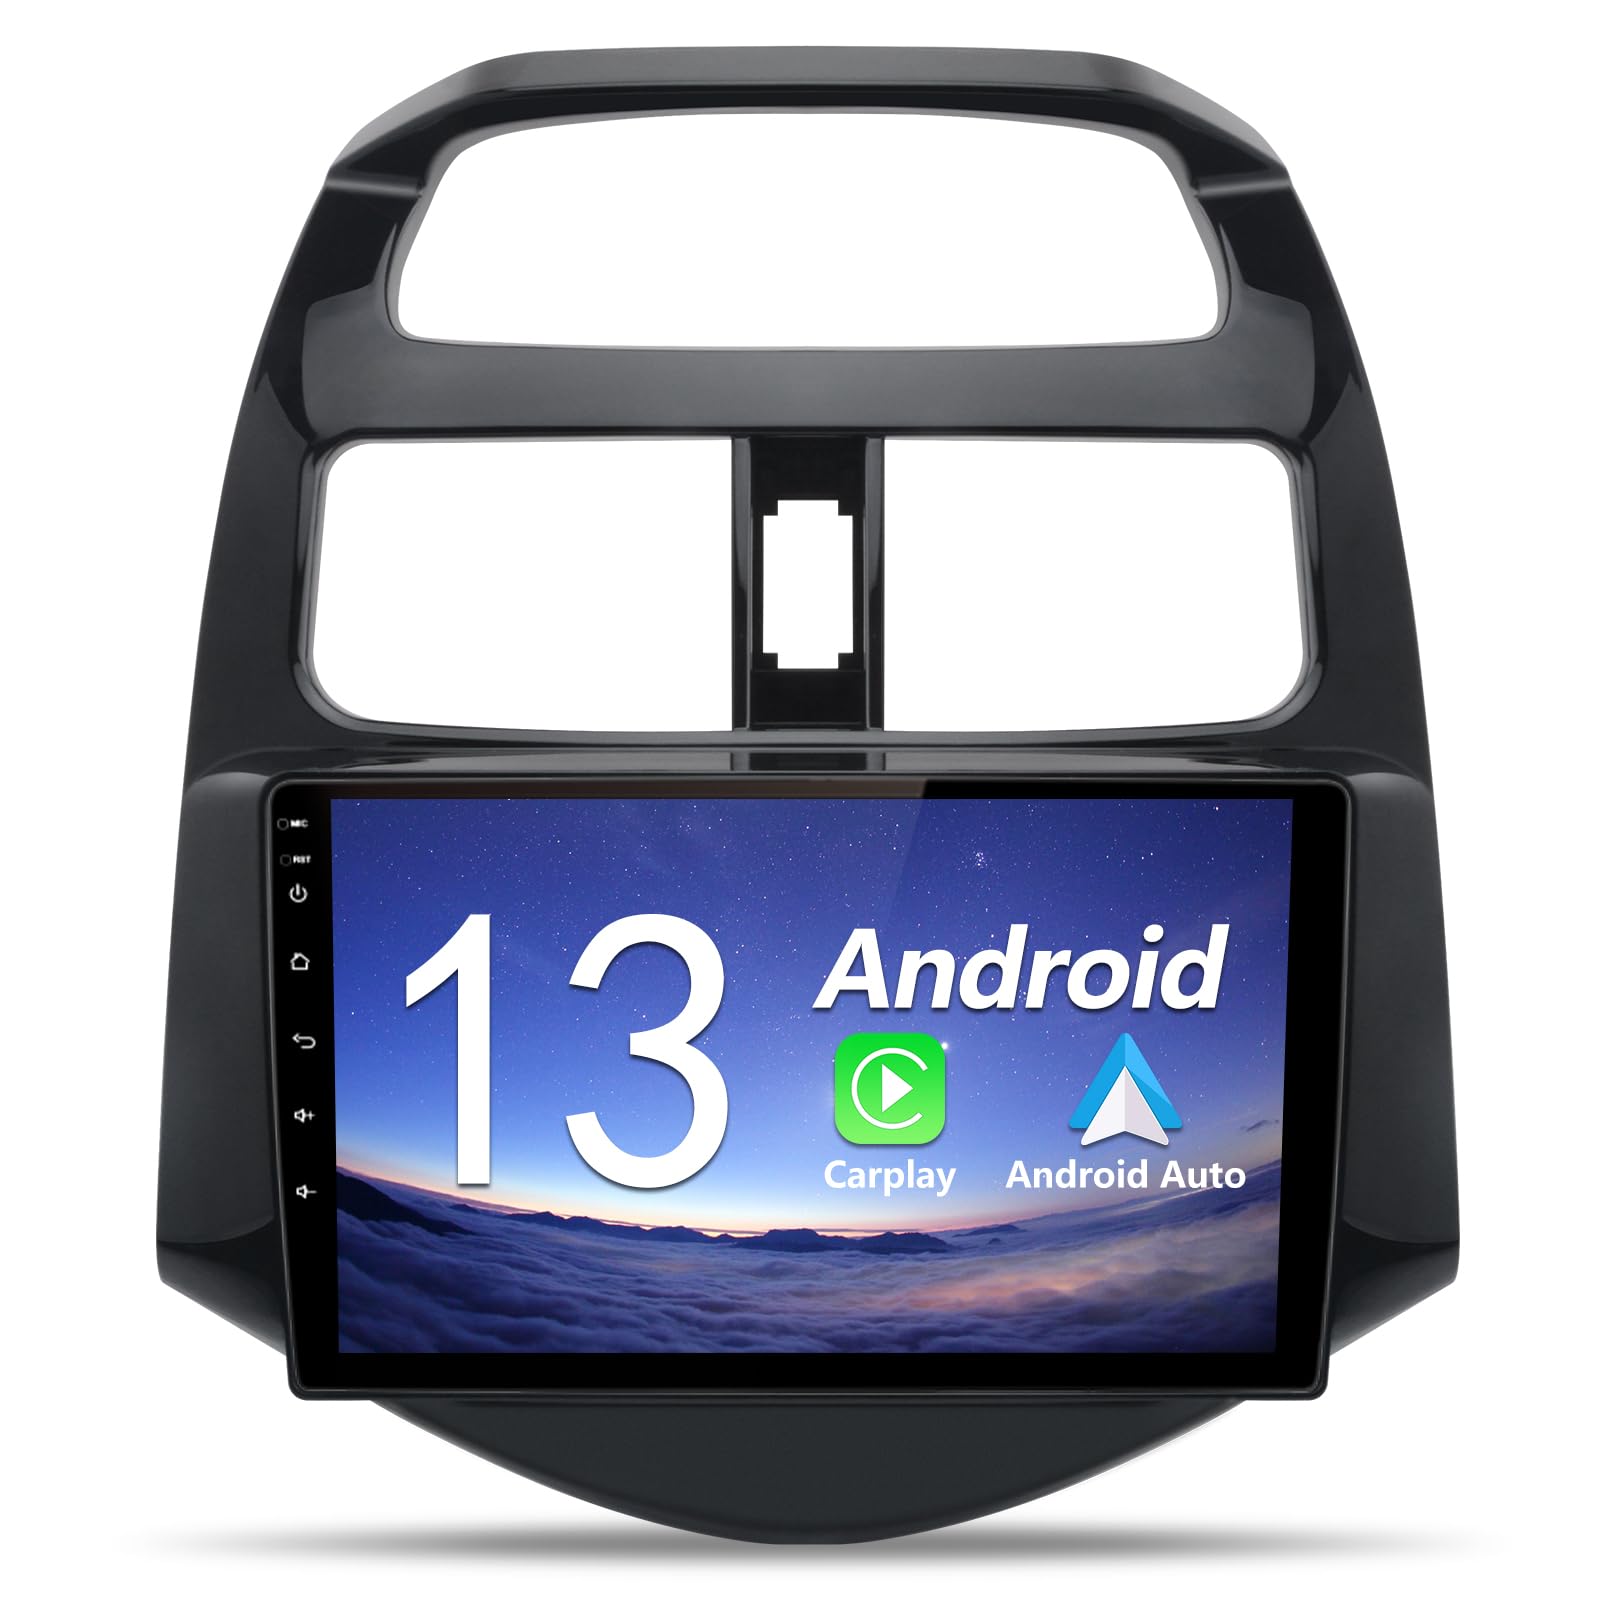
Figure 3.4.1: Before and After Installation of the EagleNav Car Radio
4. Operating Instructions
4.1 Wireless CarPlay & Android Auto
The unit supports seamless integration with your smartphone via wireless CarPlay (for iOS) and Android Auto (for Android devices). This allows access to navigation, music, calls, and messages directly from the car radio's display.
- Ensure Bluetooth and Wi-Fi are enabled on your smartphone.
- On the car radio, open the CarPlay/Android Auto application (e.g., 'Zlink' or similar).
- Follow the on-screen prompts to pair your phone via Bluetooth.
- Once paired, the system will automatically connect to CarPlay or Android Auto.

Figure 4.1.1: Wireless CarPlay and Android Auto Interface
Video 4.1.1: Carplay Function Operation. This video demonstrates the steps to connect and operate CarPlay on the EagleNav car radio, including Bluetooth pairing and accessing various applications.
4.2 GPS Navigation
The built-in GPS module allows for accurate navigation. You can download and use various online map applications directly from the Play Store via Wi-Fi.
- Ensure the GPS antenna is properly installed and has a clear signal.
- Connect to Wi-Fi to download map data or updates.
- Open your preferred navigation app and enter your destination.
Figure 4.2.1: Online GPS Navigation Interface
4.3 Bluetooth Connectivity
Connect your smartphone via Bluetooth for hands-free calling and audio streaming.
- Go to the Bluetooth settings on the car radio.
- Enable Bluetooth on your smartphone and search for available devices.
- Select 'Car BT' (or similar name displayed on the unit) from your phone's Bluetooth list.
- Confirm the pairing code on both devices.
- Once connected, you can make/receive calls and play music through the car's speakers.
4.4 FM/AM Radio & DSP
The unit features a high-quality digital stereo FM/AM tuner with RDS. The Digital Signal Processing (DSP) allows for advanced audio customization.
- Radio Operation: Access the radio application to scan for stations automatically or manually. Save your favorite stations as presets.
- DSP Settings: Navigate to the sound settings to adjust equalizer presets (Jazz, Rock, Pop, Classic, etc.), balance, fader, and other audio parameters for an optimized listening experience.
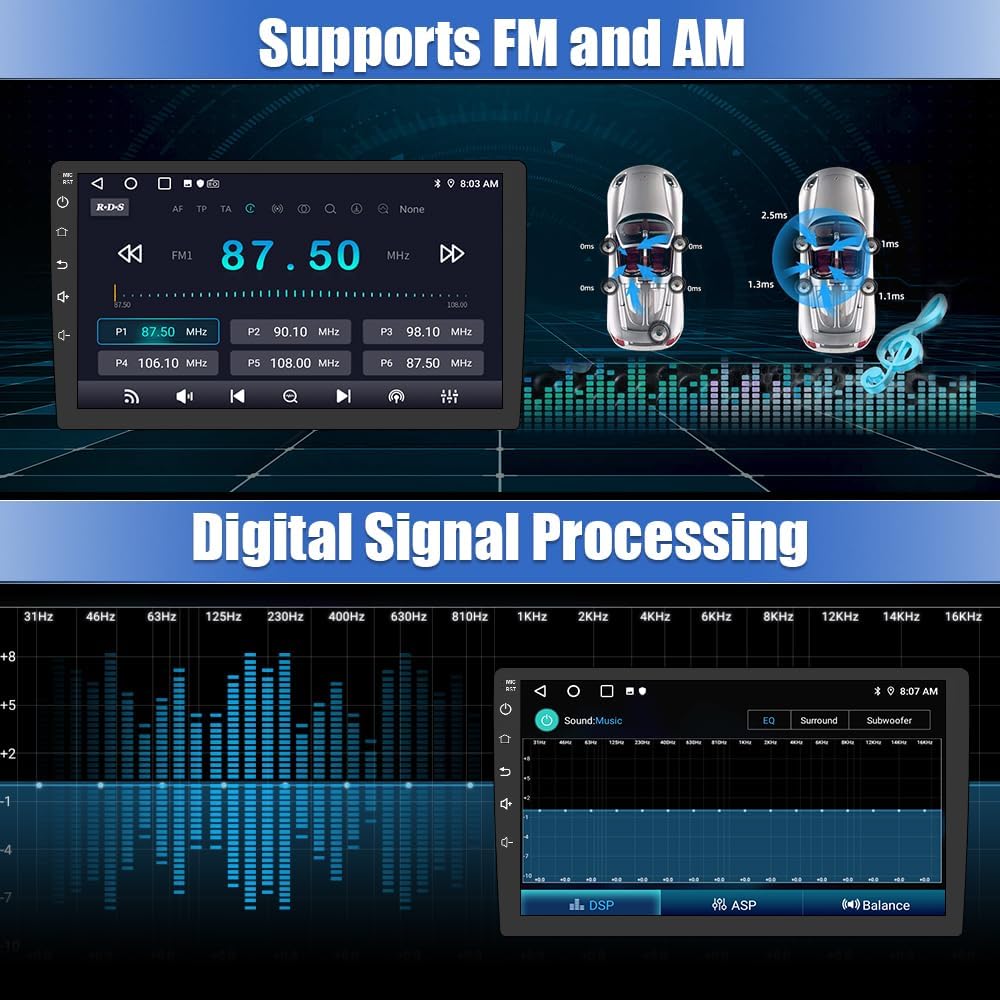
Figure 4.4.1: FM/AM Radio and Digital Signal Processing (DSP) Interface
4.5 Steering Wheel Controls (SWC)
The unit supports the vehicle's factory steering wheel controls, allowing you to manage audio volume, switch tracks/channels, and handle calls without taking your hands off the wheel.
- After installation, the steering wheel controls should function automatically via the CANBUS decoder.
- If controls do not work, check the wiring connections to the CANBUS box and refer to the unit's settings for SWC configuration.

Figure 4.5.1: Steering Wheel Control Functions
4.6 User Interface (UI) & Split Screen
The Android 13 interface is intuitive and offers customization options. The split-screen function allows you to run two applications simultaneously.
- Theme Store: Access the built-in theme store to choose from diverse interface styles.
- Button Backlight: Adjust the color of the radio button backlights to match your car's ambient lighting.
- Split Screen: To activate split-screen, long-press the recent apps button or drag an app to one side of the screen.

Figure 4.6.1: Split Screen Functionality and Multiple UI Interfaces
5. Maintenance
To ensure the longevity and optimal performance of your EagleNav car radio, follow these maintenance guidelines:
- Cleaning: Use a soft, dry cloth to clean the screen and exterior. Avoid abrasive cleaners or solvents that could damage the surface.
- Software Updates: Periodically check for software updates to ensure you have the latest features and bug fixes. Connect the unit to Wi-Fi to download updates.
- Temperature: Avoid leaving the unit in direct sunlight or extreme temperatures for extended periods, as this can affect performance and lifespan.
6. Troubleshooting
If you encounter issues with your EagleNav car radio, refer to the following common problems and solutions:
- Unit Does Not Power On:
- Check all power cable connections.
- Verify the vehicle's fuse for the radio is intact.
- Ensure the vehicle battery is properly connected.
- No Sound from Speakers:
- Check speaker wiring connections.
- Verify volume levels are not muted or set too low.
- Ensure the correct audio output source is selected.
- If only some speakers are affected, check their individual wiring.
- CarPlay/Android Auto Not Connecting:
- Ensure Bluetooth and Wi-Fi are active on your phone and the car radio.
- Delete previous pairings and attempt to re-pair.
- Restart both your phone and the car radio.
- GPS Signal Issues:
- Ensure the GPS antenna is mounted in an unobstructed location.
- Check the GPS antenna connection to the unit.
- Steering Wheel Controls Not Working:
- Verify the CANBUS decoder is correctly connected.
- Check the SWC settings within the car radio's menu.
For further assistance, please refer to the support section.
7. Specifications
| Feature | Specification |
|---|---|
| Operating System | Android 13 |
| Display Size | 9 Inches |
| Connectivity Technology | Bluetooth, Wi-Fi |
| Special Features | Bluetooth, Lane Assist, Touchscreen |
| Map Type | North America (pre-installed/supported) |
| Audio Output Mode | Stereo |
| Mounting Type | Dashboard Mount |
| Item Model Number | XT892CSpark315 |
| Item Weight | 4.24 pounds |
| Product Dimensions | 4.2 x 12.8 x 15.5 inches |
8. Warranty and Support
8.1 Product Warranty
The EagleNav Android 13 Car Radio comes with a 1-year warranty from the date of purchase, covering manufacturing defects and malfunctions under normal use.
8.2 Customer Support
If you encounter any quality problems, have questions regarding product operation, or require installation assistance, please contact EagleNav customer support. You can reach us through the Amazon platform by navigating to your order details and selecting the 'Ask a question' option for the seller.
Our team is committed to providing timely and helpful after-sales service.