1. Product Overview
The Fuers Portable Door Lock and Door Stop Alarm Kit provides dual protection for personal security. This kit includes one portable door lock and one door stop alarm, designed for use in various settings such as homes, hotels, dormitories, and apartments.

Image 1: Components of the Fuers Portable Door Lock and Door Stop Alarm Kit. Shown are the white door stop alarm and the red portable door lock with its metal plate.
2. Setup Instructions
2.1. Door Stop Alarm Setup
- Install Battery: Open the battery compartment on the underside of the door stop alarm. Insert one 9V battery (not included), ensuring correct polarity. Close the compartment securely.
- Adjust Sensitivity: Locate the sensitivity switch (L/M/H) on the side of the alarm.
- L (Low): For minimal vibration detection.
- M (Medium): Standard vibration detection.
- H (High): For maximum vibration detection, triggering the alarm with slight movement.
- Activate Alarm: Turn the ON/OFF switch to the "ON" position. The alarm is now active.
- Placement: Place the door stop alarm on the floor directly behind the door you wish to secure. Ensure the wedge-shaped part is firmly under the door, preventing it from opening.

Image 2: Detailed view of the door stop alarm, highlighting the wedge-shaped design, sensitivity switch, power switch, non-skid pad, and the 9V battery compartment (battery not included).
2.2. Portable Door Lock Setup
This portable door lock is designed for doors that open inward and have a suitable gap between the door and the frame.
- Identify Door Type: Ensure the door opens inward. This lock is not compatible with sliding doors, double doors, garage doors, or doors that open outward.
- Check Door Gap: Verify that there is a gap of at least 0.07 inches (approximately 2mm) between the door and the door frame.
- Insert Metal Plate: Open the door slightly. Insert the metal plate of the portable door lock into the strike plate of the door frame, ensuring the bolt passes through the smaller hole (0.78 inches) if applicable, or the larger opening for wider bolts.
- Close Door: Close the door firmly, ensuring the metal plate remains securely in place within the door frame.
- Attach Red Lock Body: Slide the red lock body onto the metal plate, aligning the moving rod with the hole on the metal plate. Push the red lock body down to secure it. The door is now locked.
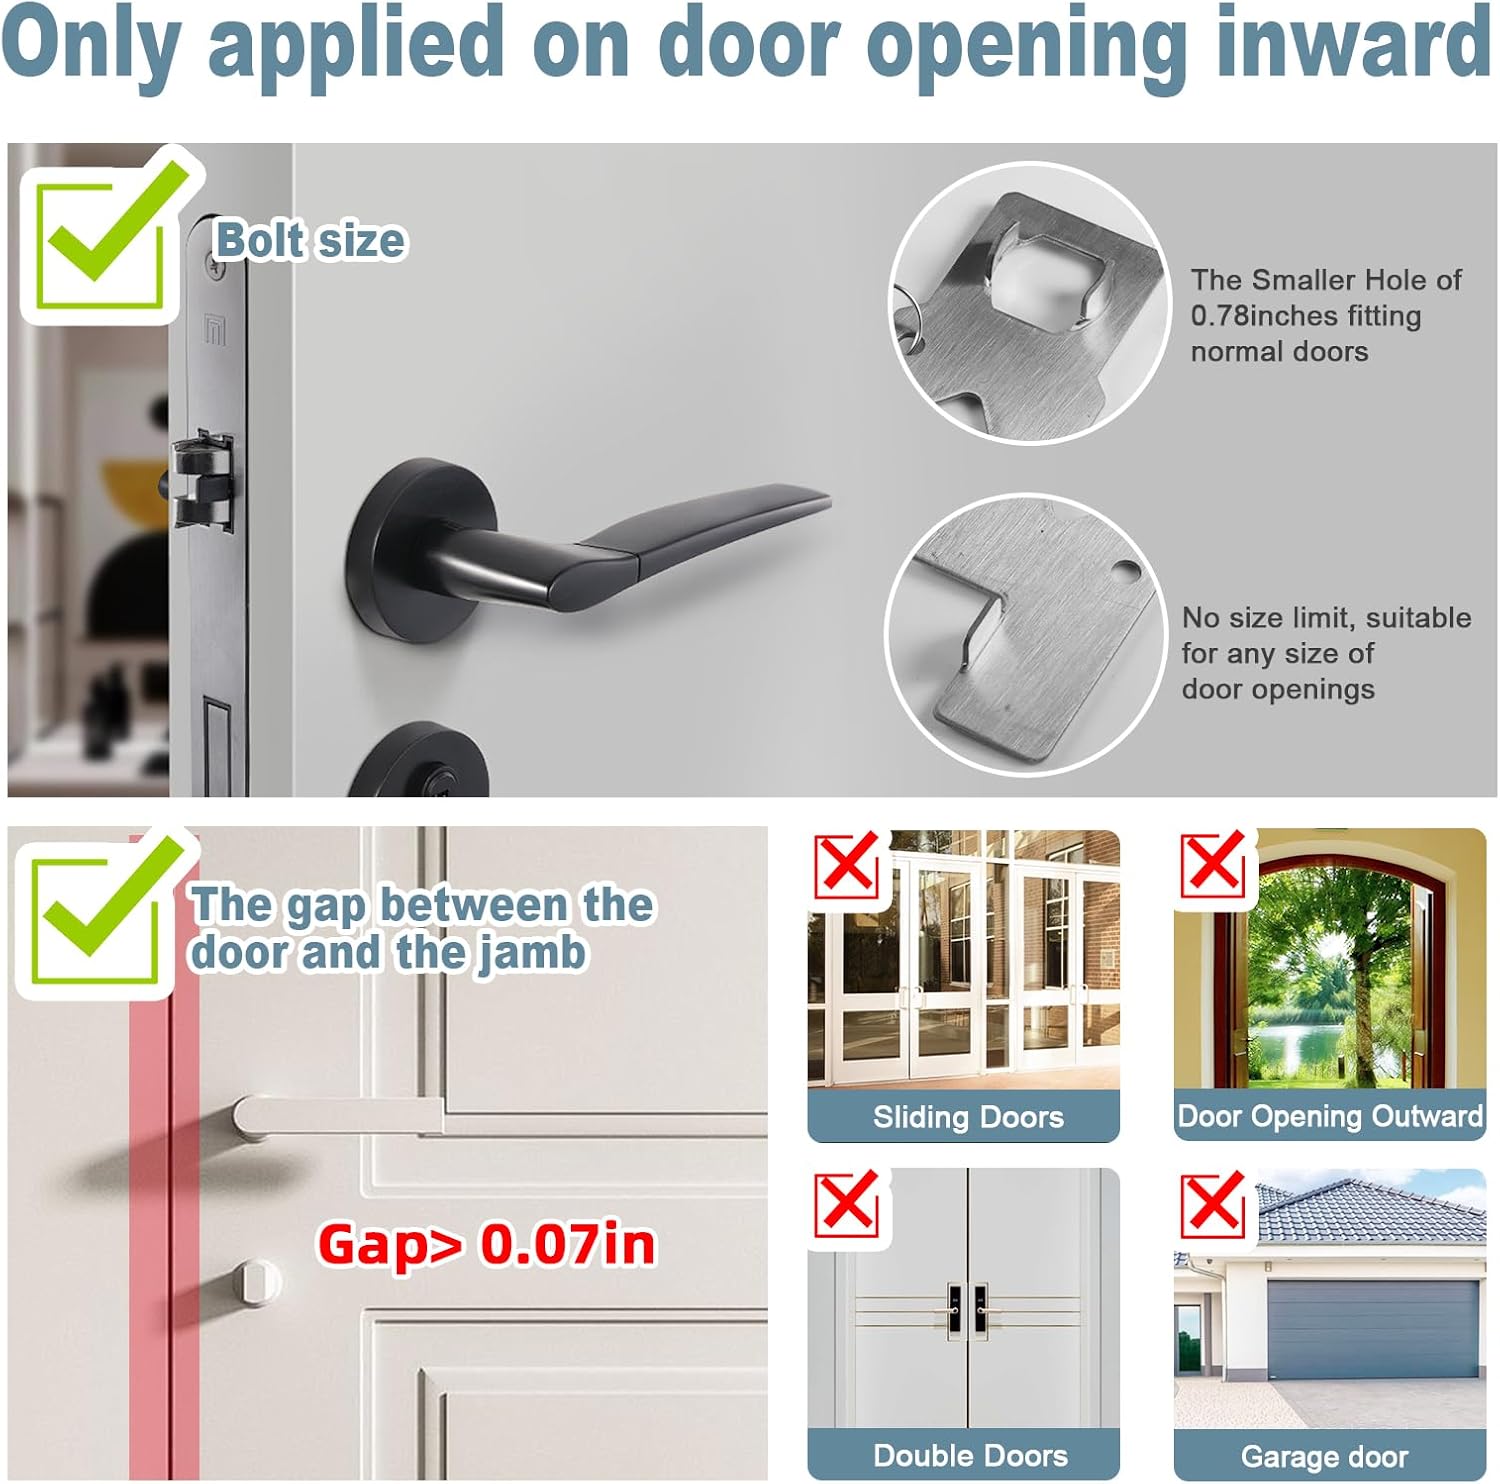
Image 3: Visual guide for portable door lock compatibility, showing requirements for inward-opening doors, bolt size, and minimum door gap. Incompatible door types are also illustrated.

Image 4: Combined step-by-step instructions for installing the door stop alarm (left side) and the portable door lock (right side).
3. Operating Instructions
3.1. Using the Door Stop Alarm
Once set up and activated, the door stop alarm functions as both a physical door wedge and an audible alert system.
- Physical Barrier: The rubberized bottom and wedge shape prevent the door from being pushed open, adding a physical layer of security.
- Audible Alert: If the door is forced open and makes contact with the alarm, or if significant vibration is detected (depending on sensitivity setting), a loud 120dB siren will sound continuously. This alerts occupants and may deter intruders.
- Deactivation: To turn off the alarm, switch the ON/OFF button to the "OFF" position.

Image 5: Depiction of the door stop alarm triggering a 120dB alert when a door is forced open.
3.2. Using the Portable Door Lock
The portable door lock provides an additional layer of security by physically blocking the door from opening, even if a key is used from the outside.
- Enhanced Security: Once installed, the lock prevents the door from being opened from the exterior, offering increased privacy and safety.
- Removal: To unlock, lift the red lock body upwards to disengage it from the metal plate. Then, open the door and remove the metal plate from the strike plate.
4. Maintenance
- Battery Replacement: When the door stop alarm's sound weakens or fails to activate, replace the 9V battery. Always use a fresh, high-quality 9V battery.
- Cleaning: Wipe both the door stop alarm and the portable door lock with a soft, dry cloth. Avoid using abrasive cleaners or solvents, as these may damage the materials.
- Storage: Store the devices in a cool, dry place when not in use.
5. Troubleshooting
- Alarm does not sound:
- Check if the 9V battery is installed correctly and has sufficient power. Replace if necessary.
- Ensure the ON/OFF switch is in the "ON" position.
- Verify the sensitivity setting. If set to "L" (Low), more force may be required to trigger the alarm. Adjust to "M" or "H".
- Ensure the alarm is placed firmly under the door and makes proper contact.
- Portable door lock does not fit or secure:
- Confirm the door opens inward. This lock is not compatible with outward-opening doors.
- Check the gap between the door and the frame. A minimum gap of 0.07 inches (2mm) is required.
- Ensure the metal plate is fully inserted into the door frame's strike plate before closing the door.
- Verify that the red lock body is correctly aligned and pushed down onto the metal plate.
- False alarms from door stop alarm:
- Adjust the sensitivity switch to a lower setting (e.g., from "H" to "M" or "L") to reduce accidental triggers from minor vibrations.
6. Specifications
| Brand | Fuers |
| Model Number | HHMD001 |
| Material | Stainless Steel (Portable Door Lock), Plastic/Metal (Door Stop Alarm) |
| Color | White/Red |
| Product Dimensions | 2.3"L x 1.95"W x 5.5"Th (Approximate, for individual components) |
| Item Weight | 8.4 ounces (Total kit) |
| Power Source (Door Stop Alarm) | 1 x 9V Battery (Not Included) |
| Alarm Volume | 120dB |
| Door Clearance (Door Stop Alarm) | 0.39'' to 1.38'' |
| Door Gap Requirement (Portable Door Lock) | Minimum 0.07 inches (2mm) |
7. Warranty and Support
Fuers products are manufactured to high-quality standards. For any questions, concerns, or support needs regarding your Portable Door Lock and Door Stop Alarm Kit, please contact Fuers customer service through your purchase platform or the official Fuers website. Please retain your proof of purchase for warranty claims, if applicable.