1. Introduction
This manual provides comprehensive instructions for the Glomora Brushless ESC Programming Card. This device is designed to configure various settings on compatible HOBBYFANS, OCDAY, and GOOLRC brushless Electronic Speed Controllers (ESCs) used in 1/10 scale RC car models. Please read this manual thoroughly before use to ensure proper operation and to maximize the performance of your RC vehicle.

Image 1: Front view of the Glomora Brushless ESC Programming Card, showing the ITEM and VALUE indicator lights and the four control buttons (ITEM, VALUE, OK, RESET).
2. Product Features
- Universal Compatibility: Designed for seamless integration with HOBBYFANS, OCDAY, and GOOLRC Brushless ESC systems for 1/10 RC car models.
- User-Friendly Interface: Features four intuitive buttons (ITEM, VALUE, OK, RESET) and indicator lights for straightforward setting adjustments.
- Compact and Portable: Measures approximately 8 x 5.4 x 1.3 cm and weighs 31g, making it easy to transport and store.
- Durable Construction: Manufactured from high-quality ABS material for long-lasting reliability.
- Customizable Settings: Allows adjustment of critical ESC parameters such as braking force, reverse power, neutral range, and more.
3. Package Contents
Please verify that all items are present in your package:
- Glomora Brushless ESC Programming Card (1 unit)
- User Manual (this document)
4. Specifications
| Parameter | Value |
|---|---|
| Brand | Glomora |
| Model Number | Glomoracwtoa3rzdk |
| Dimensions | Approx. 8 x 5.4 x 1.3 cm (3.15 x 2.36 x 0.79 inches) |
| Weight | Approx. 31g (1.13 ounces) |
| Material | ABS |
| Compatibility | HOBBYFANS, OCDAY, GOOLRC Brushless ESCs |
5. Setup Instructions
Follow these steps to connect the programming card to your ESC:
- Ensure your RC car's battery is disconnected from the ESC to prevent accidental operation.
- Locate the signal cable from your ESC. This is typically a three-wire cable (black, red, white/yellow) that connects to the receiver.
- Disconnect the ESC's signal cable from the receiver.
- Connect the ESC's signal cable to the designated port on the programming card. The port is usually a 3-pin connector. Ensure the polarity is correct (usually indicated on the card).
- Connect the RC car's battery to the ESC. The programming card will power on, and the indicator lights will illuminate.

Image 2: Close-up view of the 3-pin connector port on the Glomora Programming Card, where the ESC signal cable is connected.
Once connected, the programming card is ready for operation.
6. Operating Instructions: Programming Parameters
The programming card allows you to adjust various parameters of your ESC. Use the ITEM, VALUE, OK, and RESET buttons to navigate and confirm settings.
- ITEM Button: Press to cycle through the available programming items. The corresponding ITEM indicator light will illuminate.
- VALUE Button: Press to change the value for the currently selected ITEM. The corresponding VALUE indicator light will illuminate.
- OK Button: Press to confirm and save the selected value for the current ITEM.
- RESET Button: Press to restore all programming items to their factory default settings.
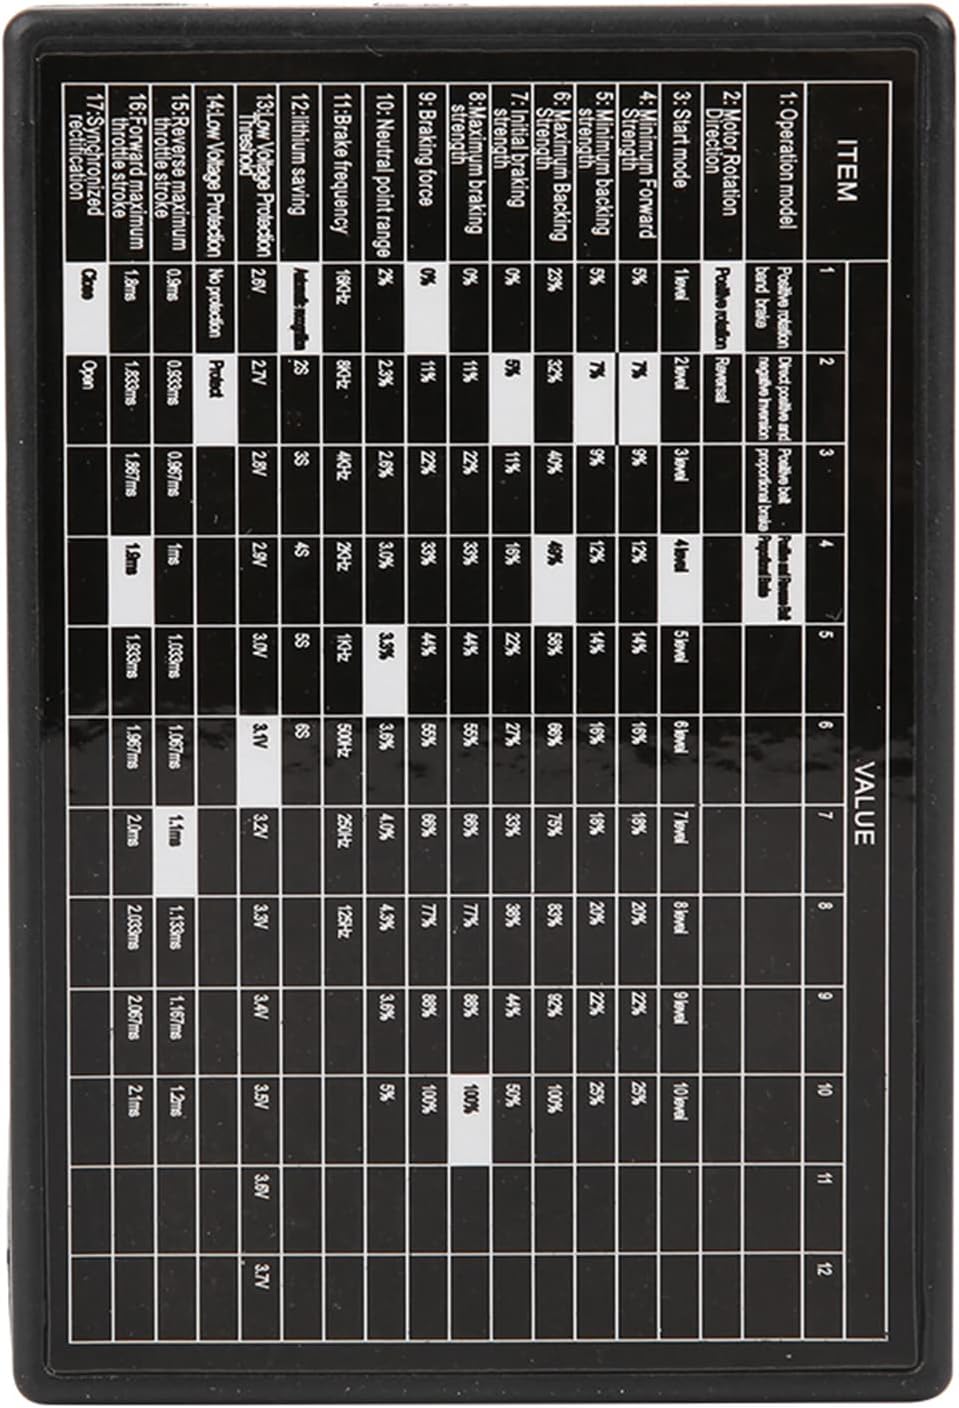
Image 3: Detailed table showing the various programming items and their adjustable values on the Glomora Programming Card.
Programming Parameter Details:
| Item No. | Parameter | Description / Values |
|---|---|---|
| 1 | Operation Mode | Forward/Brake/Reverse, Forward/Brake (Race Mode) |
| 2 | Motor Rotation Direction | Normal, Reverse |
| 3 | Start Mode (Punch) | Level 1 (Soft) to Level 9 (Aggressive) |
| 4 | Minimum Forward Strength | 5% to 100% (in increments) |
| 5 | Maximum Braking Strength | 25%, 50%, 75%, 100% |
| 6 | Initial Braking Strength | 0% to 100% (in increments) |
| 7 | Drag Brake Strength | 0% to 100% (in increments) |
| 8 | Maximum Reverse Strength | 25%, 50%, 75%, 100% |
| 9 | Neutral Range | 2% to 10% (in increments) |
| 10 | PWM Frequency | 8KHz to 250KHz (in increments) |
| 11 | Low Voltage Protection | 2.8V to 3.7V (per cell) or Disabled |
| 12 | Overheat Protection | Enabled, Disabled |
| 13 | Throttle Curve | Linear, S-Curve |
| 14 | Brake Curve | Linear, S-Curve |
| 15 | Reverse Maximum Stroke | Adjustable from 0.8ms to 2.0ms |
| 16 | Forward Maximum Stroke | Adjustable from 0.8ms to 2.0ms |
| 17 | Neutral Point Range | Adjustable from 1.500ms to 1.520ms |
Note: The specific values and ranges may vary slightly depending on the ESC firmware version. Always refer to your ESC's manual for detailed compatibility information.
7. Maintenance
The Glomora Brushless ESC Programming Card requires minimal maintenance. Follow these guidelines to ensure its longevity:
- Keep the card clean and free from dust and debris. Use a soft, dry cloth for cleaning.
- Avoid exposing the card to moisture, extreme temperatures, or direct sunlight.
- Store the card in a safe place when not in use to prevent physical damage.
- Do not attempt to disassemble the card, as this will void any potential warranty and may cause damage.
8. Troubleshooting
If you encounter issues with your programming card, refer to the following common problems and solutions:
- Card does not power on:
- Ensure the ESC is properly connected to the programming card.
- Verify that the RC car's battery is fully charged and correctly connected to the ESC.
- Check the polarity of the ESC signal cable connection to the programming card.
- Settings are not saving:
- Ensure you press the "OK" button after selecting a value for an item.
- Confirm that the ESC is compatible with the programming card.
- Unexpected behavior after programming:
- Try resetting the ESC to factory defaults using the "RESET" button on the programming card, then re-program your desired settings.
- Double-check all parameter values against your ESC's recommended settings.
If problems persist, contact Glomora customer support for further assistance.
9. Warranty and Support
Glomora products are designed for reliability and performance. For warranty information and customer support, please refer to the contact details provided with your purchase or visit the official Glomora website. Please retain your proof of purchase for warranty claims.