1. Introduction
Thank you for choosing the VEVOR 2.5 lbs CO2 Tank. This aluminum alloy cylinder is designed for reliable and consistent CO2 supply for various applications, including draft beer dispensing, soda making, and aquarium CO2 systems. This manual provides essential information for the safe and effective operation, maintenance, and troubleshooting of your CO2 tank. Please read it thoroughly before use and retain it for future reference.
2. Safety Information
WARNING: CO2 is a high-pressure gas. Improper handling can lead to serious injury or death. Always follow safety guidelines.
- Ensure the tank is always stored and used in a well-ventilated area.
- Do not expose the tank to temperatures exceeding 125°F (52°C).
- Always secure the tank in an upright position to prevent it from falling.
- Do not attempt to modify, repair, or tamper with the tank or valve.
- Always wear appropriate personal protective equipment (PPE), such as safety glasses, when handling the tank.
- Ensure the tank is DOT approved and has a current hydrostatic test date. This VEVOR CO2 tank is externally capped with U.S. DOT certification.
- The tank is shipped empty. Only fill with food-grade, 99.95% pure CO2 compliant with E290 standards at a certified CO2 filling station.

Image: The VEVOR CO2 tank is DOT approved, ensuring compliance with safety standards for various applications including carbonated beverages and aquatic systems.
3. Product Overview and Components
The VEVOR 2.5 lbs CO2 tank is constructed from durable aluminum alloy, providing a lightweight yet robust solution for your CO2 needs. It features a light gray spray coating for enhanced durability and aesthetic appeal. The tank is equipped with a standard CGA320 valve for secure and leak-proof connections.

Image: Key features of the VEVOR 2.5 lbs CO2 tank, emphasizing its lightweight aluminum alloy construction and reusability. The tank is shipped empty.
Key Components:
- Aluminum Alloy Cylinder: Lightweight and corrosion-resistant body.
- CGA320 Valve: Standard valve for CO2 regulators, compatible with 8 mm hoses, featuring external threading.
- Handwheel: For easy opening and closing of the valve.
- Sealing Washers: Included to ensure a leak-proof connection with regulators.

Image: Detailed view of the CGA320 certified valve and the included washers, which are crucial for preventing gas leaks during connection.
4. Specifications

Image: Visual representation of the CO2 tank's dimensions and key specifications.
| Specification | Value |
|---|---|
| Item Model Number | RY-111-3000-H-01 |
| Item Capacity | 2.5 lbs |
| Color | Spray-coating Gray |
| Working Pressure | Up to 1800 PSI |
| Test Pressure | 3000 PSI |
| Tank Material | AA6061 Aluminum with Spray Coating |
| Valve Material | Brass |
| Handwheel Material | Aluminum Alloy, Black |
| Item Net Weight | 5.29 lbs / 2.4 kg |
| Item Dimensions (L x W x H) | 4.37 x 4.37 x 14.76 inches / 111 x 111 x 375 mm |
5. Setup
- Initial Inspection: Upon receiving the tank, inspect it for any visible damage. Ensure the valve is securely attached.
- Filling the Tank: The tank is shipped empty. Take the tank to a certified CO2 filling station to have it filled with food-grade CO2. Ensure the station is aware of the tank's capacity and specifications.
- Connecting the Regulator:
- Ensure the CO2 tank valve is closed (handwheel turned clockwise until snug).
- Place a sealing washer onto the CGA320 valve outlet.
- Carefully thread your CO2 regulator onto the tank valve. Hand-tighten first, then use a wrench to tighten securely, but do not overtighten.
- Ensure all connections are tight to prevent leaks.
- Securing the Tank: Always secure the CO2 tank in an upright position using a tank strap or bracket to prevent it from tipping over.

Image: The 2.5 lbs CO2 tank positioned within a kegerator, demonstrating a typical setup for beer dispensing. The tank is designed to dispense 3-4 small beer kegs.
6. Operating Instructions
Once the tank is filled and connected to your system (e.g., beer kegerator, soda maker, aquarium regulator), you can begin operation.
- Opening the Valve: Slowly turn the handwheel counter-clockwise to open the CO2 tank valve. Do not open it too quickly, as this can damage the regulator.
- Adjusting Output Pressure: Use the adjustment knob on your CO2 regulator to set the desired output pressure. The VEVOR CO2 tank supports an adjustable output pressure range of 0-60 PSI, ensuring consistent pressure for your application.

Image: A visual of the CO2 tank connected to a dispensing system, highlighting the ability to maintain stable pressure output for consistent results, such as stable beer foam.
- Checking for Leaks: After setting the pressure, apply a soapy water solution to all connections (tank valve to regulator, regulator to hose) to check for bubbles, which indicate a leak. Tighten connections if leaks are found.
- Closing the Valve: When not in use for an extended period, or when changing kegs/bottles, turn the handwheel clockwise to close the CO2 tank valve. Then, dispense any remaining pressure from the system before disconnecting.
7. Maintenance
- Regular Inspection: Periodically inspect the tank for any signs of damage, corrosion, or dents. Check the valve for wear.
- Cleaning: Wipe down the exterior of the tank with a damp cloth. Do not use abrasive cleaners or solvents.
- Valve Maintenance: Ensure the CGA320 valve is clean and free of debris. Replace sealing washers as needed to maintain a leak-proof seal.
- Hydrostatic Testing: CO2 tanks require periodic hydrostatic testing as mandated by DOT regulations. Check the tank's stamp for the last test date and ensure it is retested before the expiration.
- Storage: Store the tank in a cool, dry, well-ventilated area, away from direct sunlight, heat sources, and corrosive materials. Always store upright and secured.
8. Troubleshooting
Common Issues:
- Gas Leakage:
- Symptom: Hissing sound, soapy water bubbles at connections, rapid pressure drop.
- Solution: Ensure all connections are tight. Replace worn or damaged sealing washers. Check the regulator for internal leaks.
- No Gas Flow:
- Symptom: Regulator gauges show no pressure, or system is not carbonating.
- Solution: Ensure the tank valve is fully open. Check if the tank is empty and requires refilling. Inspect the regulator for blockages or malfunctions.
- Inconsistent Pressure:
- Symptom: Pressure fluctuates, leading to uneven carbonation or dispensing.
- Solution: Ensure the regulator is properly adjusted and functioning. Check for leaks in the system. Ensure the tank is not running low on CO2.
9. Warranty and Support
VEVOR provides technical support and e-warranty services for its products. For any issues, questions, or to register your product for warranty, please visit the official VEVOR support website.
Official VEVOR Support: www.vevor.com/support
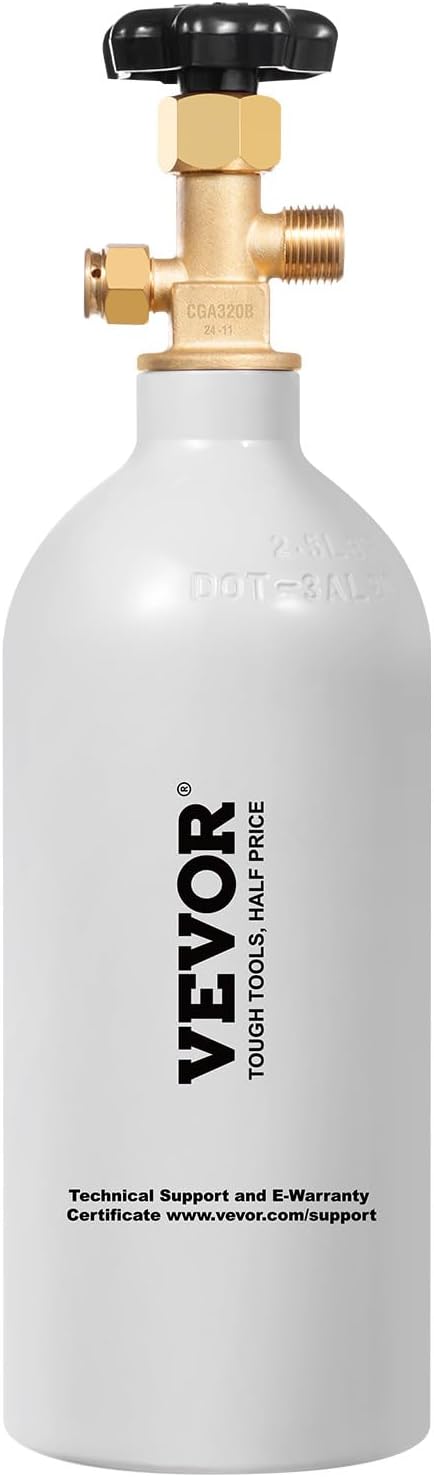
Image: The VEVOR CO2 tank displaying the brand logo and the web address for technical support and e-warranty certificate.