1. Introduction
This manual provides essential information for the safe and efficient use of your UMIDIGI G100A Cell Phone. Please read this guide thoroughly before operating your device.
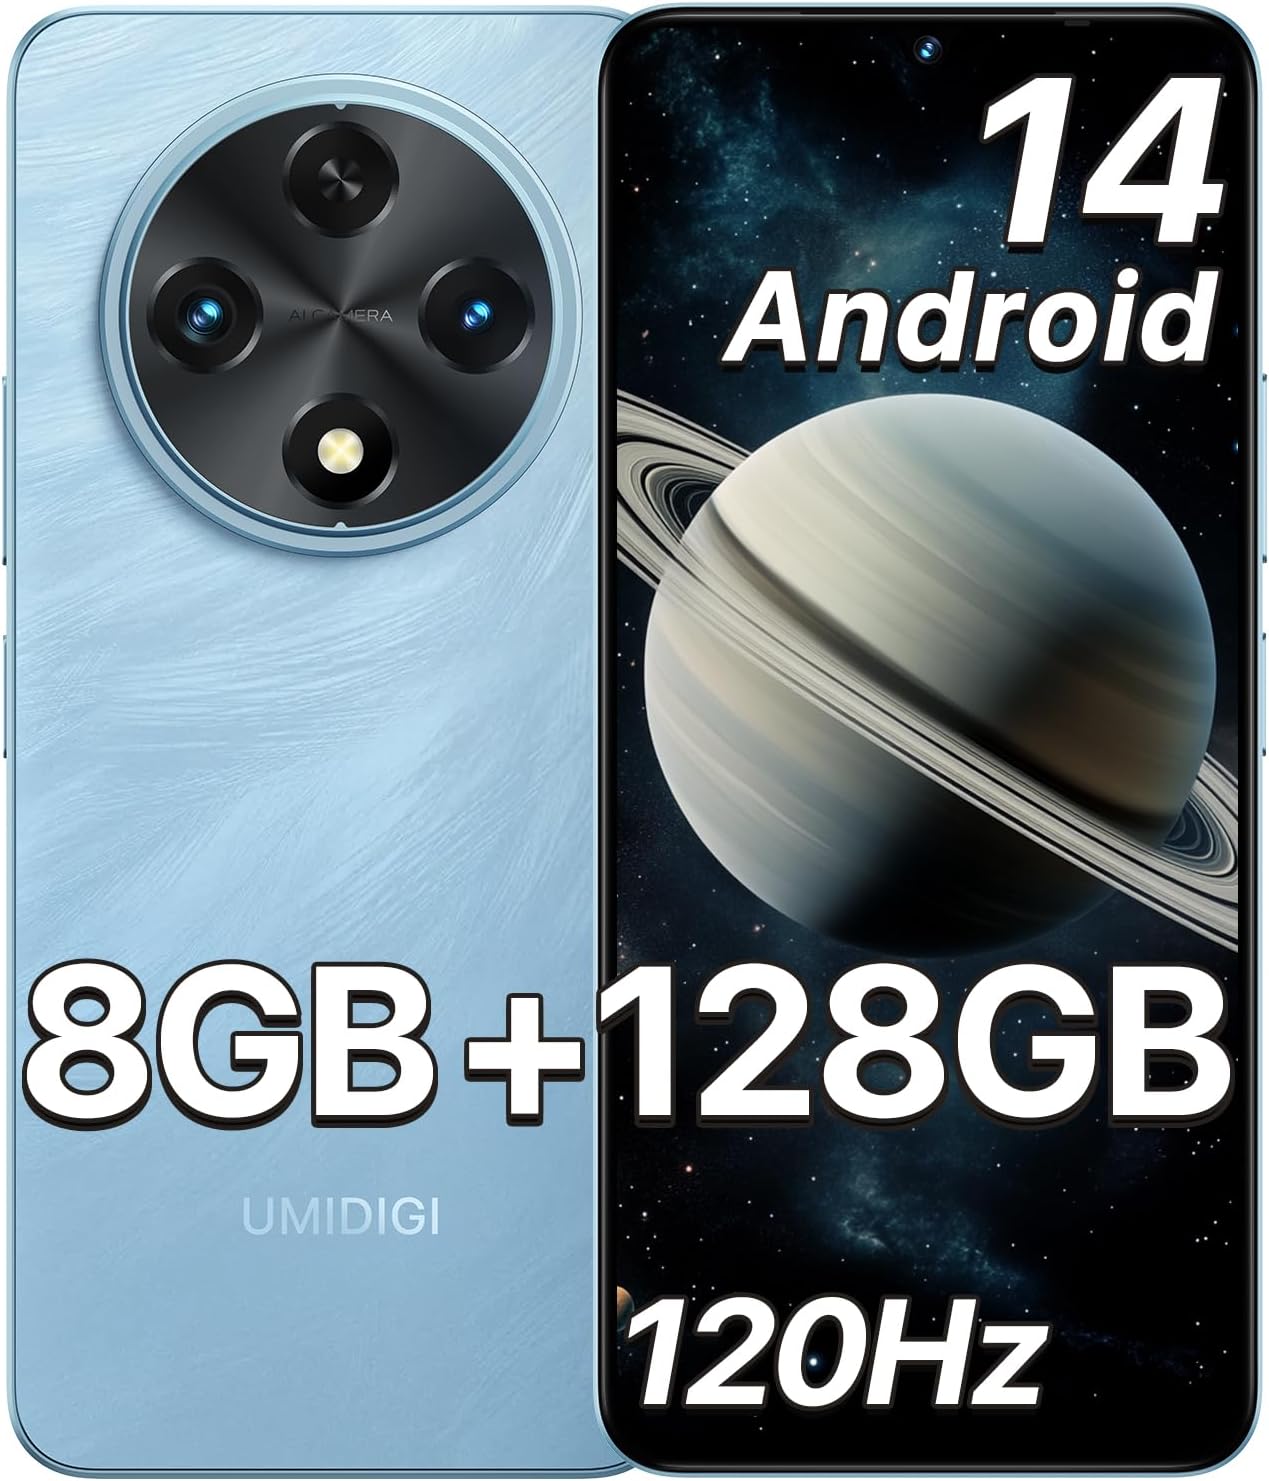
Image: Front and back view of the UMIDIGI G100A smartphone, showcasing its design and key features like Android 14 and memory specifications.
2. What's in the Box
Upon opening the package, verify that all items are present and in good condition.
- UMIDIGI G100A Cell Phone
- Pre-applied Protector Film
- Phone Case
- Power Adapter (10W)
- Type-C to Type-C Cable
- SIM Tray Ejector
- Quick Start Guide

Image: A visual representation of all items included in the UMIDIGI G100A product packaging.
3. Device Layout
Familiarize yourself with the physical components and ports of your UMIDIGI G100A.

Image: Detailed diagram illustrating the location of the front camera, main camera, depth camera, power button, volume keys, side fingerprint sensor, Type-C port, 3.5mm headphone jack, and speaker on the UMIDIGI G100A.
- Front Camera: For selfies and video calls.
- Main Camera (13MP): Primary camera for photos and videos.
- Depth Camera (2MP): Assists with portrait mode effects.
- Power Button: Turns the device on/off, locks/unlocks the screen.
- Volume +/- Keys: Adjusts media and call volume.
- Side Fingerprint Sensor: Integrated into the power button for secure unlocking.
- Type-C Port: For charging and data transfer.
- 3.5mm Headphone Jack: For wired audio accessories.
- Speaker: For audio output.
- SIM/TF Card Slot: For inserting SIM cards and a microSD card.
4. Setup
4.1. Inserting SIM and TF Cards
- Locate the SIM/TF card slot on the side of your phone.
- Insert the SIM tray ejector tool into the small hole next to the slot to open the tray.
- Carefully place your Nano-SIM card(s) and/or microSD (TF) card into the designated slots on the tray. Ensure the gold contacts face downwards.
- Gently push the tray back into the phone until it clicks into place.

Image: Illustration demonstrating the correct placement of two SIM cards and one TF (microSD) card into the phone's tray.
4.2. Initial Power On and Setup
- Press and hold the Power button until the UMIDIGI logo appears.
- Follow the on-screen instructions to select your language, connect to Wi-Fi, and set up your Google account.
- You will be guided through setting up security features like fingerprint unlock and AI face unlock.

Image: Visual guide for setting up AI Face Unlock and the side-mounted fingerprint sensor for secure access to the device.
5. Operating Your Device
5.1. Display and Navigation
The UMIDIGI G100A features a 6.9-inch HD+ 120Hz display for smooth visuals and responsive touch.

Image: Details of the 6.9-inch HD+ display, highlighting its 1640x720 resolution, 120Hz refresh rate, and eye-care features.
- Touch Gestures: Swipe, tap, pinch-to-zoom for navigation and interaction.
- Notification Panel: Swipe down from the top of the screen to access quick settings and notifications.
- Home Screen: Customize with widgets and app shortcuts.
5.2. Battery Management
The device is equipped with a 6000mAh battery. Use the provided 10W power adapter for charging. The phone supports up to 20W PD charging with a compatible charger (sold separately).
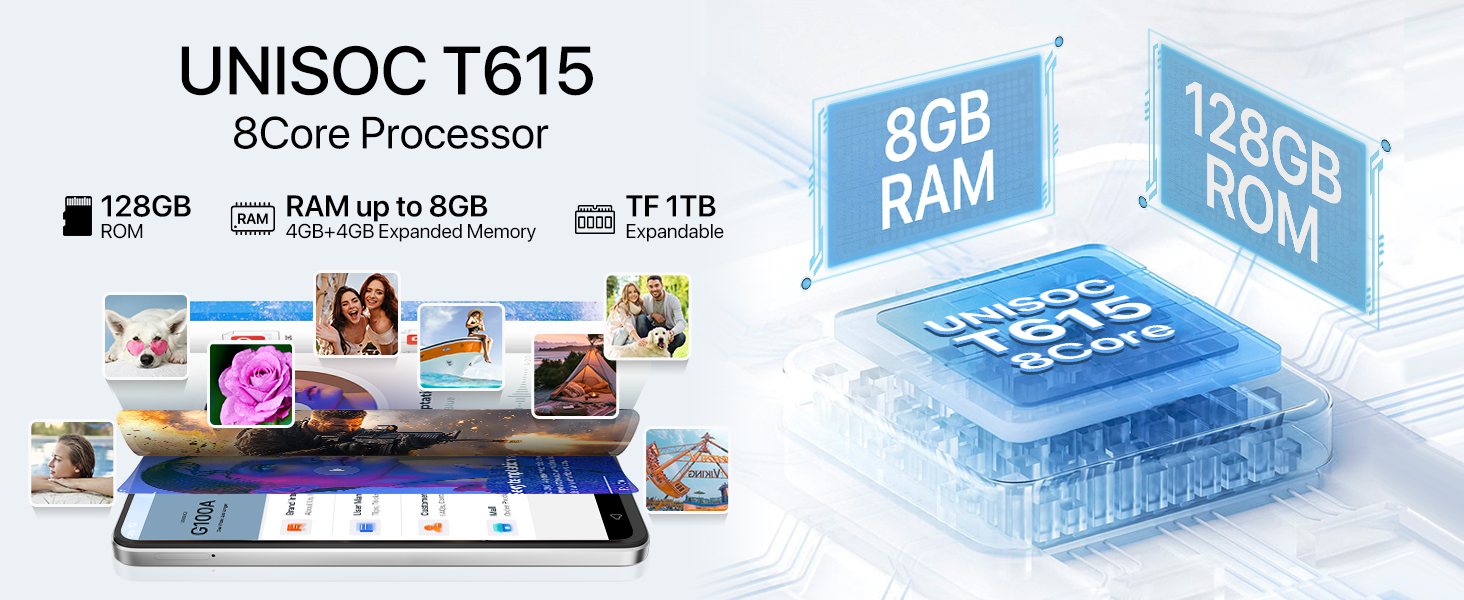
Image: Information about the 6000mAh battery, indicating support for 20W PD charging and the inclusion of a standard 10W charger and Type-C USB cable.
- To charge, connect the Type-C cable to the phone and the power adapter, then plug into a wall outlet.
- Avoid using non-certified chargers or cables to prevent damage.
- Optimize battery life by adjusting screen brightness, disabling unused features (Wi-Fi, Bluetooth, GPS), and closing background apps.
5.3. Camera Functions
The UMIDIGI G100A features a 13MP main camera and an 8MP front camera.

Image: Overview of the phone's camera system, detailing the 8MP front camera, 13MP rear camera, and 2MP depth camera, along with available modes like Pro, Capture, Portrait, and Night.
- Open the Camera app from your home screen or app drawer.
- Switch between photo, video, portrait, and other modes as needed.
- Tap on the screen to focus, and use the shutter button to capture images or start/stop video recording.
5.4. Android 14 Features
Your UMIDIGI G100A runs on Android 14, offering enhanced personalization, privacy, and security features.

Image: Screenshots of the UMIDIGI G100A displaying the Android 14 interface, highlighting its personalization, privacy, and security enhancements.
- Parental Controls: Manage app permissions, screen time, and content filters.
- Memory Expansion: Extend RAM up to 8GB (4GB physical + 4GB virtual) via settings.
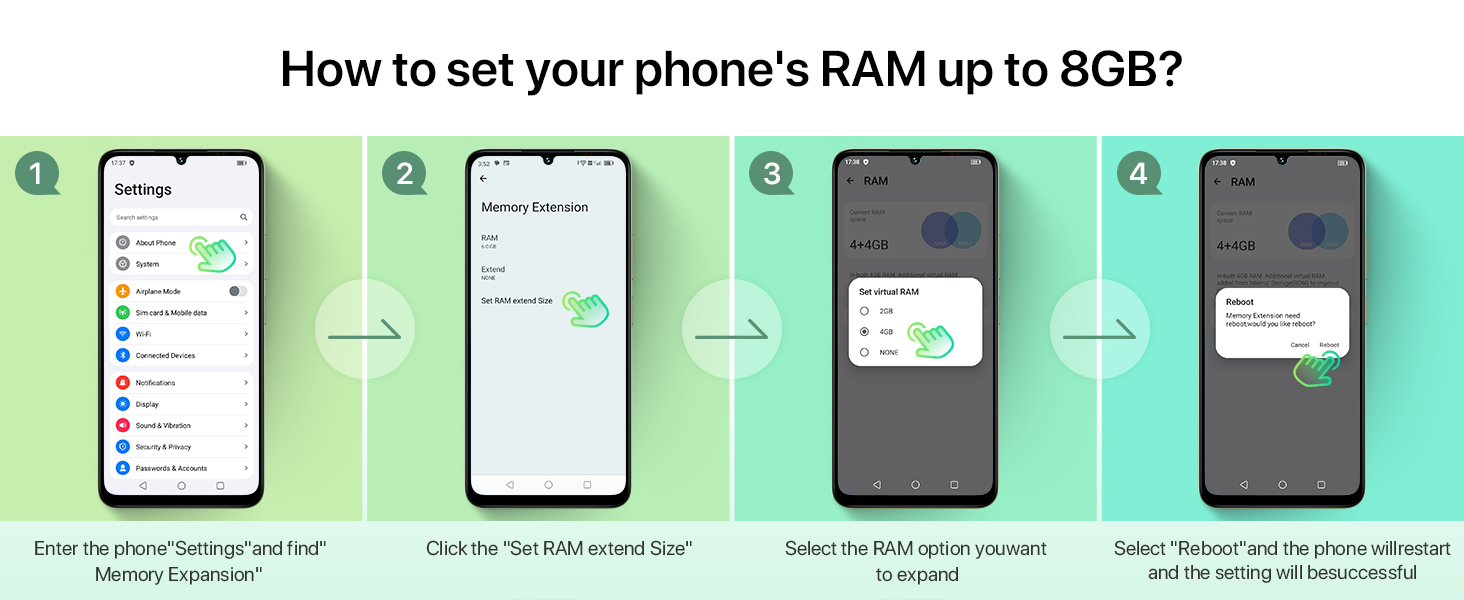
Image: Step-by-step guide on how to access and set up parental controls through the "Digital Wellbeing & parental controls" section in the phone's settings.

Image: Step-by-step instructions on how to expand the phone's RAM up to 8GB by navigating through settings and selecting the desired expansion size, followed by a reboot.
6. Maintenance
6.1. General Care
- Keep your phone dry. Moisture can damage electronic circuits.
- Avoid extreme temperatures. High temperatures can shorten the life of electronic devices and damage batteries.
- Do not drop, knock, or shake the phone. Rough handling can break internal circuit boards.
- Use only approved accessories.
6.2. Cleaning
- Wipe the screen and body with a soft, clean, dry cloth.
- Do not use alcohol, thinners, or benzene for cleaning.

Image: Information indicating the UMIDIGI G100A's IP53 rating, signifying its splash-proof and dust-proof capabilities for everyday use.
7. Troubleshooting
- Phone does not turn on: Ensure the battery is charged. Connect the charger and wait a few minutes before attempting to power on.
- Phone freezes or is unresponsive: Press and hold the Power button for about 10-15 seconds to force a restart.
- Poor network signal: Check if your SIM card is properly inserted. Move to an area with better network coverage. Contact your carrier if issues persist.
- Charging issues: Ensure the charging cable and adapter are securely connected. Try a different compatible charger and cable. Inspect the charging port for any debris.
- Touchscreen not responding: Restart the device. If parts of the screen remain unresponsive, this may indicate a hardware issue requiring service.
- No app drawer: The UMIDIGI G100A, like some Android devices, may place all apps directly on the home screens. Organize them into folders for better management.
- No NFC: This model does not support NFC functionality, therefore tap-to-pay or other NFC-dependent features are not available.
8. Specifications
| Feature | Detail |
|---|---|
| Model Name | UMIDIGI G100A |
| Operating System | Android 14 |
| Display | 6.9-inch HD+ (1640x720) 120Hz |
| Processor | UNISOC T615 Octa-Core |
| RAM | 8GB (4GB physical + 4GB expanded) |
| Internal Storage | 128GB ROM (expandable up to 1TB via TF card) |
| Rear Camera | 13MP Main + 2MP Depth |
| Front Camera | 8MP |
| Battery | 6000mAh (Supports 20W PD charging) |
| Connectivity | 4G Dual SIM, Wi-Fi 2.4G/5G, Bluetooth 5.2, GPS/Glonass/Galileo/Beidou |
| Ports | Type-C, 3.5mm Headphone Jack |
| Security | Side Fingerprint Sensor, AI Face Unlock |
| Dimensions | Height: 171mm, Width: 77.6mm, Thickness: 8.1mm |
| Weight | 205g |
| Durability | IP53 Splash-proof and Dust-proof |
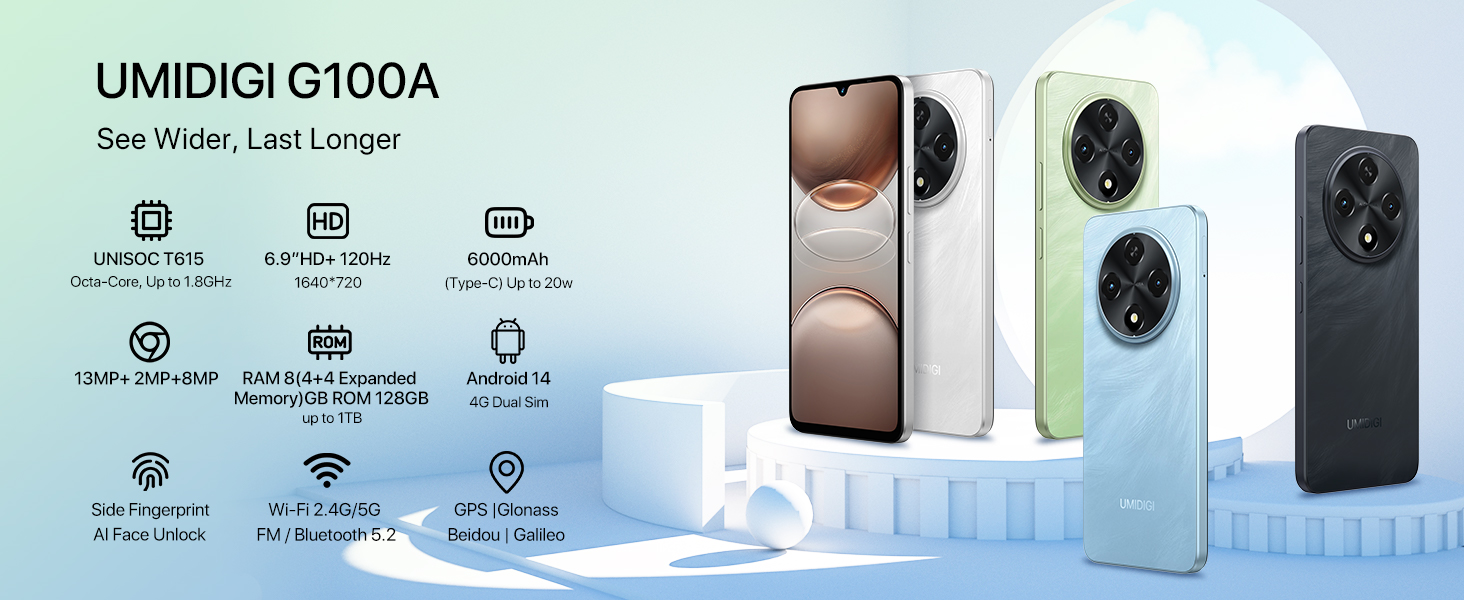
Image: A summary graphic displaying the core specifications of the UMIDIGI G100A, including processor, display, battery, camera, memory, and connectivity.
9. Warranty and Support
UMIDIGI products are covered by a limited warranty. For detailed warranty information, please refer to the warranty card included in your product packaging or visit the official UMIDIGI website.
For technical support, FAQs, and customer service, you can utilize the UMIDIGI Customer Center App or visit the UMIDIGI support page online.

Image: Screenshots of the UMIDIGI Customer Center App, showing options for brand information, user manuals, FAQs, and direct customer service contact.