1. Introduction
This manual provides essential information for the safe assembly, operation, and maintenance of your eAhora Juliet Pro II Electric Bike. Please read this manual thoroughly before your first ride to ensure proper function and safety. Retain this manual for future reference.
2. Safety Information
Always wear a helmet and appropriate safety gear when riding. Ensure all components are securely fastened before each ride. Adhere to local traffic laws and regulations. Avoid riding in adverse weather conditions or under the influence of substances. Regular maintenance is crucial for safe operation.
3. Setup and Assembly
Your eAhora Juliet Pro II Electric Bike comes 85% pre-assembled. The following steps detail the final assembly process. Please wear gloves to avoid injury during installation.
3.1 Unboxing
Carefully open the two boxes. Box A contains the e-bike (excluding the front wheel), headlight, charger, and installation tools. Box B contains the front wheel and front wheel fender. Remove all packaging materials and inspect for any damage.
Video: Unboxing and initial inspection of the eAhora Juliet Pro II Electric Bike components.
3.2 Install Handlebars
Attach the handlebars to the stem. Ensure the display is centered and the brake levers are positioned comfortably. Tighten all bolts securely using the provided tools.
3.3 Install Front Wheel
Remove the protective gasket from the brake caliper. Carefully align the front wheel with the fork and insert the axle. Ensure the brake rotor is correctly seated within the caliper. Secure the axle nuts firmly. Note: Do not apply the brakes right after removing the gasket. Test the brakes only after installing them on the disc to avoid fluid leakage.
3.4 Install Front Fender
Attach the front fender to the fork using the provided screws. Ensure it is properly aligned over the front wheel.
3.5 Install Cushion (Seat)
Insert the seat post into the frame's seat tube. Adjust the seat height to your preference and secure it with the quick-release lever. Ensure the quick-release is fully closed and tight.
3.6 Install Pedals
Identify the left (L) and right (R) pedals. The left pedal threads counter-clockwise, and the right pedal threads clockwise. Apply a small amount of grease to the threads and screw them into the crank arms. Tighten them firmly with a wrench.

Image: The eAhora Juliet Pro II Electric Bike fully assembled, showcasing its robust design and integrated features.
4. Operating Guide
4.1 Powering On/Off and PAS Adjustment
To power on the e-bike, press and hold the power button on the handlebar control panel. The LCD display will illuminate. Use the '+' and '-' buttons to adjust the Pedal Assist System (PAS) level from 0 (no assist) to 5 (maximum assist).
4.2 Motor Mode Adjustment
Press the power button briefly to cycle through different motor operating modes: Front Drive Mode, Dual Drive Speed Mode, and Rear Drive Mode. Select the mode suitable for your terrain and riding preference.
4.3 Headlight and Horn Operation
Long press the '+' button to turn the headlight on or off. Press the horn button to activate the horn.
4.4 Walk Mode
Long press the '-' button to enter Walk Mode. This provides low-speed assistance for walking the bike.
4.5 Cruise Mode
To enter Cruise Mode, maintain a consistent throttle speed for 5-8 seconds. The cruise control indicator will appear on the display. To exit Cruise Mode, pinch either brake handle.

Image: The Smart LCD Display provides real-time riding data, while the companion app offers additional control and navigation features.
5. Maintenance
5.1 Battery Care
The 60V 70Ah removable battery is IP65 waterproof. For optimal performance and longevity, charge the battery fully after each use. The 7A fast charger can fully charge the battery in approximately 8-10 hours. The Battery Management System (BMS) ensures consistent performance and safety. Always turn off the battery using its power switch when not in use to save power.

Image: The large capacity 60V 70Ah removable battery provides extended range for long rides.
5.2 Brake System
The e-bike is equipped with 4-piston hydraulic disc brakes (203*3.0T discs). Regularly check brake pads for wear and replace them as needed. Ensure brake fluid levels are adequate and there are no leaks. Adjust brake levers for comfortable reach.
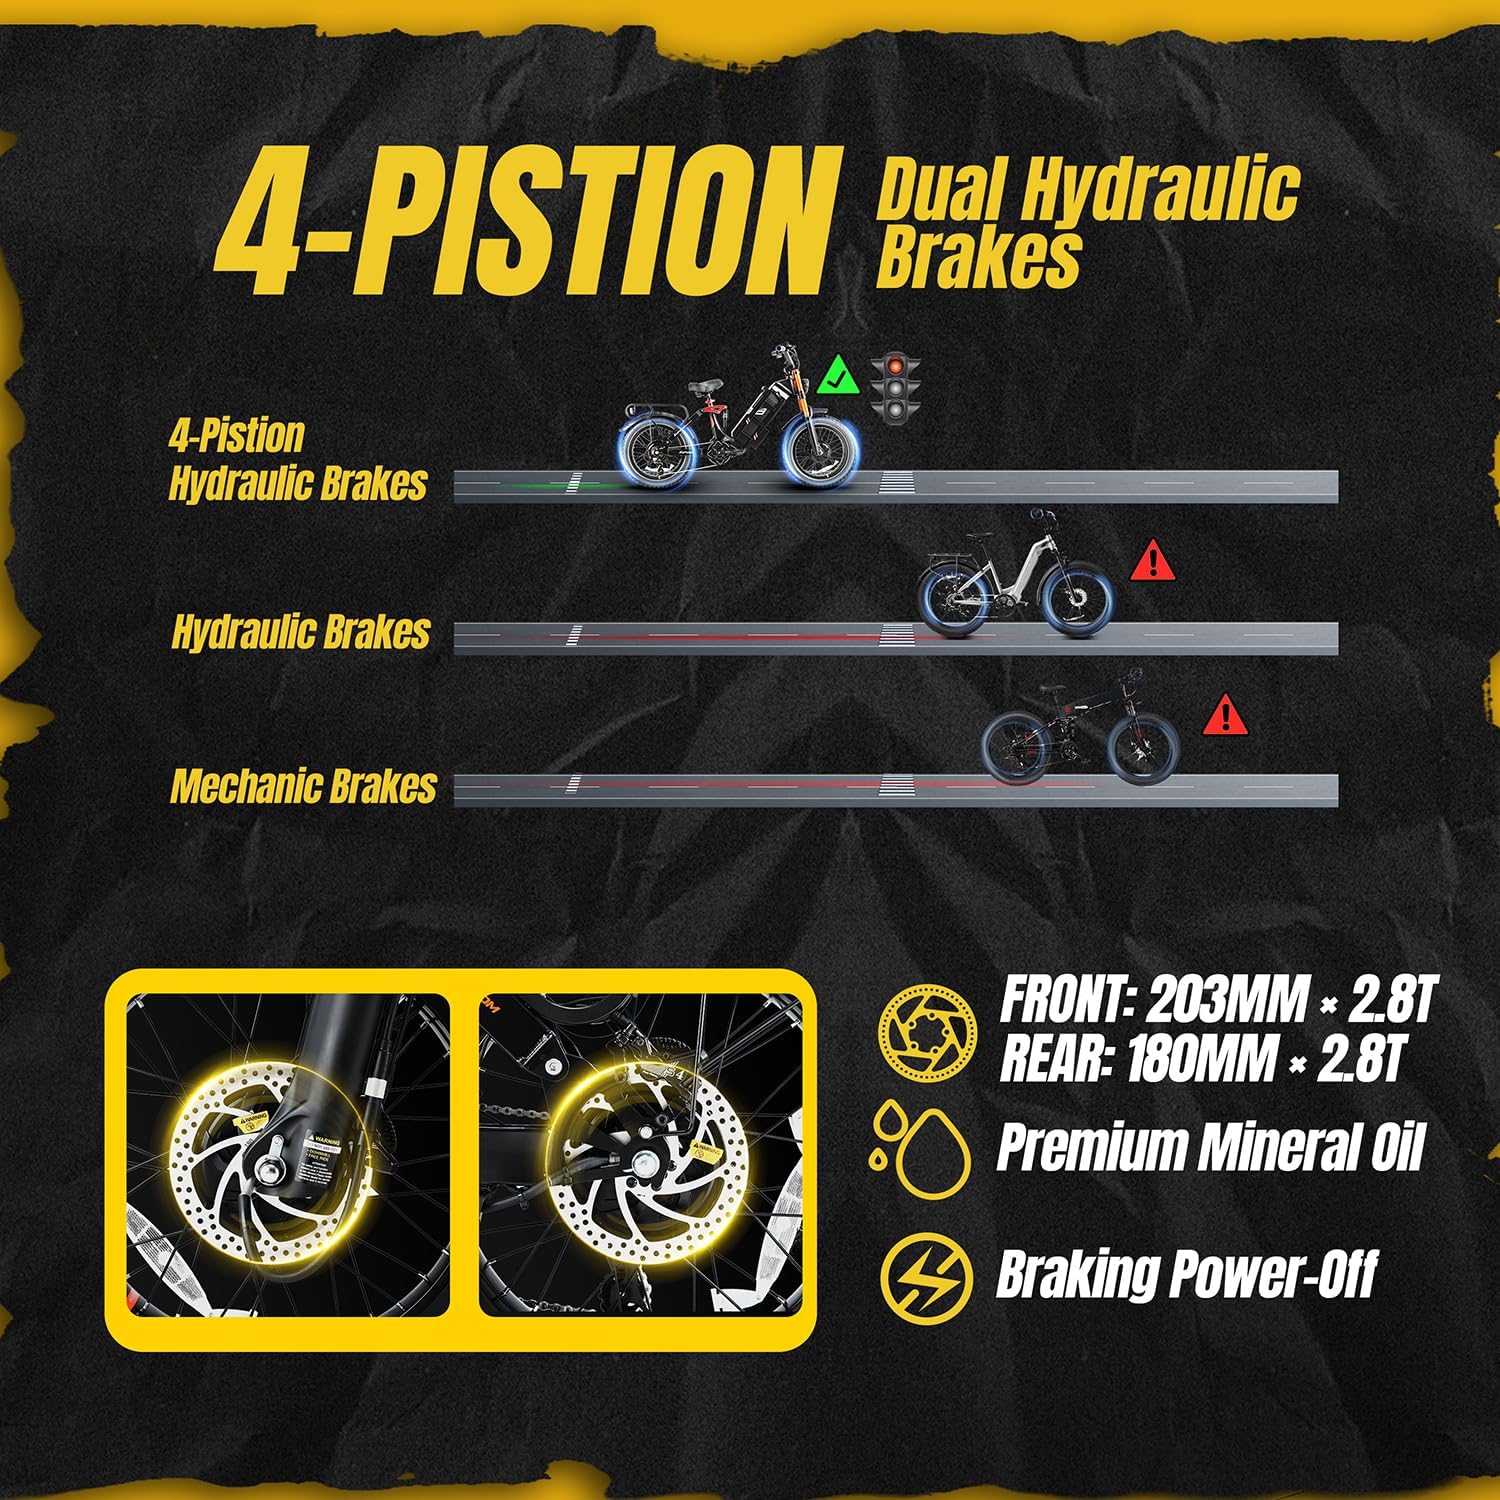
Image: The 4-piston dual hydraulic disc brakes offer superior stopping power and heat dissipation.
5.3 Tires and Wheels
The 20"x4.0 fat tires are wear-resistant and puncture-resistant. Maintain recommended tire pressure for optimal performance and safety. Regularly inspect tires for cuts, punctures, or excessive wear. Check wheel spokes for tension and true the wheels if necessary.

Image: The 20x4.0 inch fat tires provide excellent grip and stability across various terrains and weather conditions.
5.4 Suspension System
The e-bike features an adjustable lockable front fork with damping and a four-link rear suspension system. Regularly check the suspension components for proper function and adjust damping settings according to your riding style and terrain. Keep suspension components clean and lubricated.

Image: The advanced dual suspension system, including an adjustable front fork and four-link rear shock absorbers, ensures a smooth ride over rough terrain.
5.5 Lighting
The e-bike is equipped with a 2000lm bright LED headlight and a taillight with brake signal. Ensure all lights are functioning correctly before riding, especially in low-light conditions.

Image: The powerful 2000lm headlight and integrated taillight with brake signal enhance visibility and safety.
6. Charging Method
The battery can be charged either directly on the bike or removed for charging. To remove the battery, unlock it with the key and slide it out. Connect the charger to the battery's charging port, then plug the charger into a power outlet. The charger indicator light will show charging status (usually red for charging, green for fully charged). Always use the original eAhora charger.
7. Troubleshooting
| Problem | Possible Cause | Solution |
|---|---|---|
| Bike does not power on | Battery off or low charge; loose connections | Ensure battery is switched on and charged. Check all electrical connections. |
| Motor not assisting | PAS level 0; motor mode incorrect; sensor issue | Increase PAS level. Check motor mode. Inspect pedal assist sensor. |
| Brakes feel weak | Worn brake pads; low fluid; air in system | Inspect/replace brake pads. Check fluid levels. Bleed brake system if necessary. |
| Unusual noises | Loose components; chain issues; motor problem | Inspect all bolts and connections. Lubricate chain. Contact support if motor noise persists. |
8. Specifications
| Feature | Detail |
|---|---|
| Bike Type | Electric Bike |
| Model Name | Juliet Pro II |
| Age Range | Adult |
| Motor | Dual Motor Peak 5400W (2200W+2200W) |
| Top Speed | 43 MPH (factory limit 28 MPH) |
| Battery | 60V 70Ah (220 Miles range with pedal assist) |
| Charger | 7A Fast Charger (8-10 hours full charge) |
| Brakes | 4-Piston Oil-Hydraulic Disc Brakes (203*3.0T discs) |
| Tires | 20"x4.0 Fat Tire (Puncture-resistant) |
| Suspension | Adjustable Lockable Air Front Fork & Four-Link Rear Shock Absorbers |
| Gears | SHIM 7-speed transmission |
| Max Load | 400 Lbs |
| Special Features | Smart APP Control, LCD Display with USB port, Cruise Control, Brake-to-Start Safety Feature, 2000lm LED Headlight, Taillight with Brake Signal |
| Frame Material | Aluminum |
| Assembly Required | Yes (85% pre-assembled) |
9. Warranty and Support
eAhora offers a 1-Year WARRANTY on the Motor and Battery, and a 2-Year WARRANTY on the frame. Lifetime support is also provided. For any questions or technical assistance, please contact eAhora customer service. All necessary installation tools and manuals are included in the box.


