Introduction
Thank you for choosing the Generic TP101 Digital Food Thermometer. This manual provides essential information for the safe and effective use of your new thermometer. Please read these instructions thoroughly before operation and retain them for future reference. This device is designed to provide quick and accurate temperature readings for various food items, ensuring optimal cooking results and food safety.
Product Overview
Included Components
- 1 x TP101 Digital Food Thermometer
- 1 x Protective Probe Sheath
- 1 x Nonstandard Battery (pre-installed or included separately)
Key Features
- Instant Read: Provides temperature readings within seconds.
- Wide Temperature Range: Measures from -58°F to 572°F (-50°C to 300°C).
- Multi-Purpose Use: Suitable for meat, BBQ, deep-frying oil, baking, and other kitchen tasks.
- Clear LCD Display: Easy-to-read digital display.
- Long Stainless Steel Probe: Ensures safe distance from heat sources.
- Compact and Portable Design: Easy to store and carry.
Parts Diagram
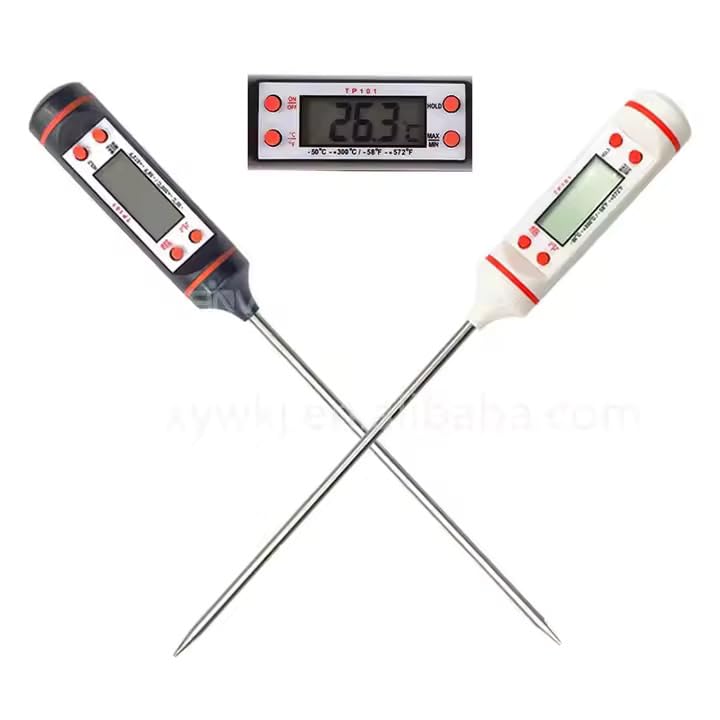
Figure 1: The TP101 Digital Food Thermometer, showing the main unit with its LCD screen, control buttons (ON/OFF, °C/°F, HOLD, MAX/MIN), and the stainless steel probe.
- Protective Sheath: Covers the probe when not in use.
- Stainless Steel Probe: For inserting into food.
- LCD Display: Shows temperature readings.
- ON/OFF Button: Powers the thermometer on or off.
- °C/°F Button: Toggles between Celsius and Fahrenheit.
- HOLD Button: Freezes the current temperature reading on the display.
- MAX/MIN Button: Displays the maximum or minimum temperature recorded since the last reset.
- Battery Compartment: Located at the back of the unit.
Setup
Battery Installation
The TP101 thermometer requires one nonstandard battery, which is typically included.
- Locate the battery compartment cover on the back of the thermometer.
- Carefully slide or unscrew the cover to open the compartment.
- Insert the battery, ensuring the correct polarity (+/-) as indicated inside the compartment.
- Replace the battery compartment cover securely.
Note: If the display shows "LO" or is dim, replace the battery.
Operating Instructions
- Power On/Off: Press the ON/OFF button to turn the thermometer on or off.
- Select Temperature Unit: Press the °C/°F button to switch between Celsius and Fahrenheit temperature scales.
- Measure Temperature:
- Remove the protective sheath from the stainless steel probe.
- Insert the probe tip into the center of the thickest part of the food, avoiding bone or gristle.
- Wait a few seconds for the temperature reading to stabilize on the LCD display.
- Once the reading is stable, remove the probe from the food.
- HOLD Function: Press the HOLD button to freeze the current temperature reading on the display. Press it again to release and resume live temperature measurement.
- MAX/MIN Function: Press the MAX/MIN button to view the maximum temperature recorded since the thermometer was last turned on or reset. Press again to view the minimum temperature. Press a third time to return to the current temperature. To reset MAX/MIN values, turn the thermometer off and then on again.
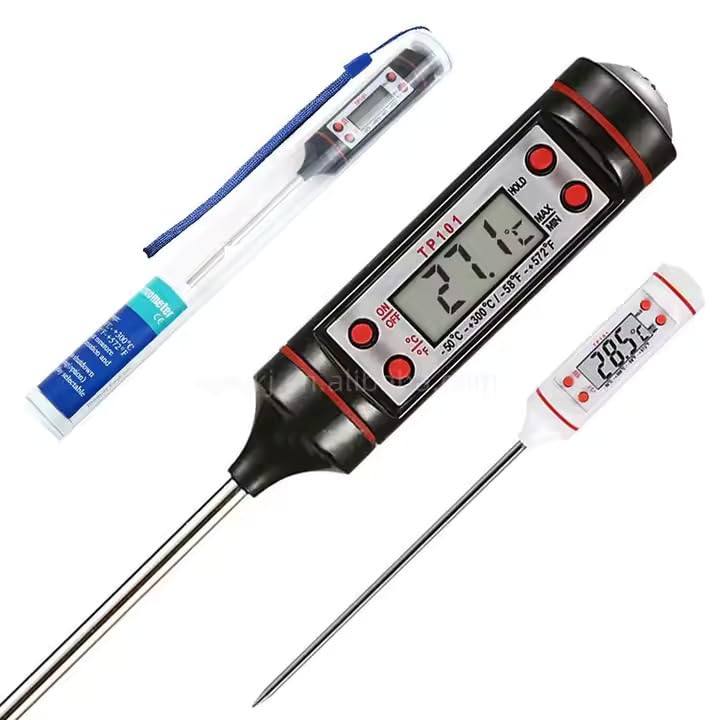
Figure 2: The TP101 Digital Food Thermometer, illustrating its compact design and the protective sheath for the probe.
Temperature Measurement Guidelines
For accurate temperature readings, always insert the probe into the thickest part of the food. Avoid touching bones, fat, or the bottom of the cooking vessel, as these can give inaccurate readings.
Recommended Uses:
- Meat and Poultry: Insert into the thickest part of roasts, steaks, chicken, or turkey.
- BBQ and Grilling: Ideal for checking internal temperatures of grilled items.
- Deep Frying: Monitor oil temperature for optimal frying results.
- Baking: Check internal temperatures of bread, cakes, and casseroles.
- Liquids: Measure the temperature of milk, water, or other beverages.
Refer to reliable cooking charts for safe internal temperatures of various foods.
Maintenance and Care
- Cleaning: After each use, wipe the stainless steel probe with a damp cloth or sponge and mild soap. Rinse thoroughly and dry immediately.
- Avoid Submerging: Do not submerge the main unit of the thermometer in water or place it in a dishwasher, as this can damage the electronic components.
- Storage: Store the thermometer in a dry place, preferably with the protective sheath covering the probe, when not in use.
- Battery Replacement: If the display becomes dim or shows an error, replace the battery as described in the "Setup" section.
Troubleshooting
| Problem | Possible Cause | Solution |
|---|---|---|
| Display is blank or dim. | Low or dead battery. | Replace the battery. Ensure correct polarity. |
| Inaccurate temperature readings. | Probe not inserted correctly; probe tip touching bone, fat, or pan; thermometer needs calibration (unlikely for basic models). | Re-insert probe into the thickest part of the food, avoiding bones/fat. Ensure probe is clean. |
| "LO" or "HHH" displayed. | Temperature is outside the measurable range (-58°F to 572°F / -50°C to 300°C). | Ensure the temperature being measured is within the specified range. |
| Thermometer does not turn on. | Battery issue; unit malfunction. | Check or replace the battery. If problem persists, contact customer support. |
Specifications
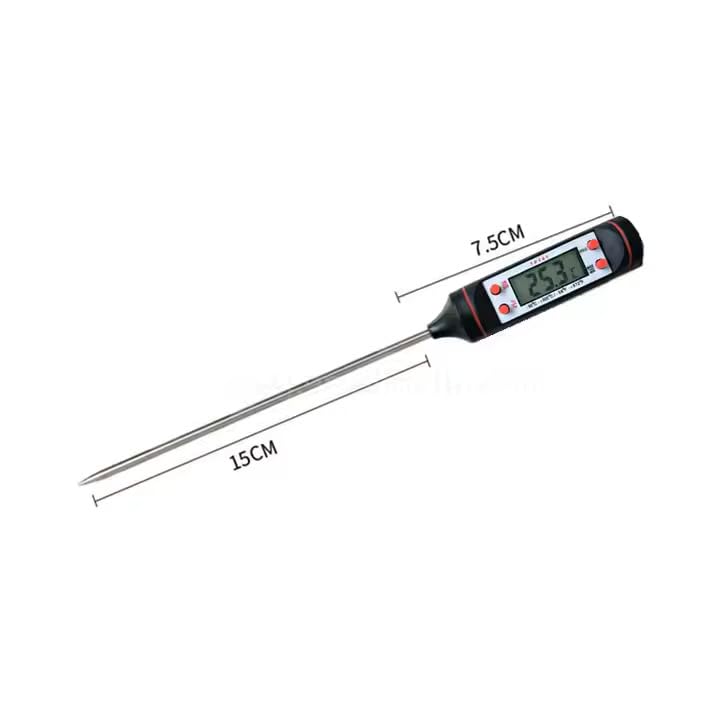
Figure 3: Dimensions of the TP101 Digital Food Thermometer, indicating a main unit length of approximately 7.5 cm and a probe length of 15 cm.
| Model Number | TP101 |
| Temperature Range | -58°F to 572°F (-50°C to 300°C) |
| Display Type | LCD Digital Display |
| Power Source | 1 x Nonstandard Battery (included) |
| Probe Material | Stainless Steel |
| Outer Material | Plastic, Stainless Steel |
| Special Features | Digital Temperature Reading, Fast Reading System, Food Safe, LCD Display, HOLD function, MAX/MIN function |
| Product Care | Avoid Submerging In Water, Store In Dry Place, Wipe Clean With Damp Cloth |
| Package Dimensions | 9.72 x 1.02 x 0.98 inches |
| Item Weight | 1.13 ounces |
Warranty and Support
For warranty information or technical support, please refer to the retailer or contact the manufacturer directly. Keep your purchase receipt as proof of purchase.