1. Introduction
Thank you for choosing the Dejasound Pro 5 Channel Audio Mixer Mic Set. This professional audio mixer is designed for a variety of applications, including live streaming, family karaoke, studio recording, and small performances. It features a 5-channel mixer, dual UHF wireless microphones, a USB audio interface, and Bluetooth connectivity, providing comprehensive audio adjustment and versatile input options.
This manual provides detailed instructions for setting up, operating, and maintaining your audio mixer. Please read it thoroughly before use to ensure optimal performance and longevity of the product.
2. Safety Information
- Power Source: Use only the provided 5V 2A power adapter. Ensure the power supply voltage matches the product's requirements.
- Water and Moisture: Do not expose the device to water, rain, or excessive moisture. Avoid using it in damp environments.
- Heat Sources: Keep the mixer away from heat sources such as radiators, heat registers, stoves, or other heat-producing appliances.
- Ventilation: Ensure proper ventilation around the unit. Do not block any ventilation openings.
- Cleaning: Clean only with a dry cloth. Do not use liquid cleaners or aerosol cleaners.
- Servicing: Do not attempt to service this product yourself. Refer all servicing to qualified service personnel.
- Microphone Batteries: Use 2 x 1.5V AA batteries for each wireless microphone. Ensure correct polarity when inserting batteries. Remove batteries if the microphones will not be used for an extended period.
3. Package Contents
Please check the package to ensure all items are present:
- 1 x 5-Channel Audio Mixer
- 2 x Wireless Microphones
- 4 x 1.5V AA Batteries (for microphones)
- 1 x USB to Type-C Power Cable
- 1 x USB to USB Audio Cable
- 1 x 3.5mm to RCA Audio Cable
- 1 x 5V 2A Power Adapter
- 2 x Microphone Foam Windshields
- 2 x Microphone Anti-slip Rings
- 1 x User Manual (this document)

Image: The Dejasound Pro 5 Channel Audio Mixer with its two accompanying wireless microphones.
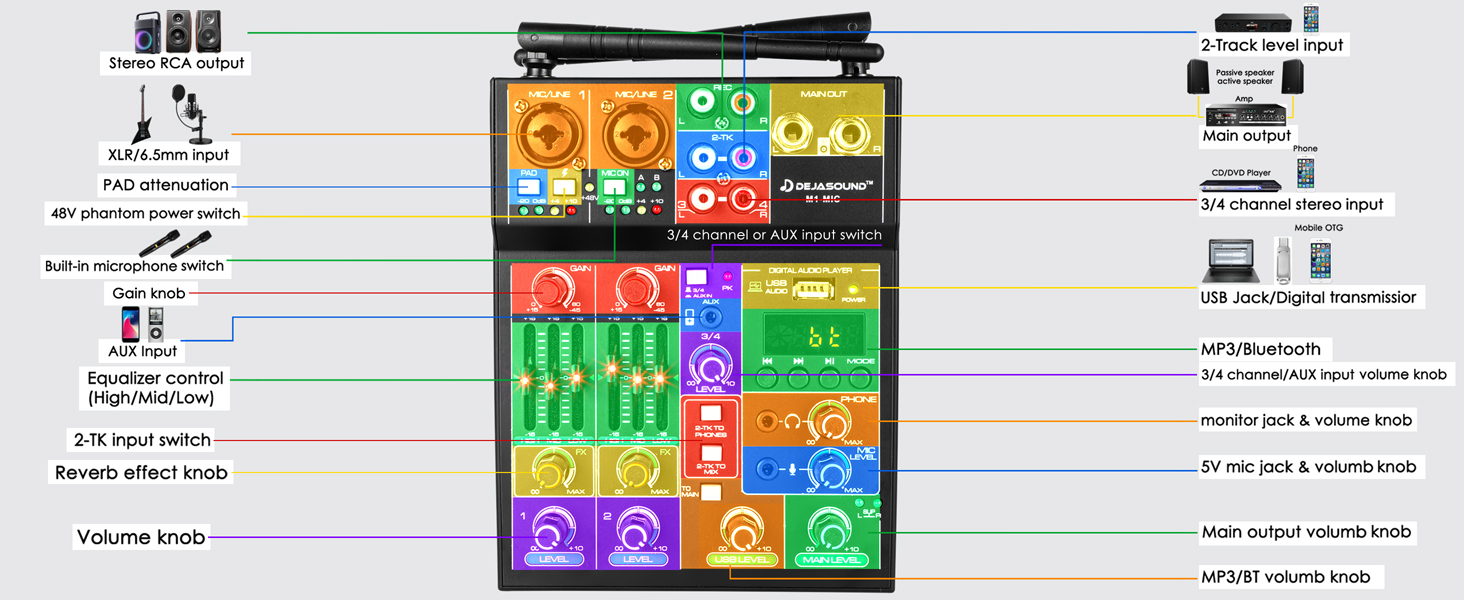
Image: Visual representation of all items included in the Dejasound M1 Audio Mixer package, including cables, power adapter, and accessories.
4. Product Overview
The Dejasound M1-MIC mixer features a compact design with intuitive controls for various audio sources. Below is a detailed diagram of the mixer's front panel and its components.

Image: A comprehensive labeled diagram of the Dejasound M1 Audio Mixer, highlighting all input/output ports and control knobs.
4.1. Front Panel Controls and Connections
- MIC/LINE 1 Input: XLR/6.5mm combo jack for microphone or line-level input.
- PAD Attenuation: -30dB pad switch for MIC/LINE 1.
- +48V Phantom Power Switch: Activates 48V phantom power for condenser microphones on MIC/LINE 1.
- MIC/LINE 2 Input: XLR/6.5mm combo jack for microphone or line-level input. This channel also receives audio from the built-in wireless microphone receiver.
- Wireless Microphone Frequency Select (A/B): Switches between wireless microphone frequencies.
- REC Output: RCA stereo output for recording.
- 2-TK Input: RCA stereo input for external playback devices.
- MAIN OUT: RCA stereo output for connecting to speakers or amplifiers.
- Digital Audio Player Section:
- USB Audio Port: Connects to PC/smartphone for recording/playback.
- Power Indicator: Lights up when power is connected.
- Display Screen: Shows mode, track information, and Bluetooth status.
- Control Buttons: Play/Pause, Next/Previous track, Mode selection (USB/Bluetooth).
- GAIN Knobs (Channels 1 & 2): Adjust input sensitivity for microphones/line inputs.
- Equalizer Controls (Channels 1 & 2): HIGH, MID, LOW knobs to adjust treble, midrange, and bass frequencies.
- FX Reverb Effect Knobs (Channels 1 & 2): Adjust the amount of reverb applied to the channel.
- LEVEL Faders (Channels 1 & 2): Adjust the output volume of each channel.
- 3/4 Channel Input: RCA stereo input for external devices (e.g., DVD, CD, TV).
- AUX Input: 3.5mm stereo input for external devices.
- 3/4 Channel/AUX Input Volume Knob: Adjusts the volume for the 3/4 channel and AUX inputs.
- 2-TK to Phones Switch: Routes 2-TK input to headphones.
- 2-TK to Main Switch: Routes 2-TK input to main output.
- PHONES Jack: 3.5mm headphone output.
- Monitor Jack & Volume Knob: Adjusts headphone volume.
- USB Level Knob: Adjusts the volume of the USB audio input.
- Main Output Volume Knob: Controls the overall output volume of the mixer.
- MP3/BT Volume Knob: Adjusts the volume of the MP3 player or Bluetooth input.
4.2. Wireless Microphones
The set includes two UHF wireless handheld microphones. Each microphone features a power button and a display showing its operating frequency. They operate on specific frequencies (CHA 576.1-590.1MHz, CHB 560.1-574.1MHz) and are powered by 2 x 1.5V AA batteries.

Image: A close-up view of one of the wireless microphones, showing its display and power button.
5. Setup
5.1. Power Connection
- Connect the USB to Type-C power cable to the mixer's power input.
- Connect the other end of the USB cable to the provided 5V 2A power adapter.
- Plug the power adapter into a standard electrical outlet. The power indicator on the mixer will light up.
5.2. Wireless Microphone Setup
- Unscrew the bottom cap of each wireless microphone.
- Insert 2 x 1.5V AA batteries into each microphone, observing correct polarity (+/-).
- Screw the bottom cap back on.
- Press and hold the power button on each microphone to turn it on. The display will show the operating frequency.
- The mixer has a built-in receiver for these microphones, which are routed through MIC/LINE 2. Ensure the "MIC ON A" or "MIC ON B" indicator lights up on the mixer for the corresponding microphone.
- If interference occurs, use the frequency select switch (A/B) on the mixer to change the wireless microphone frequency.

Image: Two wireless microphones with their battery compartments open, showing the required AA batteries.
5.3. Connecting Input Devices
- Wired Microphones/Instruments: Connect XLR or 6.5mm cables from your microphones or instruments to the MIC/LINE 1 or MIC/LINE 2 inputs.
- RCA Devices (Channels 3-4): Use RCA cables to connect devices like CD players, DVD players, or TVs to the 3/4 Channel Input.
- AUX Devices: Use the 3.5mm to RCA audio cable (or a standard 3.5mm cable) to connect smartphones, tablets, or other portable devices to the AUX input.
- USB Audio Interface: Connect the USB to USB audio cable from the mixer's USB Audio Port to your computer or smartphone (with appropriate adapter, not included).
5.4. Connecting Output Devices
- Speakers/Amplifiers: Connect RCA cables from the MAIN OUT to your active speakers or amplifier.
- Headphones: Plug your headphones into the PHONES jack.
- Recording Device: Connect RCA cables from the REC Output to your recording device.
6. Operating Instructions
6.1. Basic Operation
- Power On: Ensure all connections are secure, then connect the power adapter. The mixer powers on automatically.
- Initial Volume Settings: Before playing any audio, set all GAIN, LEVEL, and MAIN LEVEL knobs to their minimum positions to prevent sudden loud sounds.
- Adjusting Input Gain: For each active channel (MIC/LINE 1, MIC/LINE 2, 3/4 Channel, AUX, USB, Bluetooth), slowly increase the GAIN knob until the signal indicator (if present) shows a healthy signal without clipping (red light).
- Adjusting Channel Volume: Use the LEVEL faders for Channels 1 & 2, and the dedicated volume knobs for 3/4 Channel/AUX, USB, and MP3/BT to balance the individual source volumes.
- Adjusting Main Output: Slowly increase the MAIN LEVEL knob to achieve the desired overall volume from your speakers.
- Headphone Monitoring: Adjust the Monitor Jack & Volume Knob for comfortable headphone listening.
6.2. Equalization (EQ)
Use the HIGH, MID, and LOW knobs on Channels 1 & 2 to shape the tone of your audio sources. Turning a knob clockwise boosts the frequency, while turning it counter-clockwise cuts it.
- HIGH: Affects treble frequencies (clarity, brightness).
- MID: Affects midrange frequencies (vocal presence, instrument body).
- LOW: Affects bass frequencies (warmth, thump).
6.3. Reverb Effect (FX)
The mixer includes a built-in reverb effect. Use the FX Reverb Effect Knobs on Channels 1 & 2 to add reverb to those channels. Turn the knob clockwise to increase the amount of reverb.
6.4. Phantom Power (+48V)
If you are using a condenser microphone with MIC/LINE 1, press the +48V Phantom Power Switch. This supplies the necessary power to the microphone. Caution: Do not activate phantom power for dynamic microphones or ribbon microphones unless specifically required by the microphone manufacturer, as it may cause damage.
6.5. Bluetooth Connectivity
- Press the MODE button in the Digital Audio Player section until "BT" appears on the display.
- On your smartphone or Bluetooth-enabled device, search for Bluetooth devices and select "BT-NSMIX".
- Once connected, you can play audio from your device through the mixer. Adjust the MP3/BT Volume Knob to control the volume.
- The maximum transmission distance for Bluetooth is approximately 35 feet (10 meters).
6.6. USB Audio Interface
Connect the mixer to your computer or smartphone using the USB to USB audio cable. The mixer will be recognized as an audio input/output device. You can use it for:
- Recording: All mixed audio from the mixer will be sent to your computer/smartphone for recording.
- Playback: Audio from your computer/smartphone can be played back through the mixer. Adjust the USB Level Knob for volume control.
Note: When using the USB audio interface for recording, all inputs are summed to a mono signal, and individual channels cannot be recorded separately.
7. Maintenance
7.1. Cleaning
Wipe the mixer and microphones with a soft, dry cloth. Do not use abrasive cleaners, solvents, or chemical sprays, as these can damage the finish or internal components.
7.2. Microphone Battery Replacement
When the microphone display indicates low battery or the audio signal becomes weak/intermittent, replace the AA batteries. Always replace both batteries in a microphone at the same time with new ones.
7.3. Storage
Store the mixer and accessories in a cool, dry place away from direct sunlight and extreme temperatures. If storing for an extended period, remove batteries from the wireless microphones.
8. Troubleshooting
| Problem | Possible Cause | Solution |
|---|---|---|
| No power to the mixer. | Power adapter not connected or faulty; outlet not working. | Check power cable connections. Try a different power outlet. Ensure the 5V 2A adapter is used. |
| No sound output from speakers. | MAIN OUT cables disconnected; MAIN LEVEL knob too low; speakers off or faulty. | Check MAIN OUT connections. Increase MAIN LEVEL. Ensure speakers are powered on and functioning. |
| No sound from a specific input channel. | Channel GAIN or LEVEL too low; input device not connected or faulty; incorrect input selected. | Increase GAIN and LEVEL for the channel. Check input cable connections. Ensure the input device is working. |
| Wireless microphones not working. | Microphones off; low batteries; interference; mixer's MIC ON A/B not selected. | Turn on microphones. Replace batteries. Try changing frequency (A/B) on the mixer. Ensure MIC ON A/B is active. |
| Bluetooth not connecting. | Mixer not in Bluetooth mode; incorrect device selected; device too far. | Press MODE button until "BT" is displayed. Ensure "BT-NSMIX" is selected on your device. Move device closer to the mixer. |
| Audio distortion or clipping. | GAIN or LEVEL set too high; input signal too strong. | Reduce GAIN and LEVEL knobs. If using MIC/LINE 1, activate the PAD switch. |
| Noticeable audio latency (delay). | Inherent to some digital audio processing; specific setup configurations. | While some latency is expected in certain setups, ensure all connections are direct and minimize unnecessary processing. For critical applications, consider dedicated low-latency interfaces. |
9. Specifications
| Feature | Detail |
|---|---|
| Brand | Dejasound |
| Model | M1-MIC |
| Number of Channels | 5 |
| Connectivity Technology | Auxiliary, RCA, USB, XLR, Bluetooth |
| Output Connector Type | USB, RCA |
| Phantom Power | +48V (switchable on MIC/LINE 1) |
| Wireless Microphone Type | UHF (2 handheld microphones included) |
| Wireless Microphone Frequencies | CHA 576.1-590.1MHz, CHB 560.1-574.1MHz |
| Wireless Microphone Battery | 2 x 1.5V AA batteries (per mic) |
| Bluetooth Version | 3.0 |
| Bluetooth Transmission Distance | Up to 35 feet (10 meters) |
| Power Source | Corded Electric (5V 2A adapter) |
| Item Weight | 3.14 pounds (approx. 1.42 kg) |
| Package Dimensions | 13.5 x 11.46 x 2.95 inches (approx. 34.3 x 29.1 x 7.5 cm) |
10. Warranty and Support
Dejasound products are designed for reliability and performance. For warranty information, technical support, or service inquiries, please refer to the contact information provided with your purchase or visit the official Dejasound website.
Please retain your proof of purchase for warranty claims.


