1. Introduction
This manual provides detailed instructions for the installation, operation, and maintenance of your Bloepum L1 2x220W&350W 2.1 Channel BT Digital Power Amplifier Board. Please read this manual thoroughly before use to ensure proper functionality and safety.
2. Safety Information
- Ensure the power supply is within the specified range (DC15-36V, ≥ 8A). Do not connect to AC power directly.
- Avoid exposing the device to moisture, water, or extreme temperatures.
- Do not disassemble or modify the amplifier board. Unauthorized modifications can lead to electric shock or damage.
- Keep the device away from children.
- Ensure proper ventilation to prevent overheating.
- The amplifier board includes protection mechanisms against input anti-reverse, over-temperature, over-current, short circuit, and overload. However, always handle with care.
3. Package Contents
The package for the Bloepum L1 Amplifier Module (Type A: Without Karaoke Board) typically includes:
- 1 x Bloepum L1 Audio Amplifier Module
- Potentiometer leads (wire length 35cm, with 4 single link 10K potentiometers and 1 10K potentiometer with a button for main volume)
- User Manual
Note: Additional accessories may vary based on specific product bundles.
4. Product Features and Highlights
- Amplifier Chip: TPA3251D2 for low noise audio amplification.
- Audio Output: Left channel 220W + Right channel 220W + Subwoofer 350W.
- Audio Input Options: Bluetooth (BT), AUX, USB drive, PC sound card, and MIC.
- Bluetooth Version: 5.0 for stable wireless connection up to 15m.
- Adaptive Power Supply: DC15-36V, ≥ 8A.
- Adaptive Speaker: Left and Right channels 50-200W (3-8Ω); Subwoofer 50-300W (2-8Ω).
- Dual Volume Adjustment: Independent control for background music (via multifunctional buttons) and MIC volume.
- Protection Mechanisms: Input anti-reverse, over-temperature, over-current, short circuit, and overload.
- Characteristic Function: Dual microphone input, supports EQ adjustment via upper computer software, and can be used independently as a 2.1 amplifier board.

Image: Bloepum L1 Amplifier Board with key features such as TPA3251D2 chips, dual microphone input, and main switch highlighted.

Image: Product highlights showing supported USB drive formats (MP3, WAV, SBC, WMA, AAC, APE, FLAC) and emphasizing its independent 2.1 channel Bluetooth amplifier board functionality.
5. Specifications
| Parameter | Value |
|---|---|
| Model | L1 |
| Amplifier Chip | TPA3251D2 |
| Audio Output | L&R Channel 220W + Subwoofer 350W |
| Audio Input | BT + AUX + USB Drive + PC Sound Card + MIC |
| Bluetooth Version | 5.0 |
| Bluetooth Transmission Distance | 15m |
| Adaptive Power Supply | DC15-36V, ≥ 8A (Do not connect to AC) |
| Adaptive Speaker (L&R) | 50-200W, 3-8Ω |
| Adaptive Speaker (Subwoofer) | 50-300W, 2-8Ω |
| Product Dimensions | 103 x 110 x 23.7mm (Amplifier board) |
| Product Weight | 287g (Net weight) |
| Material | Metal + Plastic |

Image: Detailed product parameters for the Bloepum L1 amplifier board, including model, chip, power, input/output, and dimensions.
6. Setup Instructions
6.1. Panel Assembly (If applicable)
If your amplifier board requires assembly of the control panel, follow these steps. This process typically involves soldering the potentiometer leads to the mainboard and securing the potentiometers to the panel.
Video: Demonstration of amplifier board panel installation, including soldering connections and securing components. While this video features a different model (S200HS-W), the general assembly principles are similar.
6.2. Speaker Connections
Connect your speakers to the appropriate terminals on the amplifier board. Ensure correct polarity (positive to positive, negative to negative) for optimal sound quality.
- Left Channel Speaker: Connects to L+ L- terminals.
- Right Channel Speaker: Connects to R+ R- terminals.
- Subwoofer Channel: Connects to S+ S- terminals.
Video: General demonstration of connecting speakers to an amplifier board. This video features a different model (S350HS), but the speaker connection process is similar.
6.3. Power Connection
Connect a DC15-36V, ≥ 8A power adapter to the amplifier board. Ensure the power adapter is suitable for the amplifier's requirements.
Video: General demonstration of connecting power and speakers to an amplifier board. This video features a different model (S600X), but the power connection process is similar.
7. Operating Instructions
7.1. Audio Input Modes
The Bloepum L1 supports multiple audio input modes:
- Bluetooth (BT): Pair your device (e.g., smartphone) with the amplifier via Bluetooth. The Bluetooth version is 5.0, offering a transmission distance of up to 15m.
- AUX: Connect an external audio source using an AUX cable.
- USB Drive: Insert a USB drive containing audio files (MP3, WAV, SBC, WMA, AAC, APE, FLAC).
- PC Sound Card: Connect to a PC via USB to use the amplifier as a sound card.
- MIC: Connect microphones for vocal input. The board supports dual microphone input.

Image: Illustration of a wireless microphone setup connected to the amplifier board, demonstrating its compatibility with wireless microphones (with receiver), capacitance microphones, and dynamic microphones.
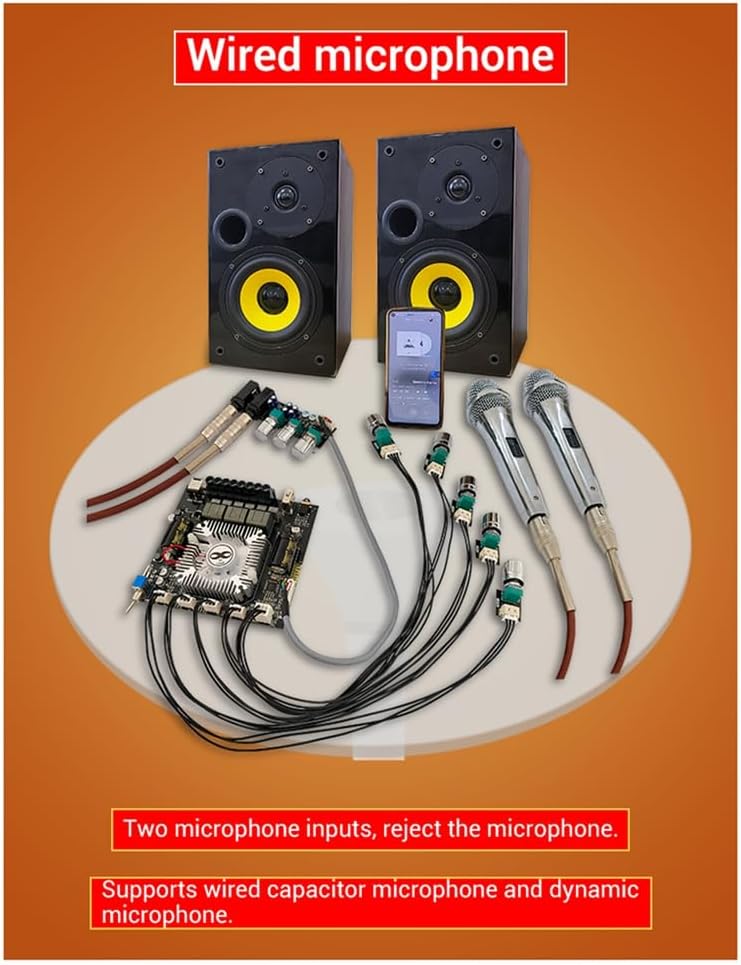
Image: Illustration of a wired microphone setup connected to the amplifier board, highlighting its dual microphone input capability and support for wired capacitor and dynamic microphones.
7.2. Volume and Tone Adjustment
The amplifier board features multiple potentiometers for precise control:
- Main Volume: Controls the overall output volume.
- Subwoofer Volume: Adjusts the volume level of the subwoofer output.
- L&R Channel Volume: Adjusts the volume for the left and right stereo channels.
- Treble/Bass: Fine-tune the high and low frequencies for the L&R channels.
- MIC Volume: Adjusts the volume of the connected microphones.
7.3. Multifunction Button Operations
The background music volume adjustment knob also functions as a multifunction button:
- Single Click: Pause/Play.
- Double Click: Skip to the next track.
- Triple Tap: Skip to the previous track.
- Long Press: Switch input mode.
7.4. EQ Adjustment
The amplifier supports EQ adjustment on a connected upper computer, allowing for customized sound profiles.
8. Maintenance
- Keep the amplifier board clean and free from dust. Use a soft, dry cloth for cleaning.
- Avoid placing heavy objects on the amplifier.
- Store the device in a cool, dry place when not in use for extended periods.
9. Troubleshooting
If you encounter any problems during use, please refer to the following common issues and solutions:
- No Sound:
- Check all cable connections (power, speakers, audio input).
- Ensure the power adapter meets the specifications (DC15-36V, ≥ 8A).
- Verify the selected input mode matches your audio source.
- Adjust volume controls on both the amplifier and your audio source.
- Bluetooth Connection Issues:
- Ensure the amplifier is in Bluetooth mode.
- Check that your device's Bluetooth is enabled and within range (15m).
- Forget the device on your smartphone/tablet and re-pair.
- Distorted Sound:
- Reduce the volume on both the amplifier and the audio source.
- Check speaker impedance and power ratings to ensure they are compatible.
- Inspect speaker wires for any damage or loose connections.
- No Microphone Input:
- Ensure microphones are correctly plugged into the dual microphone input.
- Adjust the MIC volume control.
If problems persist, please contact customer support for assistance.
10. Warranty and Support
For warranty information and customer support, please refer to the documentation provided with your purchase or contact Bloepum customer service directly. We are committed to providing you with a 100% satisfactory experience.