1. Introduction
This manual provides detailed instructions for the setup, operation, maintenance, and troubleshooting of your Ledagic Led Light Bar. Please read this manual thoroughly before using the product to ensure proper function and safety.
2. Safety Information
- Ensure the power source is 5 Volts DC.
- This product is designed for indoor use only. It is not waterproof.
- Do not disassemble or modify the device.
- Keep away from water and high humidity environments.
- Avoid direct eye exposure to the LED light for prolonged periods.
3. Package Contents
Verify that all items are present in the package:
- 2 x RGB Light Bars
- 1 x Remote Control (AAA batteries not included)
- 1 x Dual-Head USB-C Charging Cable
- 1 x Instruction Manual (this document)
- 2 x Base Brackets

Image: Contents of the Ledagic Led Light Bar package.
4. Setup
- Assemble the Light Bars: Attach each LED light bar to its respective base bracket. Ensure a secure fit.
- Position the Light Bars: Place the light bars in your desired location, such as next to a TV, PC monitor, or on a desk.
- Connect Power: Use the provided dual-head USB-C charging cable to connect both light bars to a USB power source. The light bars are USB powered and can be connected to a TV USB interface, PC mainframe, power bank, or USB charger. The 60-inch cord provides flexibility for placement.
- Insert Remote Batteries: Open the battery compartment of the remote control and insert two AAA batteries (not included), observing correct polarity.

Image: Illustration of USB power connection and control methods.
5. Operating Instructions
5.1 Control Methods
The Ledagic Led Light Bar can be controlled using three methods:
- Remote Control: Use the included 24-button multifunction remote to adjust settings.
- Mobile App: Download and use the "LotusLamp X" app for comprehensive control.
- Line Control Switch: A button on the USB power port allows basic control.
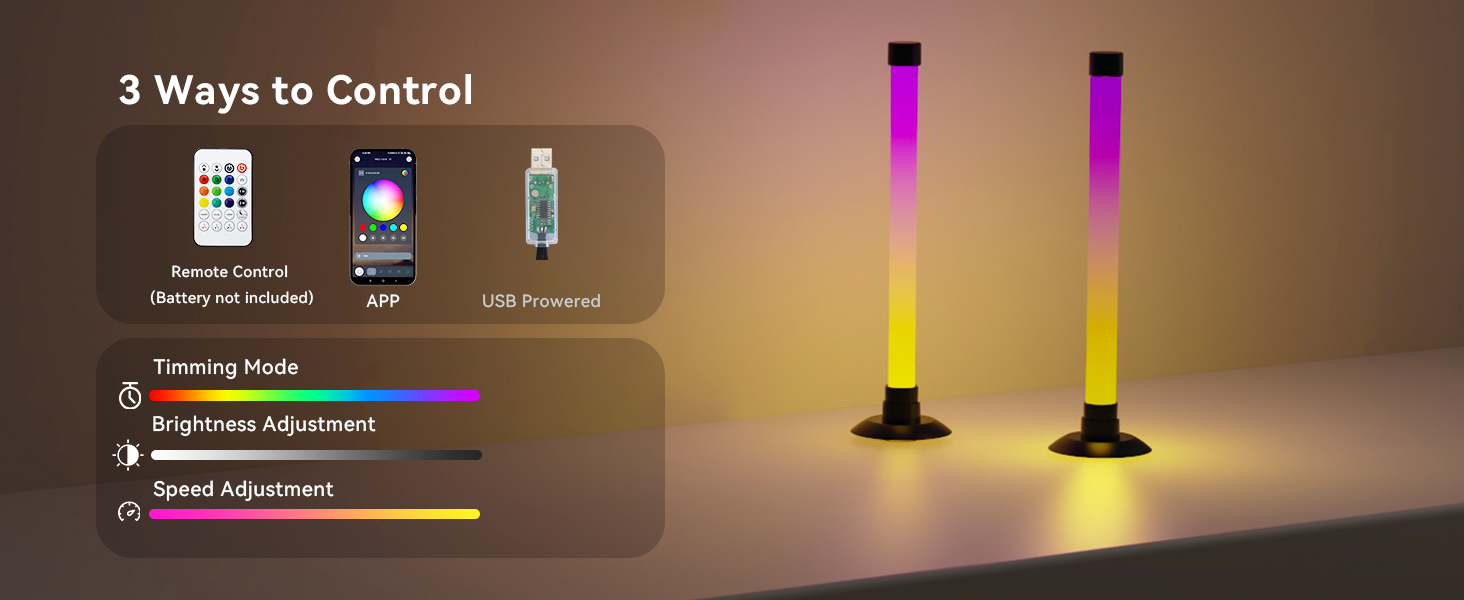
Image: Overview of the three control options for the light bars.
5.2 Basic Operation (Line Control Switch)
- Turn On: Short press the button on the USB power port.
- Adjust Mode: After turning on, short press the button to cycle through available lighting modes.
- Turn Off: Long press the button.
5.3 Remote Control & App Functions
The remote control and "LotusLamp X" app offer extensive features:
- Color Changing: Access 16 million colors and various IC+RGB & W effects. Switch between IC+RGB for dynamic atmospheres and white lighting for illumination.
- Brightness Adjustment: Adjust brightness from 1% to 100%.
- Music Sync: The built-in high-sensitivity music sensor allows lights to react to music, film, and game audio. This feature can use the phone's microphone, audio source within the phone, or the built-in microphone in the light's controller.
- Lighting Modes: Choose from 64+ patterns including strobe, illusion, jump, energy, gradient, running, chasing, and fluttering modes. Each mode can be applied to different scenes.
- Timer Function: Set schedules for automatic on/off times. Use as a light alarm clock to wake up or sleep with soft light.

Image: Brightness and color adjustment capabilities.

Image: Methods for music synchronization.

Image: Example of scheduled on/off function via the app.
6. Maintenance
- Cleaning: Wipe the light bars with a soft, dry cloth. Do not use abrasive cleaners or solvents.
- Storage: When not in use for extended periods, store the light bars in a cool, dry place.
- Power: Always disconnect power before cleaning or moving the light bars.
7. Troubleshooting
| Problem | Possible Cause | Solution |
|---|---|---|
| Light bars do not turn on. | No power or loose connection. | Ensure USB cable is securely connected to both light bars and a working USB power source. Check if the power source is active. |
| Remote control not working. | Dead batteries or obstruction. | Replace AAA batteries in the remote. Ensure there are no obstructions between the remote and the light bars. |
| App control issues. | App not connected or software glitch. | Ensure Bluetooth is enabled on your device and the app is connected to the light bars. Restart the app or your device. |
| Music sync not responsive. | Microphone sensitivity or audio source issue. | Adjust microphone sensitivity in the app. Ensure the audio source is clear and loud enough for detection. Check the selected music sync method in the app. |
8. Specifications
| Feature | Detail |
|---|---|
| Model Number | LedBar001-1 |
| Brand | Ledagic |
| Dimensions (each bar) | 3.6"D x 3.6"W x 12.8"H (9cm D x 9cm W x 32.6cm H) |
| Item Weight | 0.3 Pounds (approx. 4.8 ounces) |
| Light Source Type | LED (30 light sources) |
| Light Color | RGB (16 million colors), IC+RGB & W effects |
| Power Source | DC 5 Volts (USB Powered) |
| Control Methods | App Control ("LotusLamp X"), Remote Control, Line Control Switch |
| Special Features | Music Sync, Color Changing, Dimmable (1%-100%), Timer, Automatic On-Off |
| Material | Copper, Plastic |
| Indoor/Outdoor Usage | Indoor Only |
| Water Resistance Level | Not Water Resistant |

Image: Product dimensions and cable length.
9. Warranty and Support
Ledagic products undergo strict quality inspection. If you encounter any problems or have questions regarding your Ledagic Led Light Bar, please contact our customer support team. Our expert technical team is available to provide assistance and support.
Please refer to your purchase documentation for specific warranty terms and contact information.