1. Product Overview
This document provides instructions for the Generic replacement remote control, designed for exclusive compatibility with Okimat 2 New Gen Adjustable Bed Systems. The original remote model has been discontinued. This replacement is manufactured by OKIN, ensuring full compatibility and functionality with your existing Okimat 2 New Gen system.
It is crucial to verify your current remote and bed system against the images provided to ensure this is the correct replacement, as wireless bed remotes are not cross-compatible between different models.

Image 1.1: Remote Compatibility Overview. The image displays the discontinued gray remote on the left and three styles of the new replacement remotes (white and black) on the right. The text indicates that the gray remote is discontinued and users will receive one of the three new styles made by the same "Okin" manufacturer.
2. Setup and Pairing Instructions
2.1 Battery Installation
The remote requires AAA batteries for operation. Open the battery compartment on the back of the remote and insert the batteries, ensuring correct polarity (+/-). Close the compartment securely.
2.2 Pairing with Your Adjustable Bed
This replacement remote pairs with your Okimat 2 New Gen adjustable bed system via a specific button-press sequence. The original remote and this replacement both utilize a pairing button located on the back of the remote, above the battery compartment, rather than dipswitch pins.
- Ensure new AAA batteries are correctly installed in the remote.
- Locate the control box under your adjustable bed. This box will have a pairing button.
- Press and hold the pairing button on the control box under the bed.
- While holding the button on the control box, press and hold the pairing button on the back of your new remote (located above the battery compartment).
- Hold both buttons until the bed system responds (e.g., a light flashes on the control box, or the bed slightly moves), indicating successful pairing.
- Release both buttons. Test the remote's functionality.
If pairing is unsuccessful, repeat the steps. Ensure the remote and control box are within close proximity during the pairing process.
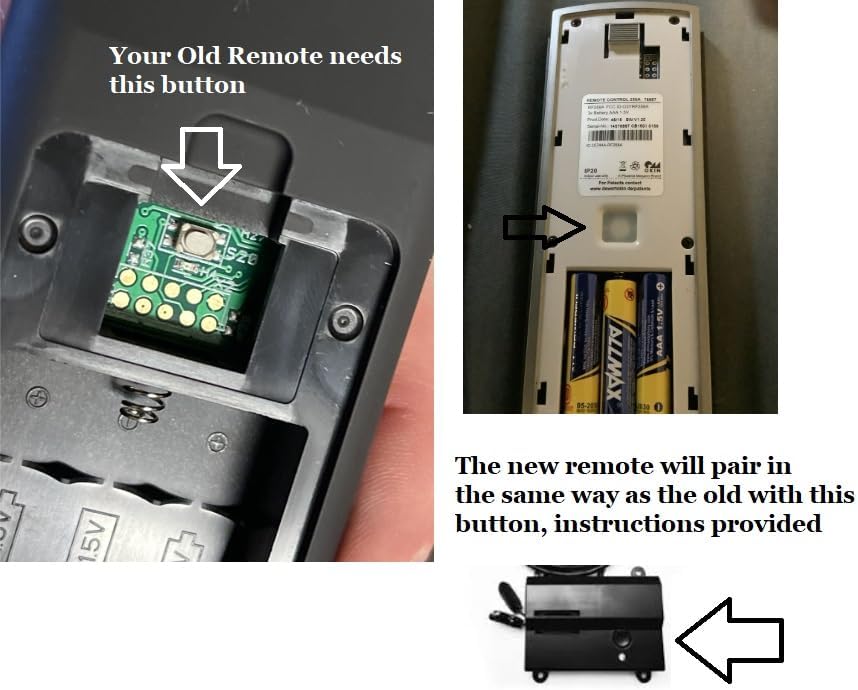
Image 2.1: Pairing Button Locations. This image shows a close-up of the pairing button on the back of an old remote (left), the pairing button on the back of a new remote (top right), and the control box under the bed with its pairing button (bottom right). The text confirms that the new remote pairs in the same way as the old one, using this button.
3. Operating the Remote Control
Once successfully paired, your remote control allows you to adjust the positions of your Okimat 2 New Gen adjustable bed. The specific button layout may vary slightly depending on the style of remote received (refer to Image 1.1), but common functions include:
- HEAD Up/Down: Adjusts the head section of the bed.
- FOOT Up/Down: Adjusts the foot section of the bed.
- FLAT: Returns the bed to a flat position.
- ZERO G (Zero Gravity): Activates a pre-programmed zero gravity position.
- MASSAGE: Controls the bed's massage functions (if equipped).
- TIMER/ALL OFF: May control massage timers or turn off all functions.
- PRESET POSITIONS (SET, TV/PC, LOUNGE, CUST): Allows saving and recalling custom or pre-defined bed positions.
Press and hold the desired button to move the bed section. Release the button when the desired position is reached.
4. Maintenance
4.1 Battery Replacement
When the remote's response becomes sluggish or it stops functioning, it is likely time to replace the AAA batteries. Follow the battery installation steps in Section 2.1.
4.2 Cleaning
To clean the remote, use a soft, dry cloth. For stubborn dirt, a slightly damp cloth with mild soap can be used, ensuring no moisture enters the remote's internal components. Do not use abrasive cleaners or solvents.
5. Troubleshooting
5.1 Remote Not Responding
- Check Batteries: Ensure batteries are correctly installed and not depleted. Replace if necessary.
- Line of Sight: While this remote uses infrared technology, ensure there are no obstructions between the remote and the bed's receiver (usually located in the control box under the bed).
- Re-pair Remote: If the remote stops responding after a power outage or prolonged disuse, attempt to re-pair it following the instructions in Section 2.2.
5.2 Bed Not Moving Smoothly
- Check for Obstructions: Ensure there are no objects preventing the bed's movement.
- Power Supply: Verify the bed is properly plugged into a working power outlet.
6. Specifications
- Brand: Generic (Manufacturer: OKIN)
- Compatible Devices: Okimat 2 New Gen Adjustable Bed
- Connectivity Technology: Infrared
- Color: Black (or White, depending on style received)
- Battery Type: AAA
- Item Weight: Approximately 0.3 Ounces
- Button Quantity: Varies by style (typically 2 to 10+ buttons)
- Special Feature: Designed for Okimat 2 New Gen systems requiring a pairing button on the remote back.
7. Warranty and Support
7.1 Warranty Information
This product comes with a 30-day manufacturer warranty and a 1-year limited warranty from bedremotes.com.
7.2 Support
For further assistance or warranty claims, please contact the vendor or visit bedremotes.com.

Image 7.1: BedRemotes.com Logo. This image displays the logo for BedRemotes.com, a resource for bed remote controls and support.


