KRPTQJoo Universal Replacement Remote for Akai Air Conditioners
Instruction Manual for Akai Air Conditioner Replacement Remote Control
Model: Universal Replacement Remote for Akai Air Conditioners
Introduction
This manual provides comprehensive instructions for the setup, operation, and maintenance of your KRPTQJoo replacement remote control, designed for various Akai Multi Split Pump Air Conditioner models. This remote serves as a direct replacement and requires no complex pairing or programming. Please note that some advanced functions may not be available if your specific air conditioner model does not support them.
Product Overview
The remote control features a clear LCD display and intuitively placed buttons for easy operation of your air conditioner.
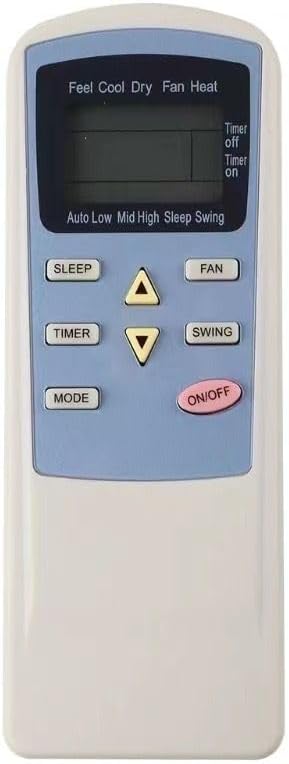
Figure 1: Front view of the remote control, highlighting the display and primary function buttons such as ON/OFF, Mode, Timer, Sleep, Fan, and Swing.

Figure 2: Front and back view of the remote control. The back panel includes the battery compartment cover.
Key Buttons and Display Indicators:
- ON/OFF: Powers the air conditioner on or off.
- MODE: Cycles through operating modes (Cool, Dry, Fan, Heat).
- SLEEP: Activates or deactivates sleep mode for energy saving and quiet operation.
- TIMER: Sets the timer for automatic power on/off.
- FAN: Adjusts fan speed (Auto, Low, Mid, High).
- SWING: Controls the louver swing function.
- Temperature Arrows (Up/Down): Adjusts the desired temperature setting.
- LCD Display: Shows current settings, temperature, mode, and timer status. Displays temperature in Celsius only.
Setup
Battery Installation:
- Locate the battery compartment on the back of the remote control.
- Slide the battery cover downwards to open.
- Insert two (2) AAA batteries, ensuring the positive (+) and negative (-) terminals align correctly with the markings inside the compartment.
- Slide the battery cover back into place until it clicks securely.
Note: This remote control does not require any pairing or programming. It is ready for use immediately after battery installation. Ensure there are no obstructions between the remote and the air conditioner's receiver.
Operating Instructions
Basic Operation:
- Power On/Off: Press the ON/OFF button once to turn the air conditioner on or off.
- Mode Selection: Press the MODE button repeatedly to cycle through available operating modes:
- Cool: For cooling the room.
- Dry: For dehumidification.
- Fan: For air circulation without heating or cooling.
- Heat: For heating the room.
- Temperature Adjustment: Use the Up (▲) and Down (▼) arrow buttons to increase or decrease the desired temperature. The display shows temperature in Celsius.
Advanced Functions:
- Fan Speed Control: Press the FAN button to select fan speed: Auto, Low, Mid, or High.
- Swing Function: Press the SWING button to activate or deactivate the automatic louver swing, which distributes air evenly.
- Sleep Mode: Press the SLEEP button to enter sleep mode, which adjusts temperature and fan speed for comfortable sleep and reduced energy consumption.
- Timer Setting: Press the TIMER button to set the automatic power-on or power-off time. Refer to your air conditioner's original manual for specific timer programming steps, as this remote typically sends the timer signal, but the AC unit processes the logic.
Important Note: The functionality of certain buttons (e.g., specific modes, advanced timer settings, or unique features) depends entirely on the capabilities of your Akai air conditioner model. If a button does not elicit a response, your air conditioner may not support that particular feature. Always refer to your air conditioner's original user manual for detailed information on its supported functions.
Maintenance
Cleaning the Remote:
To clean the remote control, gently wipe its surface with a soft, dry cloth. For stubborn dirt, a slightly damp cloth can be used, followed by immediate drying. Do not use abrasive cleaners, solvents, or chemical sprays, as these can damage the remote's surface or internal components.
Battery Replacement:
Replace batteries when the remote's response becomes sluggish or the display fades. Always replace both batteries simultaneously with new AAA batteries. Remove batteries if the remote will not be used for an extended period to prevent leakage and damage.
Troubleshooting
- Remote not responding:
- Check if batteries are inserted correctly with correct polarity.
- Replace old batteries with new ones.
- Ensure there are no obstructions between the remote's infrared emitter and the air conditioner's receiver.
- Confirm you are within the effective operating range of the air conditioner.
- Certain functions not working:
- This remote is a replacement and may not support all features present on your original air conditioner remote if your specific Akai model does not have those functions.
- Consult your air conditioner's original manual to verify supported features.
Specifications
| Product Type | Replacement IR Remote Control |
| Brand | KRPTQJoo |
| Compatible Devices | Various Akai Multi Split Pump Air Conditioner models (e.g., TEM-26CHSAAU, TEM-35CHSAKA, TEM-50CHSAKA, TEM-70CHSAAK, etc.) |
| Power Source | 2 x AAA Batteries (not included) |
| Special Features | Ergonomic design, Temperature display in Celsius only |
| Material | ABS Plastic |
Warranty and Support
This product is backed by the KRPTQJoo Guarantee. As a small, honest seller, we are committed to providing the best possible support for our customers.
If you encounter any issues or have questions regarding your remote control, please contact us. We aim to reply to all inquiries within 12 hours. Please confirm whether the buttons and functions meet your needs upon receipt.
For specific warranty terms and conditions, please refer to the product listing or contact the seller directly through the platform where the purchase was made.
Ask a question about this manual
Ask about setup, troubleshooting, compatibility, parts, safety, or missing instructions. Manuals+ will review the question and use this page’s manual context to help answer it.