Introduction
This manual provides detailed instructions for setting up, operating, and maintaining your Camgeet USB C HDMI Dual Monitor KVM Switch. This device allows you to share two monitors and multiple USB devices between a laptop and a desktop computer, supporting resolutions up to 4K@60Hz.
Package Contents
Please verify that all items are present in your package:
- 1x Camgeet USB-C+HDMI KVM Switch
- 1x USB-C Cable (0.8m)
- 1x USB 3.0 Cable (1.5m)
- 1x Wired Remote (1.5m)
- 1x 12V Power Adapter
- 1x User Manual

Figure 1: Package Contents
Setup Instructions
Follow these steps to connect your KVM switch to your computers and monitors.
1. Power Connection
Connect the provided 12V power adapter to the DC/12V port on the KVM switch and plug it into a power outlet. This ensures stable operation. The KVM switch also supports power delivery (PD) via the USB-C IN port for charging your laptop, but the 12V adapter is recommended for KVM stability.

Figure 2: Powering the KVM Switch and Laptop
2. Monitor Connections
Connect your two monitors to the KVM switch using HDMI cables. Use the ports labeled OUT A and OUT B.
3. Computer Connections
Connect your desktop PC and laptop to the KVM switch as follows:
- Desktop PC (PC 2):
- Connect two HDMI cables from your desktop PC's graphics card to the KVM switch ports labeled INPUT A and INPUT B.
- Connect the included USB 3.0 A-B cable from your desktop PC's USB port to the KVM switch port labeled PC 2 IN (USB-B).
- Laptop (PC 1):
- Connect the included USB-C cable from your laptop's USB-C port to the KVM switch port labeled USB-C IN (PD). Ensure your laptop's USB-C port supports DisplayPort Alternate Mode (DP Alt Mode) for video, data, and power delivery.
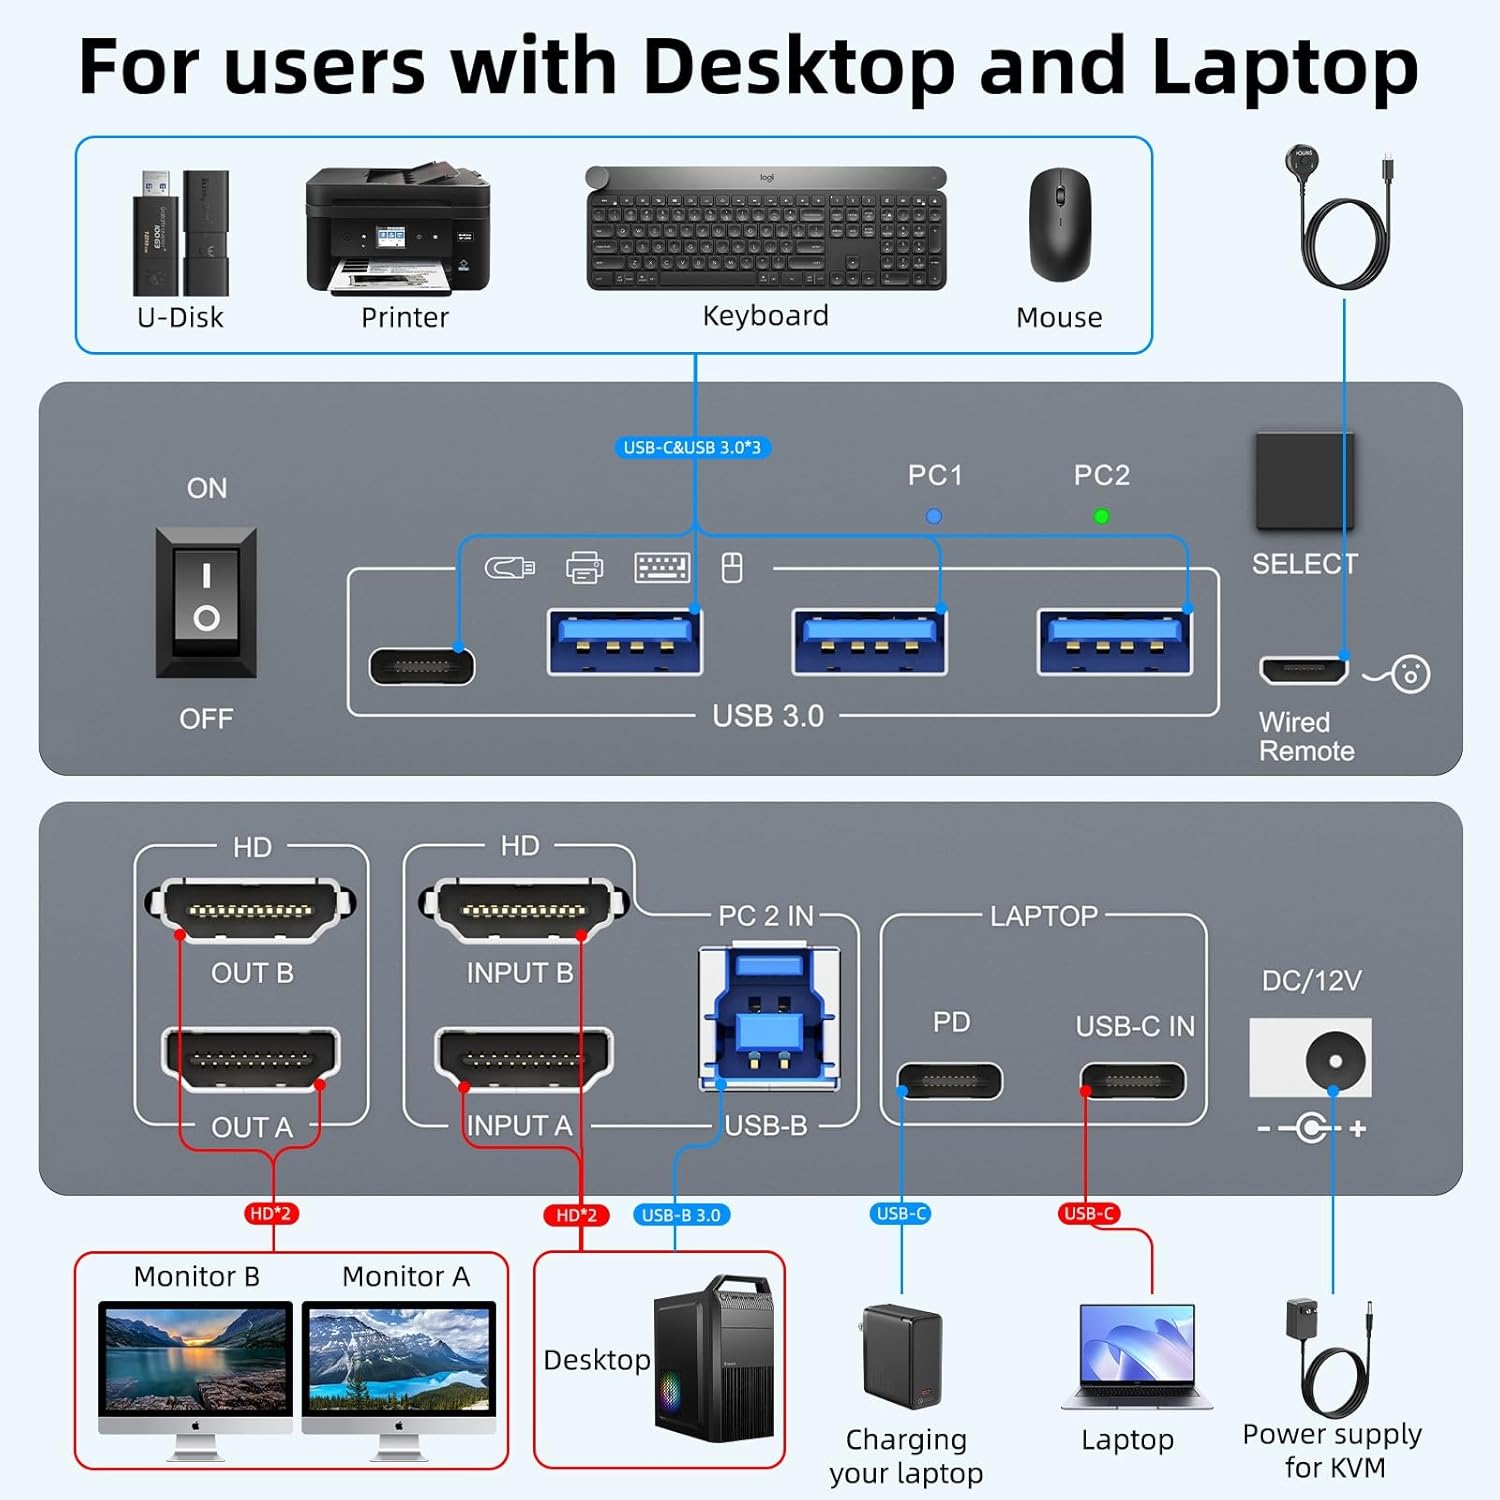
Figure 3: KVM Switch Connection Diagram
4. Peripheral Connections
Connect your USB peripherals (keyboard, mouse, printer, USB drive, etc.) to the four USB 3.0 ports on the front of the KVM switch.

Figure 4: Connecting USB Peripherals
Operating Instructions
Switching Between Computers
You can switch between the connected desktop PC (PC 2) and laptop (PC 1) using two methods:
- Front Panel Button: Press the SELECT button on the front of the KVM switch. The LED indicator will show which computer is currently active (PC1 or PC2).
- Wired Remote: Use the included wired remote control. Press the button on the remote to switch between computers. This is convenient for placing the KVM switch out of sight.

Figure 5: Switching Methods
Display Modes
The KVM switch supports both extended and mirror display modes for your two monitors. You can configure these settings within your operating system's display settings.
- Windows: Supports extended mode (displaying different content on each monitor) and mirror mode (displaying the same content on both monitors).
- Mac OS: Due to Multi-Stream Transport (MST) limitations on Mac M1/M2 chips, external monitors will display the same content (mirror mode) when connected via this KVM switch.

Figure 6: Supported Display Modes
USB 3.0 Data Transfer
The KVM switch features USB 3.0 ports, enabling ultra-fast data transfer rates of up to 5Gb/s for connected peripherals.

Figure 7: USB 3.0 High-Speed Transfer
Maintenance
To ensure the longevity and optimal performance of your KVM switch, follow these simple maintenance guidelines:
- Keep the device in a clean, dry environment, away from excessive dust and moisture.
- Avoid placing heavy objects on top of the KVM switch.
- Clean the exterior with a soft, dry cloth. Do not use liquid cleaners or aerosols.
- Ensure adequate ventilation around the device to prevent overheating.
Troubleshooting
If you encounter issues with your KVM switch, please refer to the following common problems and solutions:
No Display on Monitors
- Check all cable connections: Ensure all HDMI and USB cables are securely connected to both the KVM switch and your computers/monitors.
- Verify power: Confirm the 12V power adapter is correctly connected and the KVM switch is receiving power.
- Source selection: Make sure the KVM switch is set to the correct input (PC1 or PC2) for the computer you are trying to use.
- Laptop USB-C compatibility: For laptop connections, ensure your USB-C port supports DisplayPort Alternate Mode (DP Alt Mode) for video output. Not all USB-C ports support this functionality.

Figure 8: USB-C Port Compatibility Check
USB Peripherals Not Responding
- Check USB cables: Ensure the USB 3.0 A-B cable (for desktop) and USB-C cable (for laptop) are securely connected between the KVM switch and your computers.
- Try different USB ports: Connect your peripheral to a different USB 3.0 port on the KVM switch.
- Direct connection test: Connect the peripheral directly to your computer to confirm it functions independently of the KVM switch.
Mac M1/M2 Display Limitations
Mac M1 and M2 chip-based devices do not support Multi-Stream Transport (MST). This means that when connected to this KVM switch, both external monitors will display the same content (mirror mode), rather than extending the desktop across two unique displays.
Specifications
| Feature | Detail |
|---|---|
| Brand | camgeet |
| Model | kvm switch 2 monitores (B0DXBY14R9) |
| Connectivity Protocol | USB-C and HDMI |
| Video Resolution | Up to 4K@60Hz 4:4:4, 2K@120Hz (HDMI 2.0 and DP 1.4a compliant) |
| USB Data Transfer Speed | Up to 5Gb/s (USB 3.0) |
| USB Ports | 4x USB 3.0 ports for peripherals |
| Power Delivery (PD) | 80W via USB-C IN port |
| Power Input | 12V/2A DC adapter (included) |
| Switching Method | Front panel button, Wired remote control |
| Operating System Compatibility | Windows, Mac OS, Linux, Chrome OS (driver-free) |
| Material | Metal |
| Item Dimensions (L x W x H) | 4.72 x 2.56 x 1.34 inches |
| Item Weight | 250 Grams |
| International Protection Rating | IP54 |
| Certification | CE |

Figure 9: 4K Ultra HD Visual Effect
Warranty and Support
Camgeet provides comprehensive support for your KVM switch:
- Warranty: 1-year warranty from the date of purchase.
- Replacement Policy: 1-month free replacement for defective units.
- Technical Support: Lifetime technical support is available.
For any issues or inquiries, please contact Camgeet customer service via email. You will receive a satisfactory solution.