1. Introduction
Thank you for choosing the Generic Monitor Arms TV Bracket. This versatile mounting solution is designed to securely hold 42-80 inch LED screen displays, offering flexible installation options for both ceiling and wall mounting. With features like 360-degree rotation, adjustable tilt, and telescopic height adjustment, this bracket provides optimal viewing angles for various environments, including offices, living rooms, balconies, dining rooms, and kitchens. Please read this manual thoroughly before installation and operation to ensure safe and correct usage.

Image 1.1: The Monitor Arms TV Bracket installed with a television.
2. Safety Information
Always prioritize safety during installation and use. Failure to follow these instructions could result in property damage or personal injury.
- Weight Capacity: This bracket is designed to support TVs up to 80kg (176 lbs). Do not exceed this weight limit.
- Wall/Ceiling Integrity: Ensure that the wall or ceiling structure where the bracket will be mounted is capable of safely supporting the combined weight of the mount and the television. If unsure, consult a qualified professional.
- Proper Tools: Use appropriate tools for installation as specified in the installation guide.
- Professional Installation: If you are not confident in performing the installation yourself, seek assistance from a professional installer.
- Secure Fasteners: Ensure all screws and fasteners are tightened securely before mounting the TV. Periodically check for tightness.
- Cable Management: Route all cables safely to prevent tripping hazards or damage to the cables.
3. Package Contents
Please verify that all components are present and undamaged before beginning installation. If any parts are missing or damaged, contact your retailer immediately.
- 1 x TV Ceiling Mount Assembly
- 1 x User Manual (this document)
- 1 x Mounting Hardware Kit (includes various screws, anchors, and washers)
4. Specifications
| Feature | Specification |
|---|---|
| Material | Cold Rolled Steel Plate |
| Color | Black |
| Compatible TV Size | 42-80 inches |
| Maximum Product Weight Capacity | 80 kg (176 lbs) |
| Pitch Angle Adjustment | 0° to 90° |
| Rotation (Left and Right) | 360° |
| Installation Method | Ceiling / Wall Mount |
| Telescopic Length | 60-105 cm (23.6-41.3 inches) |
| Installation Hole Distance (VESA) | Within 600x400 MM |
| Brand | Generic |
| Country of Origin | USA |
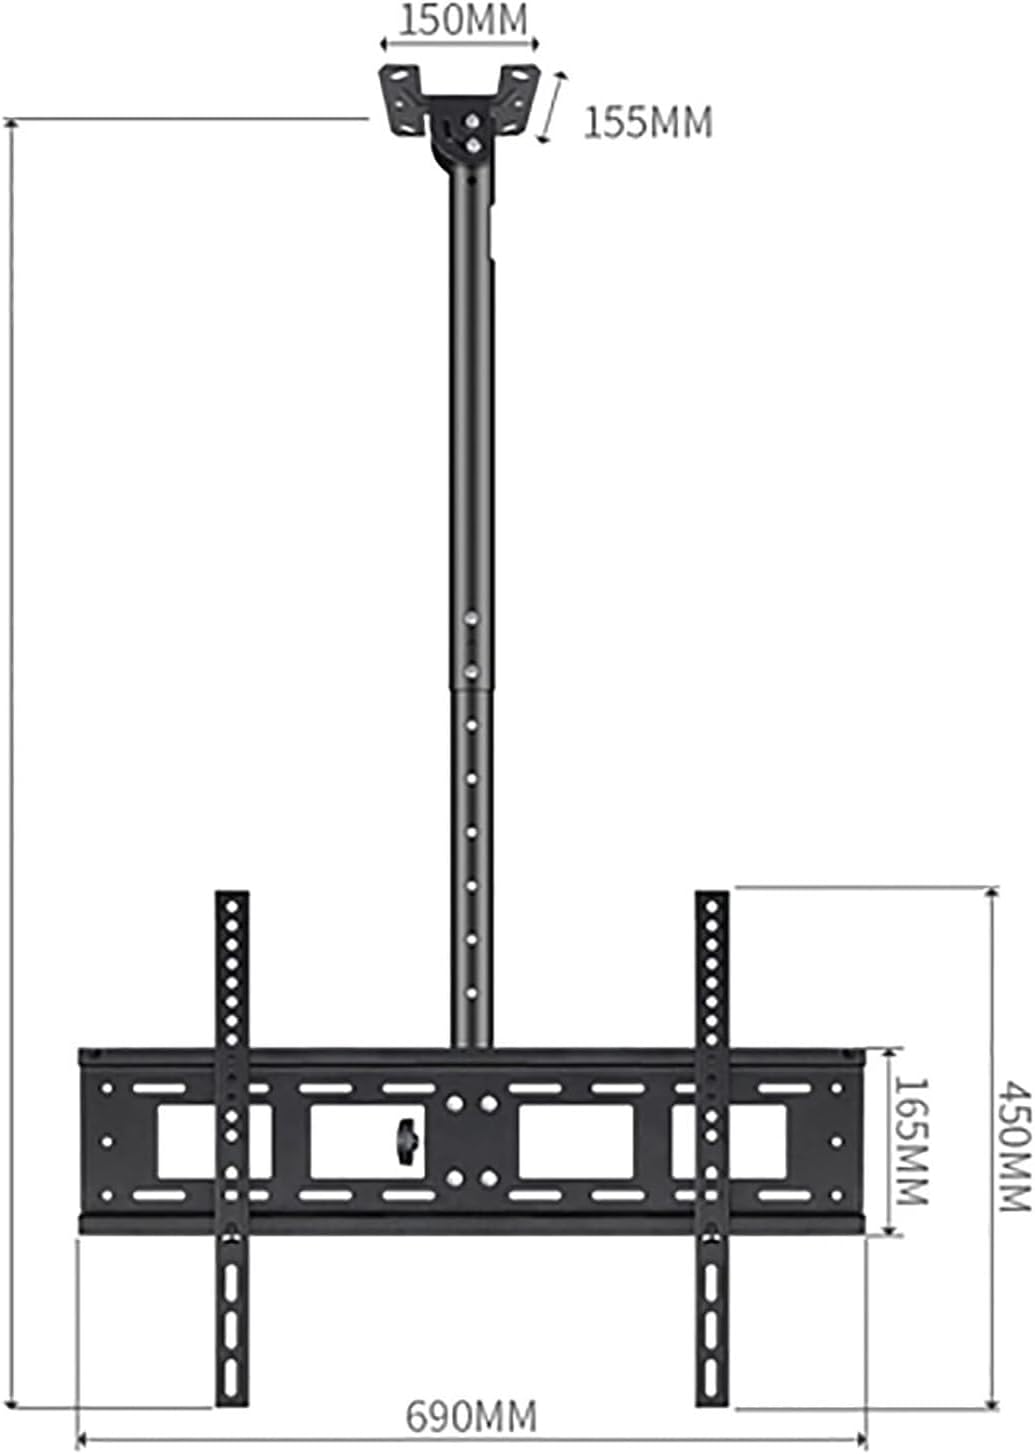
Image 4.1: Detailed dimensions of the TV mount components.
5. Setup & Installation
This TV mount can be installed on either a ceiling or a wall. Choose the appropriate method based on your viewing needs and structural capabilities. Always ensure the mounting surface is strong enough to support the combined weight of the mount and your TV.
5.1 Pre-Installation Checks
- Identify the exact mounting location.
- Locate studs or solid blocking within the wall/ceiling for secure attachment. Do not mount directly into drywall or plaster without proper anchors.
- Ensure no electrical wires, water pipes, or other hazards are present in the drilling path.
- Confirm your TV's VESA pattern (mounting hole distance) is within 600x400 MM.
5.2 Choosing Installation Mode: Ceiling vs. Wall
The bracket offers two primary installation modes. The top plate can be oriented for either ceiling or wall attachment.

Image 5.1: Illustration of the bracket's adaptability for ceiling or wall installation.
5.3 General Installation Steps (Refer to included hardware kit for specific fasteners)
- Assemble the Pole: Connect the telescopic pole sections if they are not pre-assembled.
- Attach Mounting Plate: Secure the top mounting plate to the pole, ensuring it is oriented correctly for either ceiling or wall installation.
- Mark Drilling Points: Hold the assembled mount against the desired ceiling or wall location. Use a pencil to mark the drilling points through the holes in the mounting plate. Use a level to ensure accuracy.
- Drill Pilot Holes: Drill pilot holes at the marked locations using a drill bit appropriate for your wall/ceiling material and the provided anchors/screws.
- Secure Mount: Attach the mounting plate firmly to the ceiling or wall using the provided screws and anchors from the Mounting Hardware Kit. Ensure it is securely fastened.
- Attach TV Brackets to TV: Secure the TV mounting arms to the back of your television using the appropriate screws that fit your TV's VESA pattern. Ensure they are centered and level.
- Hang TV: Carefully lift the TV and hook the TV mounting arms onto the main bracket assembly. Secure the TV to the mount using the locking mechanisms or safety screws provided.
- Adjust and Verify: Once the TV is mounted, make any necessary height, tilt, or rotation adjustments (see Section 6). Double-check all connections and fasteners for security.
6. Operation
The Monitor Arms TV Bracket offers several adjustment features to optimize your viewing experience.
6.1 Height Adjustment (Telescopic Length)
The pole features a telescopic design, allowing you to adjust the height of your TV from 60cm to 105cm. Loosen the locking mechanism on the pole, extend or retract to the desired height, and then securely tighten the locking mechanism to fix the position.

Image 6.1: Illustration of the height adjustment feature.
6.2 Pitch Angle Adjustment (Tilt)
The TV can be tilted from 0° to 90° to reduce glare or achieve a better viewing angle. Locate the tilt adjustment knobs or screws on the bracket, loosen them slightly, adjust the TV to the desired angle, and then re-tighten to secure.
6.3 360° Free Rotation
The bracket allows for a full 360° rotation of the TV, enabling you to easily change the screen orientation from landscape to portrait or adjust for different viewing areas within a room. Simply rotate the TV to the desired position.
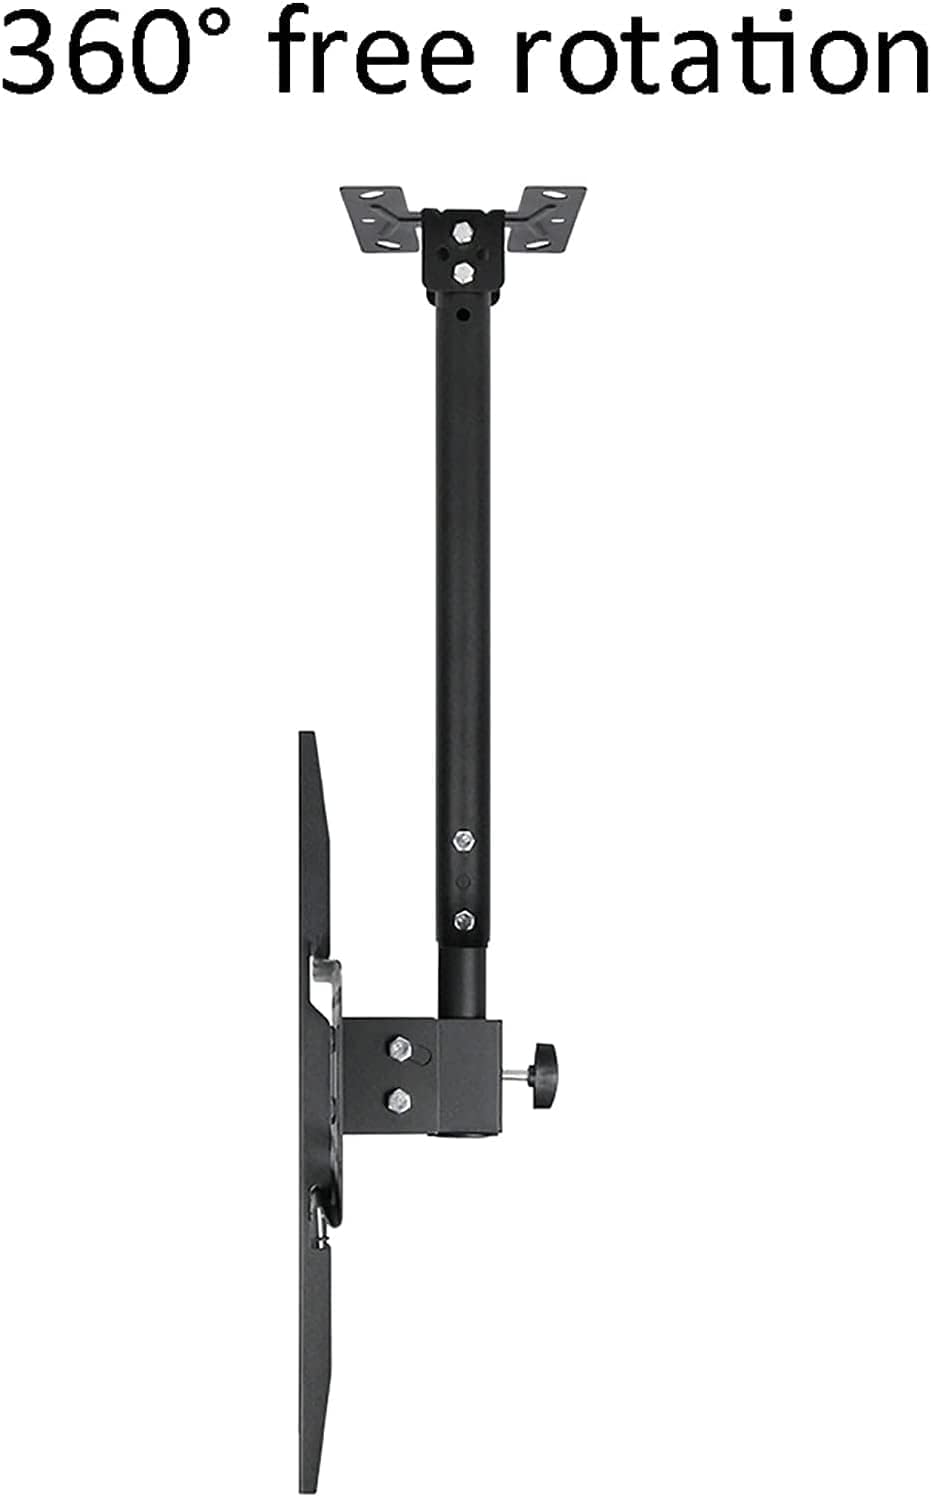
Image 6.2: Illustration of the 360-degree rotation capability.
7. Maintenance
Regular maintenance will help ensure the longevity and safe operation of your TV mount.
- Cleaning: Wipe the mount with a soft, dry cloth. Do not use abrasive cleaners or solvents.
- Periodic Checks: Every 3-6 months, inspect all screws and fasteners to ensure they remain tight. Re-tighten if necessary.
- Movement Check: Verify that all adjustable parts (tilt, rotation, height) move smoothly and can be securely locked into position.
8. Troubleshooting
If you encounter issues with your TV mount, refer to the following common problems and solutions:
- TV is not level: Ensure the mounting plate on the wall/ceiling is level. Adjust the TV mounting arms on the back of the TV to compensate if needed, or re-level the main mount.
- Mount feels unstable: Immediately remove the TV. Re-check all fasteners on the wall/ceiling and on the mount itself. Ensure you have mounted into a solid structural element (stud, concrete) and not just drywall. If unsure, consult a professional.
- Adjustments are stiff: Check for any obstructions. Ensure locking mechanisms are fully disengaged before attempting to adjust. Do not force movement.
- Missing parts: Refer to Section 3, "Package Contents." If parts are missing upon unboxing, contact your retailer for assistance.
9. Warranty & Support
Specific warranty details for this product are not provided within the available product information. For warranty claims, technical support, or further assistance, please contact the retailer or manufacturer directly. Keep your purchase receipt as proof of purchase.


