1. Introduction
This manual provides essential information for the safe and efficient operation, installation, and maintenance of your WinZo Luxury Smart Toilet, Model SM8009B-1. Please read all instructions carefully before installation and use, and retain this manual for future reference.
Safety Information
- Ensure the toilet is connected to a 110V power outlet with proper grounding.
- Do not immerse the product in water or spray water directly onto electrical components.
- Disconnect power before performing any maintenance or cleaning.
- Keep out of reach of children unless supervised.
- In case of power outage, manual flushing is available (requires 9V batteries, not included).
2. Product Overview
The WinZo Luxury Smart Toilet SM8009B-1 is a tankless, one-piece toilet designed for enhanced hygiene and comfort. It features an elongated heated bidet seat, automatic flushing, an LED display, multiple wash modes, and a starry night light system.
Key Features:
- Automatic Functions: Auto flush, auto open/close seat with foot kick sensor.
- Hygiene: Multiple wash modes (hip wash, female wash, mobile wash), self-cleaning nozzles with UV-C sterilization.
- Comfort: Elongated heated seat with adjustable temperature, warm air drying with adjustable temperature and wind settings.
- Visibility: Integrated starry night light system for subtle illumination.
- Control: Remote control and convenient side buttons for operation.

Image: WinZo Luxury Smart Toilet SM8009B-1.
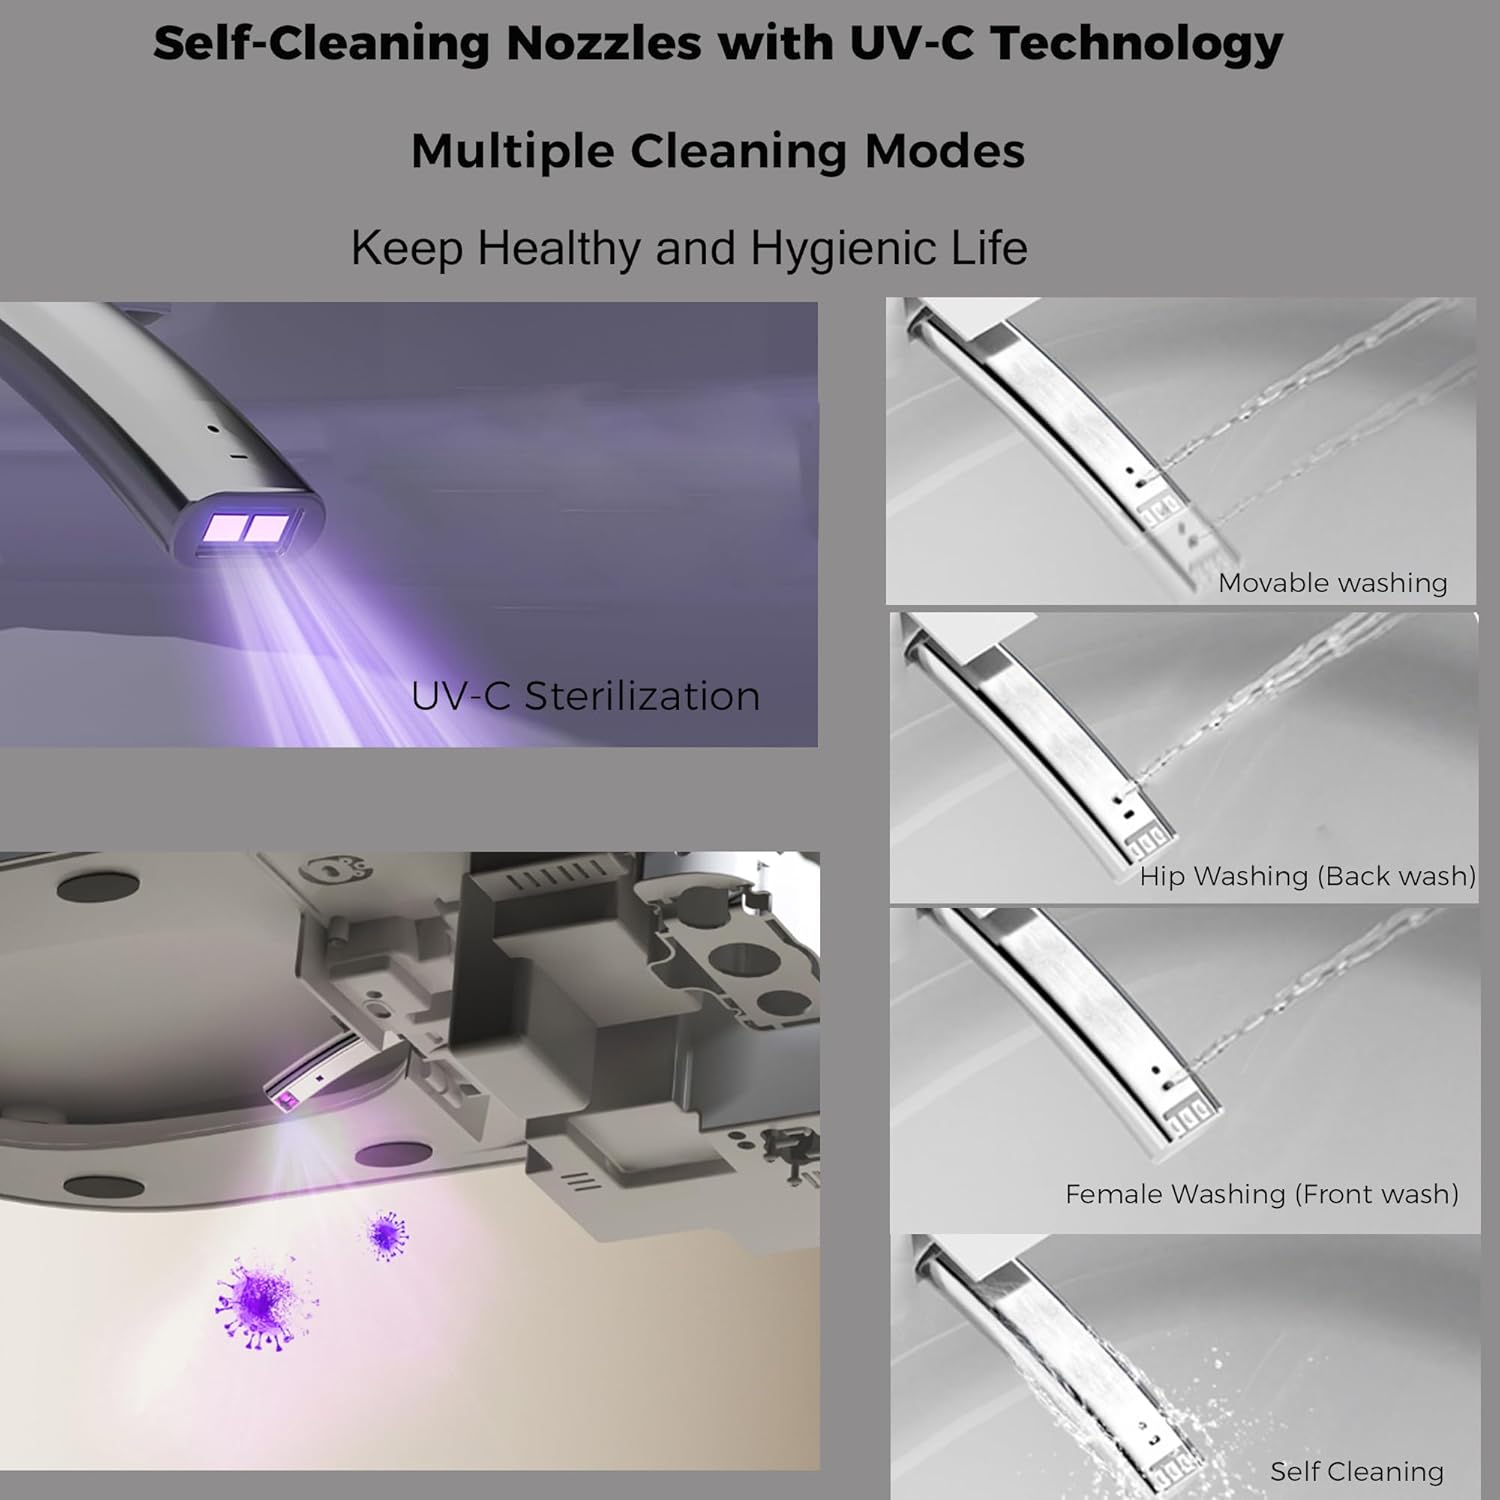
Image: Starry Night Light System detail.

Image: Starry Night Light band.

Image: Comfort Heated Seat and Instant Warm Air Dryer features.
3. Setup & Installation
Pre-Installation Requirements:
- Standard 12-inch rough-in.
- 110V power outlet required near the installation area.
- Water supply connection.
- Ensure adequate space for the toilet dimensions (28.25"D x 15.25"W x 20.5"H).
Included Components:
- Smart Toilet Unit
- Angle Valve
- Installation Hardware
- User Manual (this document)
- Wax Ring
Installation Steps:
- Prepare the Area: Turn off the water supply and remove the old toilet if applicable. Clean the flange area.
- Install Wax Ring: Place the provided wax ring onto the floor flange.
- Position the Toilet: Carefully align the toilet with the floor bolts and lower it into place. Ensure a secure fit.
- Secure the Toilet: Install the provided installation hardware to firmly secure the toilet to the floor. Do not overtighten.
- Connect Water Supply: Connect the angle valve to the water supply line and then connect the toilet to the angle valve. Ensure all connections are tight to prevent leaks.
- Connect Power: Plug the toilet's power cord into a grounded 110V electrical outlet.
- Test Functions: Turn on the water supply and check for leaks. Test all toilet functions as described in the operating instructions.

Image: Smart Toilet installed with power connection.
4. Operating Instructions
Automatic Functions:
- Auto Open: The seat lid automatically opens when a user approaches the toilet.
- Foot Kick Sensor: A sensor at the base allows for hands-free opening of the seat.
- Auto Close & Flush: The seat lid automatically closes and flushes after use.

Image: Auto Open, Soft Close, Side Button, and Foot Kick features.

Image: Auto Open / Foot Kick Operation sequence.
Wash Modes:
The toilet offers multiple wash modes for personalized cleansing. These can be activated via the remote control or side buttons.
- Hip Wash: Standard posterior cleansing.
- Female Wash: Gentle anterior cleansing.
- Mobile Wash: Oscillating nozzle for wider cleaning area.
- Adjustable Water Temperature: Customize water temperature for comfort.

Image: Self-Cleaning Nozzles with UV-C Technology and Multiple Cleaning Modes.
Comfort Features:
- Heated Seat: Adjustable temperature settings for the seat.
- Warm Air Dryer: Adjustable temperature and wind settings for drying after washing.
- Starry Night Light: Provides soft illumination for nighttime use. Can be toggled via side buttons.

Image: Heated seat temperature levels.

Image: Night Light feature.
Controls:
The toilet can be operated using the included remote control or the side buttons located on the unit.

Image: Side button controls for various functions.
Video Demonstrations:
Video: Demonstration of automatic lid opening and closing.
Video: Comprehensive feature overview of the WinZo Smart Toilet.
5. Maintenance
Cleaning:
- Always disconnect power before cleaning.
- Use a soft, damp cloth and mild, non-abrasive cleaner for exterior surfaces.
- Do not use harsh chemicals or abrasive pads, as they may damage the finish.
- The nozzles are self-cleaning and also feature UV-C sterilization for enhanced hygiene.

Image: UV-C Sterilization process.
Filter System:
The toilet incorporates a triple-filter system. Regular inspection and cleaning or replacement of filters may be required to maintain optimal performance. Refer to the full product manual for detailed filter maintenance instructions.
6. Troubleshooting
- No Power: Check if the power cord is securely plugged into a grounded 110V outlet. Verify the circuit breaker.
- No Water Flow: Ensure the water supply valve is fully open. Check for kinks in the water supply line.
- Auto Flush Not Working: Confirm the toilet is powered. If in a power outage, use manual flush.
- Seat Not Heating: Check power connection. Ensure heated seat function is activated via remote or side buttons.
- Manual Flush During Power Outage: Insert 9V batteries (not included) into the designated compartment for emergency manual flushing.
For issues not listed here, please contact WinZo customer support.
7. Specifications
| Model Number | SM8009B-1 |
| Color | White-ADA Chair Height |
| Product Dimensions | 28.25"D x 15.25"W x 20.5"H |
| Material | Ceramic, Plastic |
| Item Weight | 98 Pounds |
| Installation Type | Floor Mounted |
| Shape | Oval |
| Seat Material Type | Plastic |
| Rough-in | 12 inches |
| Seat Height | 17 inches (Comfort Height) |
| Power Requirement | 110V AC |

Image: Product Dimensions Diagram.
8. Warranty & Support
Warranty Information:
This product comes with a manufacturer's warranty. Please refer to the warranty card included with your purchase for specific terms, conditions, and duration. Keep your proof of purchase for warranty claims.
Customer Support:
For technical assistance, replacement parts, or any questions regarding your WinZo Luxury Smart Toilet, please contact WinZo customer support. Contact details can typically be found on the WinZo website or on the packaging materials.