1. Introduction
This manual provides detailed instructions for the safe and effective use of your Plkm GPS Wireless Dog Fence System. Please read this manual thoroughly before operating the device to ensure proper setup and functionality. This system is designed to create a safe, adjustable boundary for your pet using advanced GPS technology.
Key Features:
- Wireless GPS Positioning Technology: Utilizes GPS for stable and precise boundary creation, minimizing signal interference.
- Adjustable Warning Intensity: Customizable sound (on/off), vibration (0-3 levels), and electric shock (0-3 levels) to suit different dog temperaments and sizes.
- Adjustable Control Range: Boundary radius can be set from 48ft to 3540ft, with 36ft increments.
- Wireless Charging & 100% Waterproof: Features a fully sealed design with wireless charging, ensuring durability and water resistance for various environments.
- Easy to Use and Portable: Operates with simple physical buttons, no app or Wi-Fi required, making it ideal for travel.
2. Package Contents
Please verify that all items listed below are included in your package:
- GPS Fence Collar (Receiver)
- USB Charger
- USB Charge Cable
- Wireless Charger Base
- Conductive Poles (2)
- Test Light
- Boundary Flags (Optional, for visual training)

Image 2.1: Package Contents. This image displays all components included with the Plkm GPS Wireless Dog Fence System, such as the collar, charging accessories, and training tools.
3. Setup Instructions
Follow these steps to set up your Plkm GPS Wireless Dog Fence System. It typically takes 1-2 minutes to acquire a satellite signal.
- Charge the Device: Before first use, fully charge the collar receiver using the provided wireless charger. Place the collar onto the wireless charging base. The battery indicator on the display will show charging status.
- Power On: Press the 'P' key to turn on the device.
- Set Distance (Boundary Radius):
- Use the up and down keys to enter the DISTANCE menu.
- Long press the 'M' key. The distance value will begin flashing.
- Use the up and down keys to adjust the radius from 48ft to 3540ft. Each adjustment changes the radius by 36ft.
- Press 'M' again to confirm the setting.
- Adjust Beep (Sound) Intensity:
- Use the up and down keys to enter the BEEP menu.
- Briefly press the 'M' key. The BEEP value will flash.
- Use the up and down keys to adjust it (0-1, where 0 is off and 1 is on).
- Press 'M' again to confirm.
- Adjust Vibration Intensity:
- Use the up and down keys to enter the VIBRATION menu.
- Briefly press the 'M' key. The vibration value will flash.
- Use the up and down keys to adjust it (0-3, where 0 is off and 3 is highest intensity).
- Press 'M' again to confirm.
- Adjust Shock Intensity:
- Use the up and down keys to enter the SHOCK menu.
- Briefly press the 'M' key. The shock value will flash.
- Use the up and down keys to adjust it (0-3, where 0 is off and 3 is highest intensity).
- Press 'M' again to confirm.
- Acquire GPS Signal: Once powered on and settings are configured, the device will automatically search for a GPS signal. Ensure the device has a clear view of the sky for optimal signal acquisition. The signal strength indicator on the display will show GPS connectivity.
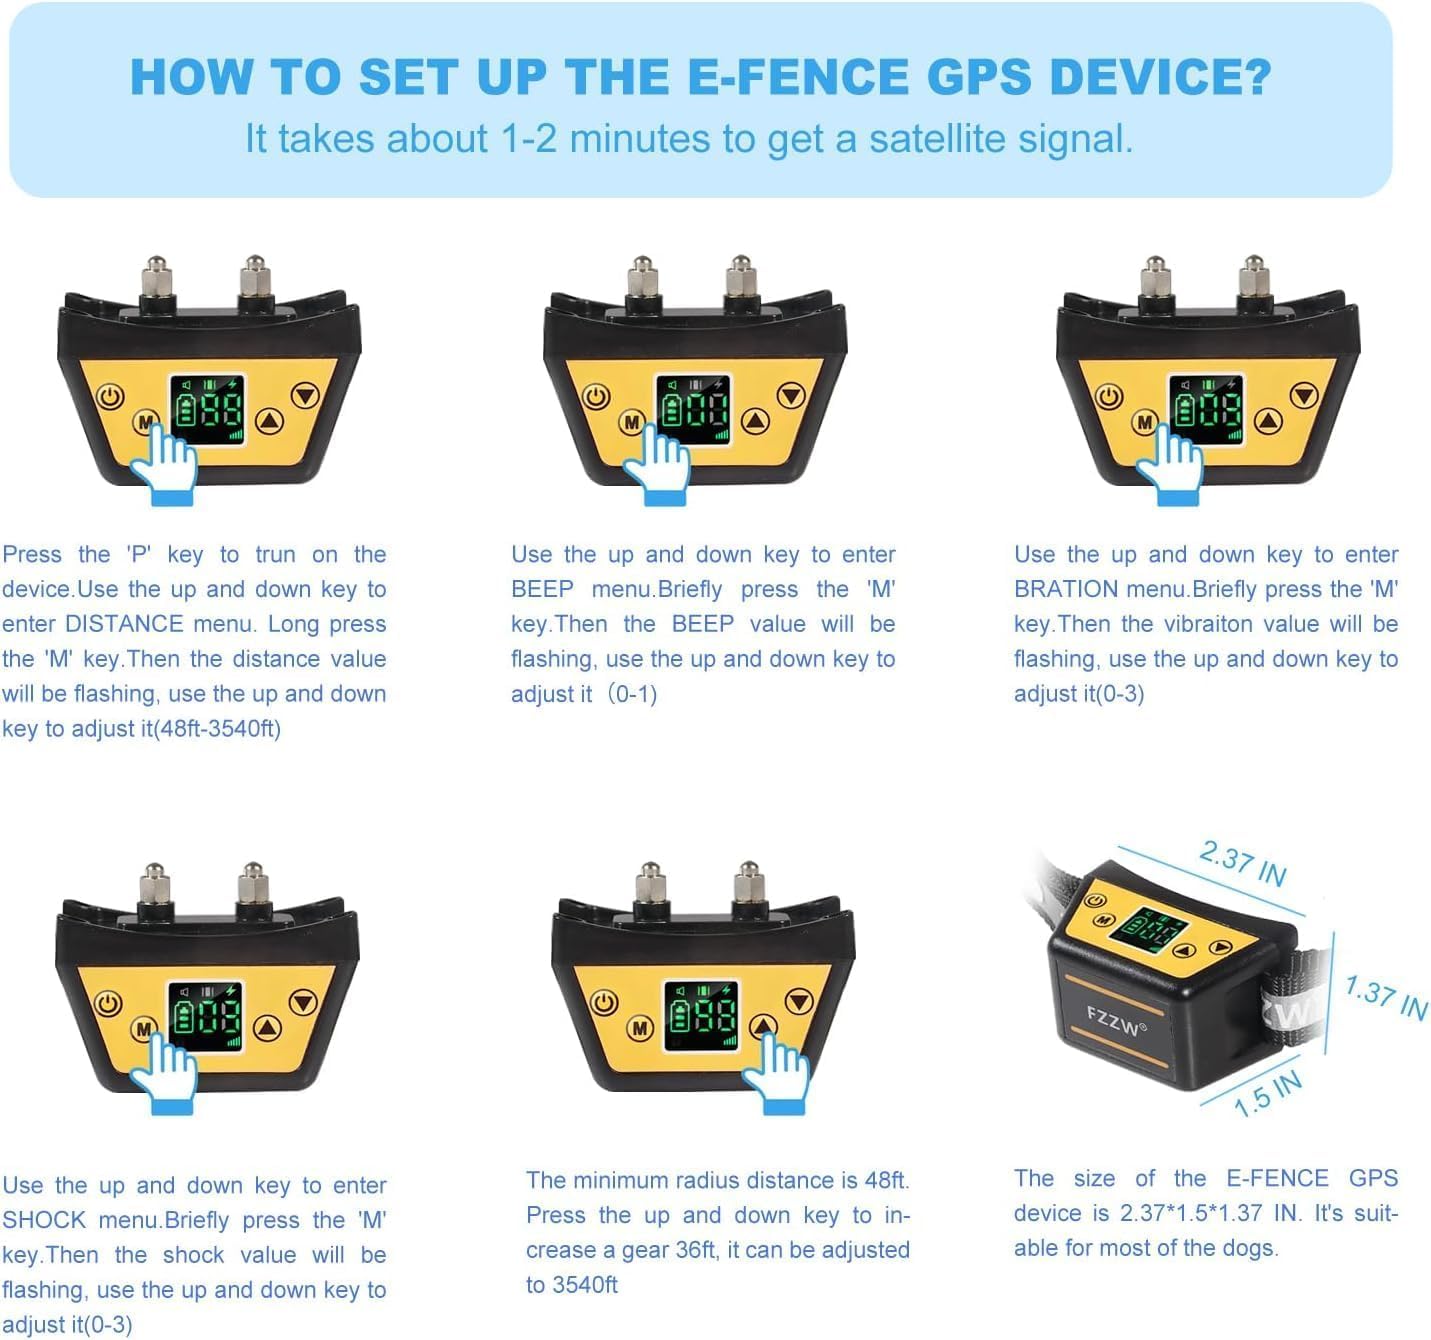
Image 3.1: Device Setup Guide. This image illustrates the process of configuring the Plkm GPS Wireless Dog Fence System, including setting the boundary radius and warning levels.
4. Operating Instructions
4.1 Device Overview and Display

Image 4.1: Function Display. This image details the buttons and screen indicators on the Plkm GPS Wireless Dog Fence collar, including battery status, signal strength, and distance/level displays.
- 'P' Button: Turn on/off the device and activate/pause GPS function.
- 'M' Button: Sets/clears the origin point for the GPS fence. Used to confirm settings in menus.
- Up Arrow Button: Increases radius, adjusts warning levels (beep, vibration, shock).
- Down Arrow Button: Decreases radius, adjusts warning levels (beep, vibration, shock).
- Display Indicators: Shows battery status, current distance/level, and GPS signal strength.
4.2 How the System Works
The Plkm GPS Wireless Dog Fence System uses satellite signals to establish a circular boundary around a central point you define. Your dog wears a collar receiver that detects its proximity to this boundary.

Image 4.2: GPS Working Principle. This diagram explains how the Plkm GPS Wireless Dog Fence System creates a circular safe area for your pet using satellite communication.
- Safe Zone: When your dog is within the set boundary radius, the collar remains inactive.
- Warning Zone: As your dog approaches the boundary, the collar will first emit a warning sound.
- Correction Zone: If your dog continues past the warning zone and approaches the boundary, the collar will activate vibration and/or static correction (based on your chosen settings) to encourage them to return to the safe zone.
- Origin Point: The 'M' button sets the center of your circular fence. Ensure this point is chosen carefully and remains consistent for reliable operation.
5. Maintenance
5.1 Charging
The Plkm GPS Wireless Dog Fence System features a wirelessly rechargeable battery designed for up to 24 hours of continuous operation. To charge:
- Place the collar receiver onto the wireless charging base.
- Ensure the charging base is connected to a power source using the provided USB cable and adapter.
- The display on the collar will indicate charging status. A full charge typically takes a few hours.
5.2 Waterproof Design
The collar receiver is designed with a fully sealed, 100% waterproof construction (IP67 rated). This means it can be used in various weather conditions, including rain and snow, and is safe for dogs to wear while swimming or playing in water without damage to the internal components.

Image 5.1: Waterproof Design. This image shows the Plkm GPS Wireless Dog Fence collar being worn by a dog in water, highlighting its fully sealed and waterproof capabilities.
5.3 Collar Adjustment and Fit
Ensure the collar fits snugly but comfortably around your dog's neck. You should be able to fit two fingers between the collar and your dog's neck. The collar strap is adjustable and can be trimmed to size if necessary. Proper fit is crucial for the conductive poles to make consistent contact with your dog's skin for effective correction.
6. Troubleshooting
If you encounter issues with your Plkm GPS Wireless Dog Fence System, please refer to the following common problems and solutions:
- Device not turning on: Ensure the device is fully charged. Connect it to the wireless charger and check the battery indicator.
- No GPS signal: Move to an open area with a clear view of the sky. Avoid dense tree cover or tall buildings that may obstruct satellite signals. Wait 1-2 minutes for signal acquisition.
- Inconsistent boundary: Ensure the 'M' button was pressed to set the origin point in an open area. Avoid setting the origin near large metal objects or buildings that can interfere with GPS signals.
- Collar not correcting:
- Check if the warning intensity levels (beep, vibration, shock) are set above 0.
- Ensure the conductive poles are making proper contact with your dog's skin. The collar should be snug.
- Test the shock function using the provided test light. Place the test light across the conductive poles and trigger a correction.
- Short battery life: Ensure the device is fully charged before each use. Battery life can be affected by extreme temperatures or continuous signal searching in poor GPS areas.
If these steps do not resolve the issue, please contact Plkm customer support for further assistance.
7. Specifications
| Feature | Specification |
|---|---|
| Model Name | FX-01-GP-K-88-2C |
| Brand | Plkm |
| Item Weight | 15.5 ounces |
| Item Package Dimensions | 10.04 x 6.26 x 2.95 inches |
| Batteries | 2 Lithium Ion batteries (included) |
| Control Range Radius | 48ft to 3540ft (adjustable in 36ft increments) |
| Warning Intensity | Sound (On/Off), Vibration (0-3 levels), Shock (0-3 levels) |
| Waterproof Rating | 100% Waterproof (Fully sealed design) |
| Charging Type | Wireless Charging |
| Battery Life | Up to 24 hours (continuous use) |
8. Safety Information
Please observe the following safety guidelines to ensure the well-being of your pet and the proper functioning of the device:
- This device is intended for use with dogs only. Do not use on other animals or humans.
- Do not leave the collar on your dog for more than 12 consecutive hours to prevent skin irritation.
- Regularly check your dog's neck for any signs of skin irritation or sores. If found, discontinue use until the skin heals.
- Ensure the collar is properly fitted. It should be snug enough for contact but not overly tight.
- The static correction feature should be used responsibly and only after your dog understands the warning tones and vibrations. Start with the lowest effective setting.
- This system is a training aid and not a substitute for direct supervision. Always supervise your pet, especially during initial training.
- Keep the device and its components out of reach of children.
- Do not attempt to modify or repair the device yourself. Contact customer support for service.
9. Warranty and Customer Support
For information regarding warranty coverage, product registration, or technical support, please refer to the warranty card included in your product packaging or visit the official Plkm website. You may also contact Plkm customer service directly for assistance with any product-related inquiries.
Plkm Customer Service: Refer to product packaging or official website for contact details.


