Introduction
This manual provides detailed instructions for the safe and efficient operation of your MARGAR Pro Serger Sewing Machine. Please read this manual thoroughly before using the machine to ensure proper setup, operation, and maintenance. Retain this manual for future reference.

Image: The MARGAR Pro Serger Sewing Machine, showcasing its compact design and four orange thread spools on the thread stand.
Important Safety Information
Always follow basic safety precautions when using electrical appliances to reduce the risk of fire, electric shock, or injury to persons.
- Read all instructions before using the machine.
- Keep fingers away from all moving parts. Special care is required around the sewing machine needle.
- Always switch the sewing machine off and unplug it from the electrical outlet when removing covers, lubricating, or when making any other user servicing adjustments mentioned in the instruction manual.
- Use this appliance only for its intended use as described in this manual.
- Never operate the sewing machine if it has a damaged cord or plug, if it is not working properly, if it has been dropped or damaged, or dropped into water.
- Never drop or insert any object into any opening.
- Do not use outdoors.
Product Overview and Components
Familiarize yourself with the various parts of your serger sewing machine for optimal operation.

Image: Detailed diagram illustrating the key components of the MARGAR Pro Serger Sewing Machine, including the pressure-adjustment screw, needle threader, light cover, thread clamp, dual-needle clamp, presser foot, needle plate, bed, left cover, chassis, lower knife bar, front cover, hand wheel, power switch, power socket, pulley housing, spool holder, and telescopic thread guide.
- Pressure-adjustment screw: Adjusts the pressure on the presser foot.
- Needle threader: Assists in threading the needles.
- Light cover: Protects the LED light.
- Thread clamp: Secures the threads.
- Dual-needle clamp: Holds the two needles.
- Presser foot: Holds fabric firmly against the feed dogs.
- Needle plate: The flat surface under the needle where stitching occurs.
- Bed: The flat working surface of the machine.
- Left cover: Removable cover on the left side.
- Chassis: The main frame of the machine.
- Lower knife bar: Holds the lower cutting knife.
- Front cover: Removable cover on the front.
- Hand wheel: Manually controls needle movement.
- Power switch: Turns the machine on/off.
- Power socket: Where the power cord connects.
- Pulley housing: Encloses the drive pulley.
- Spool holder: Holds the thread spools.
- Telescopic thread guide: Guides threads from spools to tension discs.
The machine features a heavy-duty metal body for durability and stability, and non-slip rubber suction cup feet to reduce vibration during operation.

Image: Close-up views of the machine's rubber suction cup feet for stability and the handwheel for precise manual control.
Setup
Unpacking and Placement
- Carefully remove the machine from its packaging.
- Place the machine on a stable, flat surface. Ensure adequate space around the machine for fabric handling.
- The machine comes pre-threaded for initial testing.

Image: The serger machine is shown ready for immediate use, highlighting its pre-threaded state and plug-and-play convenience.
Power Connection
- Ensure the power switch (14) is in the OFF position.
- Connect the power cord to the power socket (15) on the machine and then to a suitable electrical outlet.
Threading the Machine
The serger features clear color-coded guidelines to simplify the threading process. Refer to the internal diagrams and follow the color-coded paths for each thread.

Image: A close-up view of the serger machine's threading area, highlighting the color-coded guides for easy thread path identification.
For detailed threading instructions, please consult the operation video provided on the product's detail page or the comprehensive instruction manual included with your machine.
Operation
Stitch Capabilities
This serger supports both 3-thread and 4-thread sewing methods, allowing for a variety of professional finishes.

Image: Examples of 3-thread and 4-thread serger stitches, demonstrating the professional lockstitch capability without skipped stitches.
The machine can produce up to 12 different stitch patterns, including fine edge, rolled edge, dense copy edge, and wooden ear edge, as well as various widths of 3-thread and 4-thread stitches.

Image: Visual guide showing different multi-stitch options, including 3-thread compact, narrow, and wide edges, 4-thread wide edge, wooden ear edge, and close stitching with curled edges.
Fabric Compatibility
The serger is compatible with a wide range of fabrics, from light to heavy, including cotton, denim, knitting, hemp, chenille, canvas, modal, and mesh. The differential feeding system helps prevent puckering on light fabrics and stretching on elastic fabrics.

Image: Swatches of various fabrics like hemp, denim, chenille, and knitted fabric, demonstrating the serger's versatility.

Image: A collage showing different fabric types such as Cowboys (denim), Cotton And Linen, Cotton, Tweed, Chenille, Canvas, Modal, and Mesh, all suitable for use with the serger.
Adjustments
Presser Foot Adjustment
The presser foot pressure can be adjusted to accommodate different fabric thicknesses. Increase pressure for thicker fabrics and reduce pressure for lighter fabrics. A lower pressure setting is generally recommended for most applications.

Image: Diagram illustrating the mechanism for adjusting the presser foot, with arrows indicating how to increase or reduce pressure.
Stitch Length Adjustment
To adjust the stitch length (front and back density):
- Loosen the screw.
- Adjust the black stitch nut.
For more specific operations, please consult the operation video provided on the product's detail page or the comprehensive instruction manual included with your machine.

Image: Diagram detailing the gauge adjustment system, showing the components involved in modifying stitch length and density.
Another method for stitch length adjustment:
- Open the left cover.
- Use a wrench to turn the screw counter-clockwise to loosen.
- Turn the cap to increase or decrease stitch length.
- Use a wrench to adjust the screw clockwise to tighten.

Image: An exploded view diagram illustrating the process of adjusting stitch length by opening the left cover and using a wrench on specific components.
Thread Pressure Adjustment
The color-coded pressure adjustment wheels correspond to specific threads:
- Red: Left straight needle thread
- Green: Right straight needle thread
- Orange: Upward curved needle thread
- Blue: Lower curved needle thread
Turn clockwise to tighten thread pressure and counter-clockwise to loosen. Refer to the operation video for specific guidance.

Image: Diagram illustrating the color-coded pressure adjustment wheels for each thread, with directions for tightening and loosening thread pressure.
Speed Control
The machine offers high-speed sewing technology, capable of up to 1250 stitches per minute. The speed can be controlled via the foot controller.
Image: A close-up view of the serger machine, highlighting the speed control dial for adjusting sewing pace.
LED Lighting
An integrated LED light illuminates the sewing area, reducing visual fatigue and improving accuracy, especially in low-light conditions.

Image: A split image showing the threading guide signs and the illuminated sewing area by the LED light, emphasizing ease of use and visibility.
Maintenance
Cleaning
Regular cleaning is essential for maintaining your serger's performance. Use the included brush to remove lint and dust from the feed dogs, needle plate area, and cutter unit. Ensure the machine is unplugged before cleaning.

Image: Close-up views of the presser foot lifting device and the sharp cutter unit, components that require regular cleaning.
Oiling
To ensure smooth operation, lubricate the machine regularly. Add sewing machine oil to the designated oiling hole after 2-3 weeks of continuous use or if the machine has been inactive for more than half a year.

Image: Diagram indicating the specific oiling hole on the serger machine for lubrication.
For specific oiling procedures, refer to the operation video or the detailed instruction manual.
Troubleshooting
This section provides solutions to common issues you might encounter. For more complex problems, please contact customer support.
- Skipped Stitches: Check needle insertion, ensure the needle is not bent or dull, re-thread the machine, and verify thread tension.
- Thread Breakage: Inspect for burrs on thread guides or needle plate, ensure correct threading, adjust thread tension, and use high-quality sewing thread.
- Fabric Puckering/Stretching: Adjust the differential feed setting and presser foot pressure according to fabric type.
- Machine Not Starting: Ensure the power cord is securely plugged in, the power switch is on, and the foot controller is properly connected.
Specifications
| Feature | Detail |
|---|---|
| Model Number | BFJ0000002 |
| Product Dimensions | 11 x 10 x 10 inches (11"D x 10"W x 10"H) |
| Item Weight | 17.63 pounds |
| Stitch Capability | 3-thread, 4-thread |
| Stitch Patterns | Up to 12 patterns |
| Max. Sewing Speed | 1250 stitches per minute |
| Frame Material | Heavy-Duty Industrial Metal Frame (High strength aluminium alloy) |
| Lighting | LED Light |
| Color | White |
| Manufacture Year | 2025 |
Included Accessories
Your MARGAR Pro Serger Sewing Machine comes with a comprehensive accessory kit to support your sewing projects and maintenance needs.
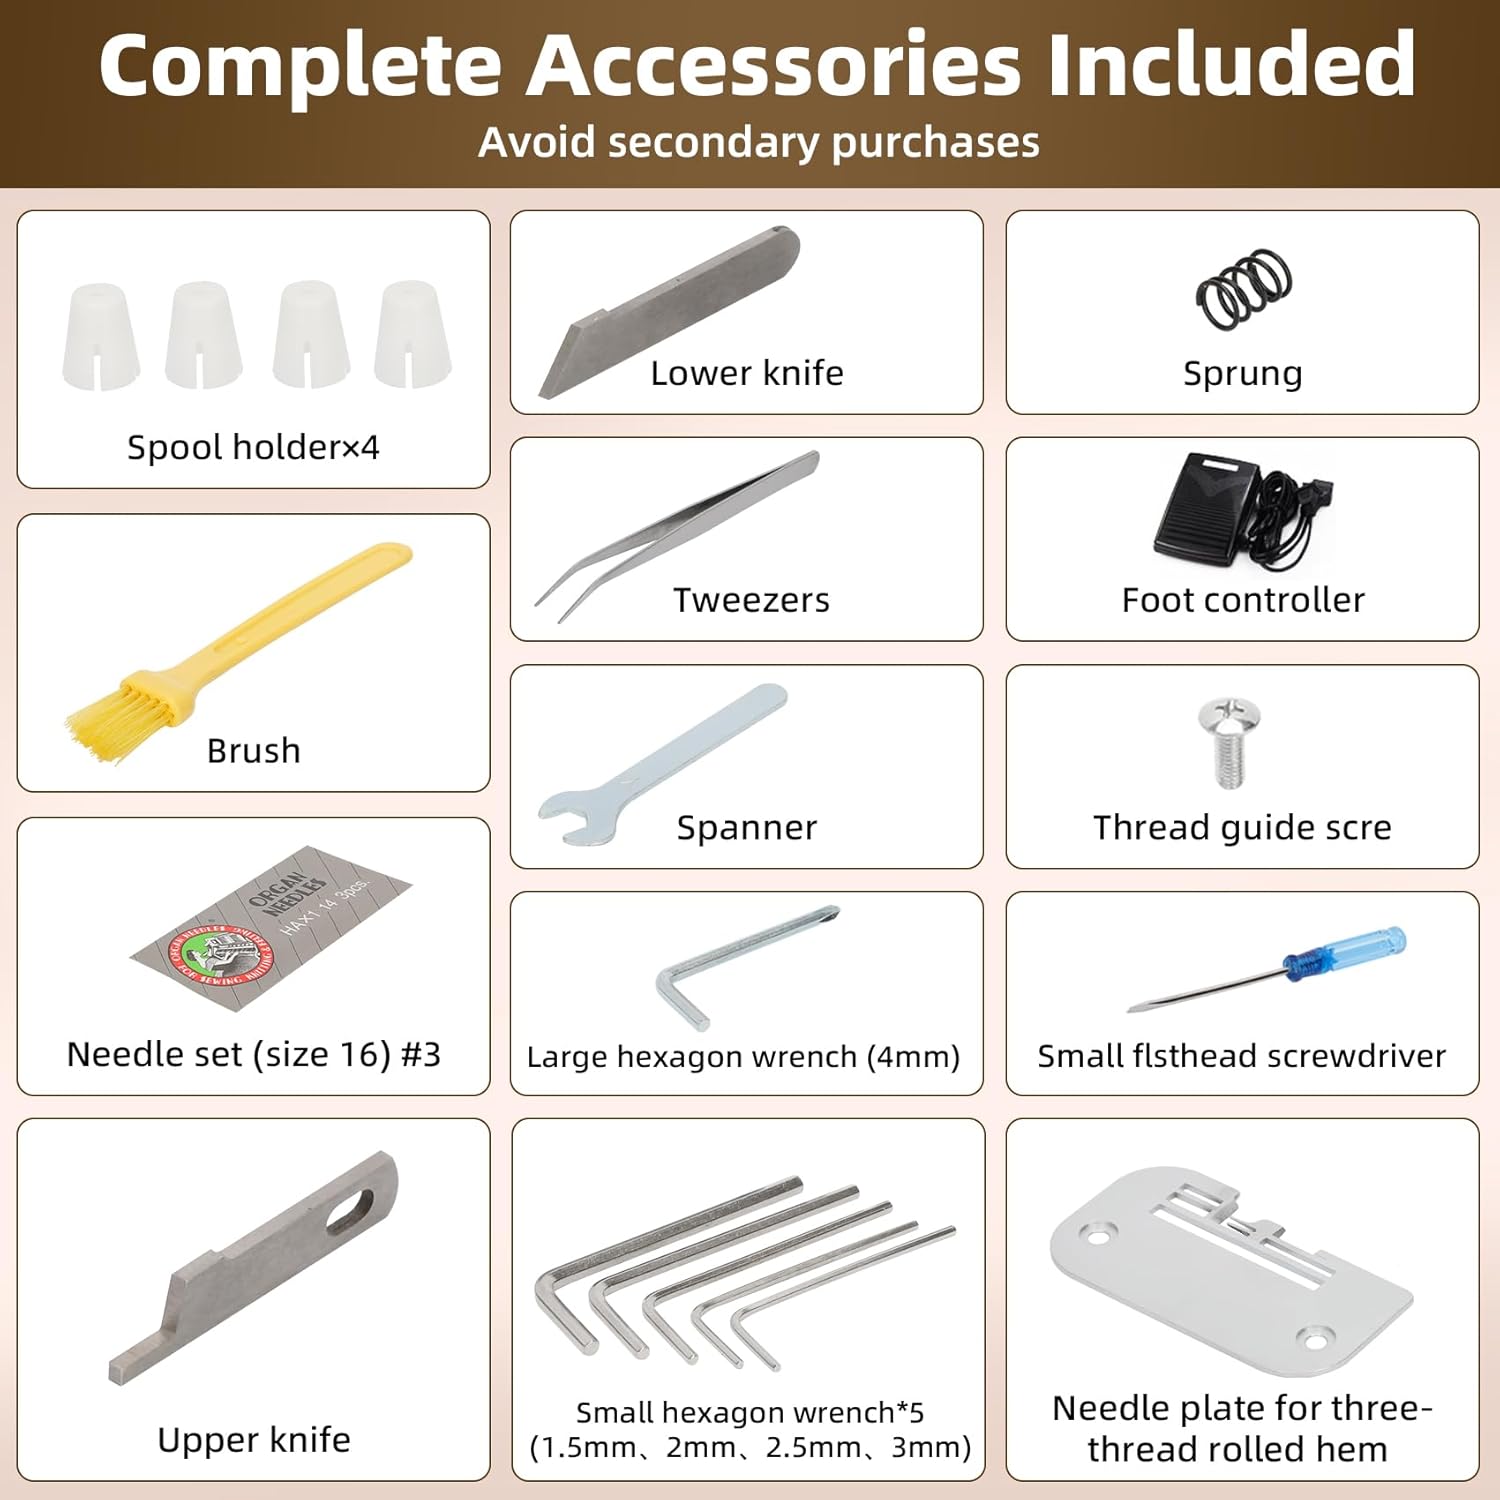
Image: A visual display of all accessories included with the serger machine, such as spool holders, lower knife, sprung, brush, tweezers, foot controller, spanner, thread guide screw, needle set, large hexagon wrench, small flathead screwdriver, upper knife, small hexagon wrench set, and needle plate for three-thread rolled hem.
- Spool holders (x4)
- Lower knife
- Sprung
- Brush
- Tweezers
- Foot controller
- Spanner
- Thread guide screw
- Needle set (size 16) #3
- Large hexagon wrench (4mm)
- Small flathead screwdriver
- Upper knife
- Small hexagon wrench set (1.5mm, 2mm, 2.5mm, 3mm)
- Needle plate for three-thread rolled hem
Warranty and Support
MARGAR is committed to providing high-quality products and excellent customer service. All products undergo strict inspection before shipment.
- Customer Support: If you encounter any issues with your serger sewing machine, please contact us. We aim to assist you in solving problems within 12 hours.
- Quality Assurance: In case of any quality problems, we will compensate for your loss or replace the product with a new one.
- Technical Support: Lifetime technical support is available.
For further assistance, please refer to the contact information provided with your purchase or on the official MARGAR website.