1. Introduction
This manual provides detailed instructions for the setup, operation, and maintenance of your JUNEBOX 8 Inch 1280x800 IPS Touchscreen Portable Monitor. This versatile display is designed for a wide range of applications, including use with Raspberry Pi, various computers, and gaming consoles. Please read this manual thoroughly before using the product to ensure optimal performance and longevity.

Image 1.1: The JUNEBOX 8 Inch Touchscreen Portable Monitor, showcasing its compact design and touch functionality.
2. Product Features
- High-Definition Display: Features an 8-inch IPS screen with a 1280x800 resolution, offering clear and crisp visuals with a 178° full viewing angle.
- Five-Point Capacitive Touch: Provides responsive and accurate multi-touch control for intuitive interaction. Note: Touch functionality requires a USB connection to the host device.
- Detachable Backboard & VESA Mount Compatibility: Equipped with a detachable stand for multi-angle support (horizontal and vertical) and compatible with standard 100/75/50 VESA wall mounts.
- Plug-and-Play Installation: Simple setup via HDMI for display and USB for touch, requiring no additional driver installation for most compatible systems.
- Wide Compatibility: Supports various Raspberry Pi versions (Pi5/Pi4/Pi3B+/Pi3/Pi2/ZERO), Octo Pi, BB Black, Banana Pi, Retro Pi, game consoles (XBOX/PS4/PS5), computers (Windows, Linux distributions), and TV boxes.
- Integrated Dual Speakers: Delivers stereo audio output for an enhanced multimedia experience.
- Energy Efficient: Includes a power switch to conserve energy when not in use.

Image 2.1: Illustration of the 5-point capacitive touch screen and the integrated dual speakers.
3. Package Contents
Verify that all items listed below are included in your package:
- 1 x 8 Inch Touchscreen Monitor
- 1 x Touch Cable (USB-A to Micro USB)
- 1 x Screwdriver
- 4 x Screws
- 1 x DC Power Adapter
- 1 x Power Black/Red Cable
- 1 x PI3 Side Panel
- 1 x PI4/PI5 Side Panel
- 1 x HDMI Ribbon Cable
- 1 x Micro HDMI Ribbon Cable
- 1 x HDMI to HDMI Cable
- 1 x USB-A to USB-C Cable

Image 3.1: All accessories and cables included with the monitor.
4. Product Overview and Port Details
Familiarize yourself with the monitor's physical components and connection ports.

Image 4.1: Front and side views detailing the monitor's ports and control buttons.
4.1. Ports and Controls
- Audio Port: For connecting external audio devices.
- HDMI Input: Connects to the video output of your device.
- Type-C Input: For power or data connection, depending on the device.
- DC 12V Input: For external power supply.
- Control Buttons: Exit, Down, Up, Menu, Power for navigating settings and power control.
- Speakers: Integrated dual speakers for audio output.
4.2. Mounting Options
The monitor features a detachable backboard that functions as a stand, offering flexible viewing angles. It also includes VESA mounting holes (compatible with 100/75/50 standards) for secure wall or arm mounting.

Image 4.2: Details on the active cooling fan, adjustable stand, and speaker placement.
5. Setup and Installation
5.1. General Connection
- Connect the monitor to a power source using the provided DC Power Adapter or a compatible USB-C power supply.
- Connect the HDMI cable from your device (e.g., Raspberry Pi, laptop, game console) to the HDMI Input port on the monitor.
- For touchscreen functionality, connect the Touch Cable (USB-A to Micro USB) from your device's USB port to the designated USB port on the monitor.
- Power on the monitor using the Power button.
5.2. Connecting to Raspberry Pi
The monitor is compatible with various Raspberry Pi models. Use the appropriate HDMI ribbon cable (standard HDMI or micro HDMI) and side panel for your specific Raspberry Pi version (e.g., PI3 Side Panel, PI4/PI5 Side Panel).
- Ensure your Raspberry Pi is powered off before connecting.
- Mount the Raspberry Pi board into the monitor's enclosure using the correct side panel and screws.
- Connect the appropriate HDMI ribbon cable from the Raspberry Pi to the monitor's HDMI input.
- Connect the power black/red cable if required for internal power distribution to the Raspberry Pi.
- Connect the Touch Cable from the Raspberry Pi's USB port to the monitor's USB port for touch input.
- Power on the Raspberry Pi and then the monitor.
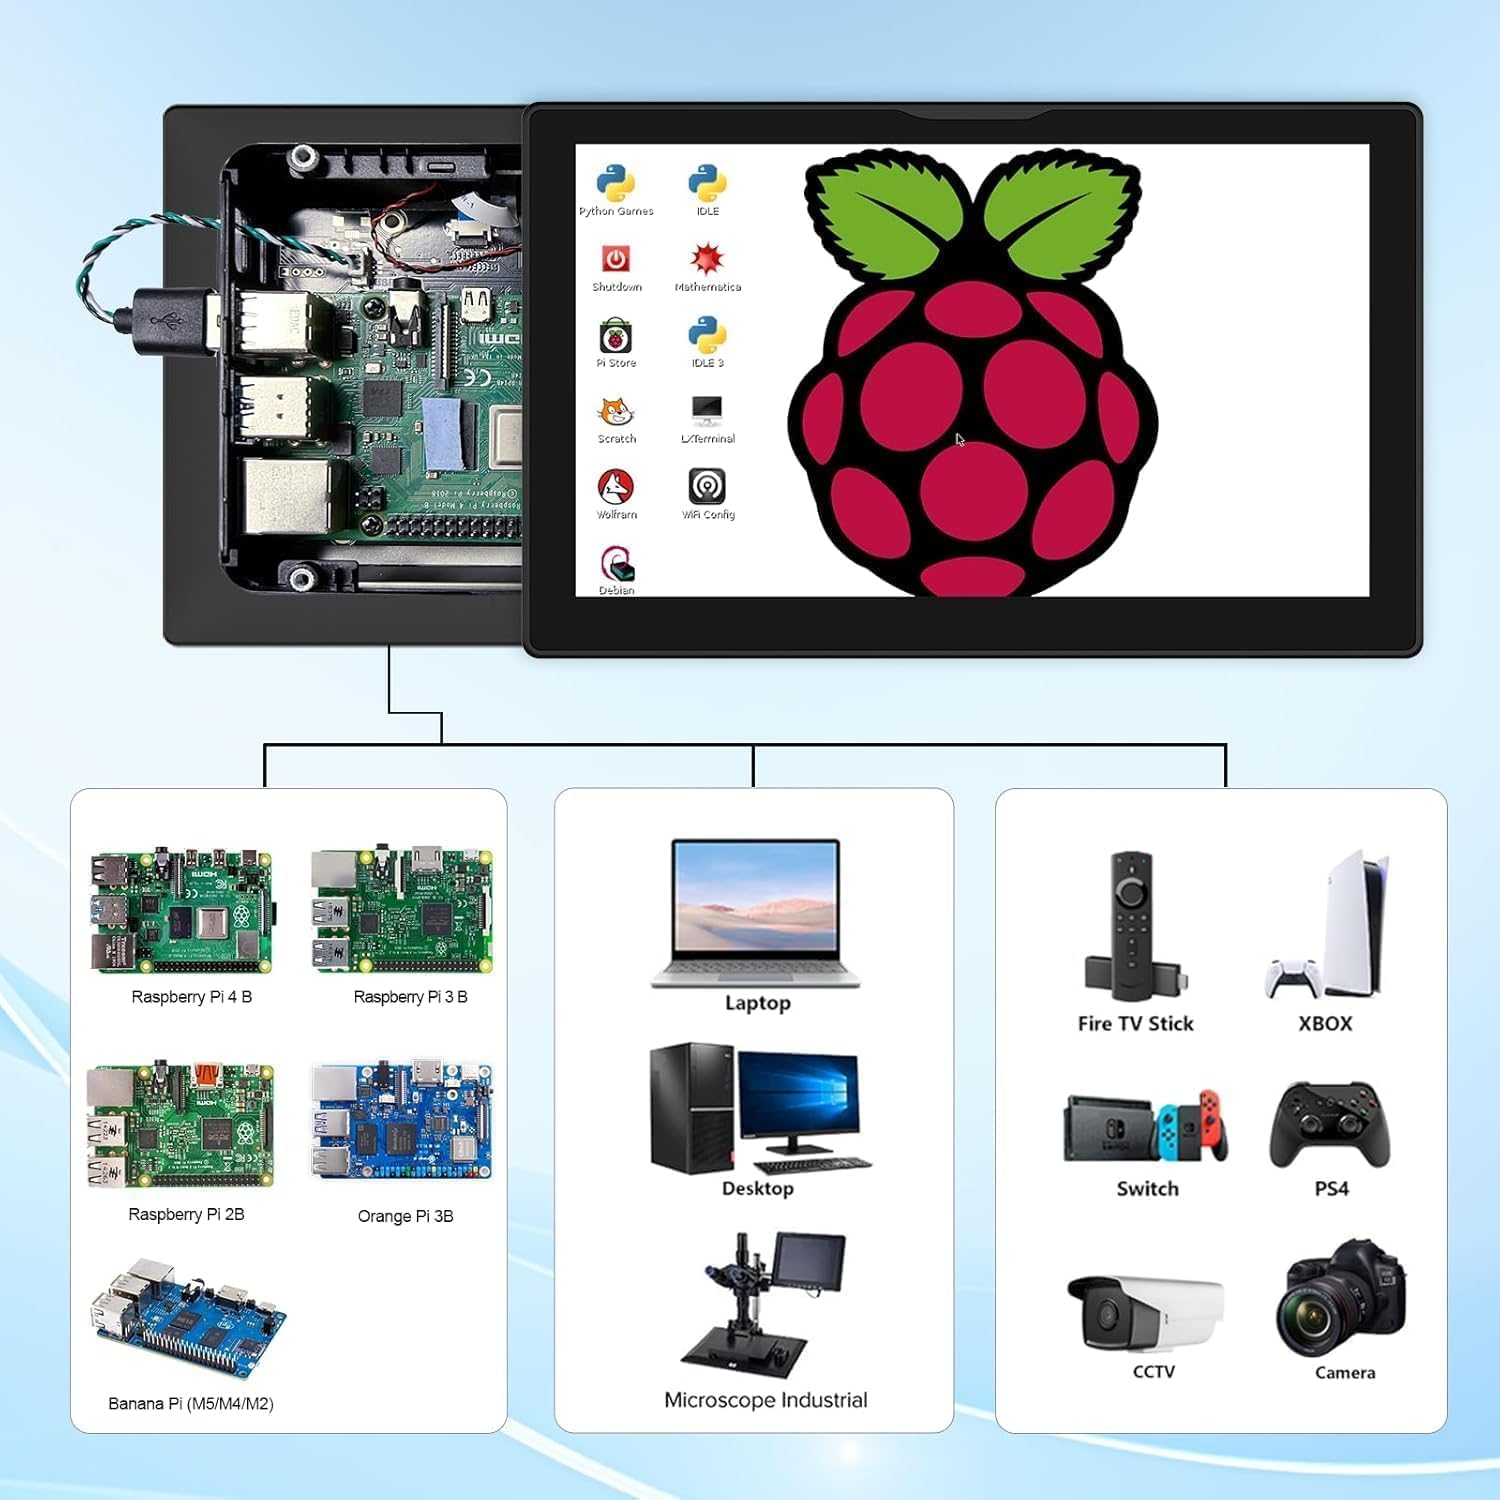
Image 5.1: Connection example with Raspberry Pi and other compatible devices.
5.3. Connecting to Laptops (Extend/Duplicate/Second Screen Modes)
When connecting to a laptop, the monitor can function in various display modes:
- Extend Mode: Extends your desktop across both screens, providing more workspace.
- Duplicate Mode: Mirrors your laptop's display on the portable monitor.
- Second Screen Mode: Uses only the portable monitor as the primary display.
These modes can typically be configured through your operating system's display settings.
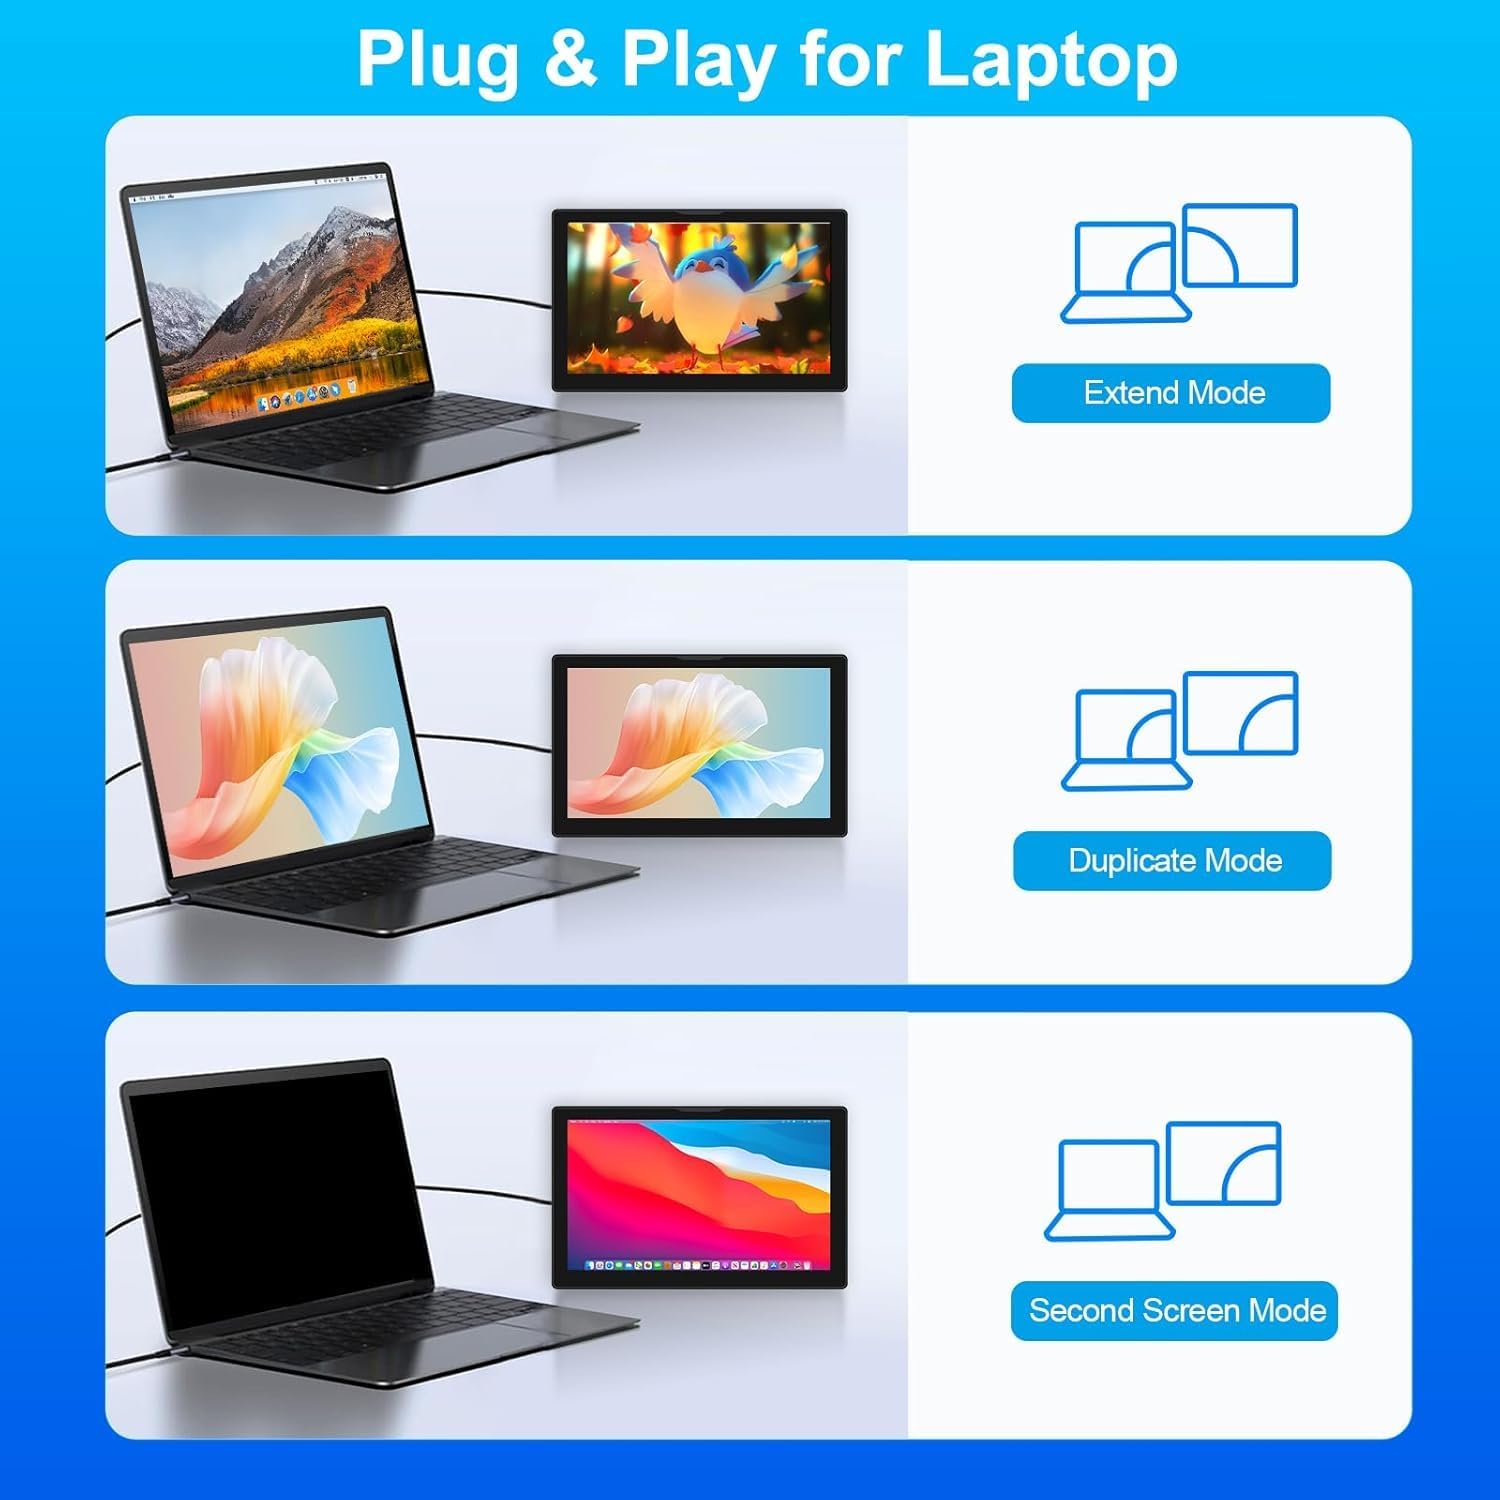
Image 5.2: Laptop connectivity options: Extend, Duplicate, and Second Screen modes.
6. Operating Instructions
6.1. Power On/Off
Press the Power button located on the side of the monitor to turn the display on or off.
6.2. Touchscreen Operation
The monitor supports 5-point capacitive touch. Ensure the USB Touch Cable is connected to your host device for touch functionality. Common gestures include:
- Tap: Select items or activate functions.
- Swipe/Scroll: Navigate through content.
- Pinch-to-Zoom: Enlarge or reduce content size.
- Drag: Move items on the screen.
6.3. Menu Navigation
Use the Menu, Up, Down, and Exit buttons to access and adjust the monitor's settings, such as brightness, contrast, color, and input source.
6.4. Audio Output
The integrated dual speakers will automatically play audio from the connected device via HDMI. You can also connect external speakers or headphones to the Audio Port.
7. Compatibility
This monitor offers broad compatibility with various devices and operating systems:
- Raspberry Pi: All versions, including Pi5, Pi4B, Pi3B+, Pi3B, Pi2, and Zero.
- Single Board Computers: Octo Pi, BB Black, Banana Pi, Retro Pi.
- Operating Systems: Windows 11/10/8/7, Raspbian, Noobs, Kali-Linux, Debian, Ubuntu, Kodi.
- Gaming Consoles: XBOX, PS4, PS5.
- Other Devices: Laptops, Desktop PCs, TV Boxes, Microscopes, Industrial Control Systems, Security DVRs, 3D Printers, Car Dash-Mounted systems, Cameras.
Important Note: Touch functionality is disabled on iOS systems.

Image 7.1: Examples of diverse applications for the portable monitor.
8. Maintenance
To ensure the longevity and optimal performance of your monitor, follow these maintenance guidelines:
- Cleaning: Use a soft, lint-free cloth to gently wipe the screen and exterior. For stubborn marks, slightly dampen the cloth with water or a screen-safe cleaner. Avoid harsh chemicals or abrasive materials.
- Handling: Handle the monitor with care. Avoid dropping it or subjecting it to strong impacts.
- Storage: When not in use, store the monitor in a cool, dry place away from direct sunlight and extreme temperatures.
- Ventilation: Ensure the cooling fan and ventilation ports are not obstructed to prevent overheating.
9. Troubleshooting
If you encounter issues with your monitor, refer to the following common solutions:
- No Display:
- Ensure the monitor is properly powered on and connected to a power source.
- Verify the HDMI cable is securely connected to both the monitor and the host device.
- Check the input source setting on the monitor using the menu buttons.
- No Touch Functionality:
- Confirm the USB Touch Cable is securely connected from the monitor to a USB port on your host device.
- Remember that touch functionality is not supported on iOS systems.
- For Raspberry Pi, ensure the operating system is configured to recognize touch input.
- No Audio:
- Check the volume settings on both the monitor and your host device.
- Ensure the HDMI cable is transmitting audio.
- On-Screen Keyboard Too Small (Raspberry Pi Specific):
Some Raspberry Pi operating systems may incorrectly detect the physical dimensions of the monitor, leading to an undersized on-screen keyboard. This is an advanced issue that may require modifying the EDID (Extended Display Identification Data) firmware. Consult online resources or technical support for detailed instructions on how to correct EDID settings for your specific Raspberry Pi setup.
- Difficulty Accessing Raspberry Pi SD Card:
Please note that to access or swap the Micro SD card on a Raspberry Pi installed within the monitor's enclosure, you will need to disassemble the case, disconnect internal cables, and remove the Raspberry Pi board. This design requires careful handling during SD card changes.
10. Specifications
| Feature | Specification |
|---|---|
| Brand | JUNEBOX |
| Model Number | 8'' 1280*800 |
| Screen Size | 8 Inches |
| Resolution | 1280 x 800 Pixels |
| Aspect Ratio | 16:9 |
| Screen Type | IPS Glossy Touchscreen |
| Touch Type | 5-Point Capacitive |
| Viewing Angle | 178° |
| Product Dimensions | 0.8 x 7 x 3 inches |
| Item Weight | 1.9 pounds |
| Total USB Ports | 1 (for touch input) |
| Audio | Dual Integrated Speakers, Audio Output Port |
| Mounting | Detachable Stand, VESA Compatible (100/75/50) |
11. Warranty and Support
11.1. Manufacturer's Warranty
This product is covered by a one-year manufacturer's warranty against defects from the date of purchase.
11.2. Technical Support
For any technical questions or assistance with your JUNEBOX monitor, please contact our customer support team. We are committed to providing timely responses and technical guidance.
Please refer to the product packaging or the official JUNEBOX website for the most current contact information.