1. Introduction
The SUNAPEX Smart Battery Box Pro is an all-in-one power solution designed for various applications including trolling motors, marine use, RVs, and solar panel setups. This versatile power center features multiple ports, integrated safety mechanisms, and real-time monitoring capabilities to provide a secure and efficient power supply. This manual provides detailed instructions for the safe and effective use of your Smart Battery Box Pro.
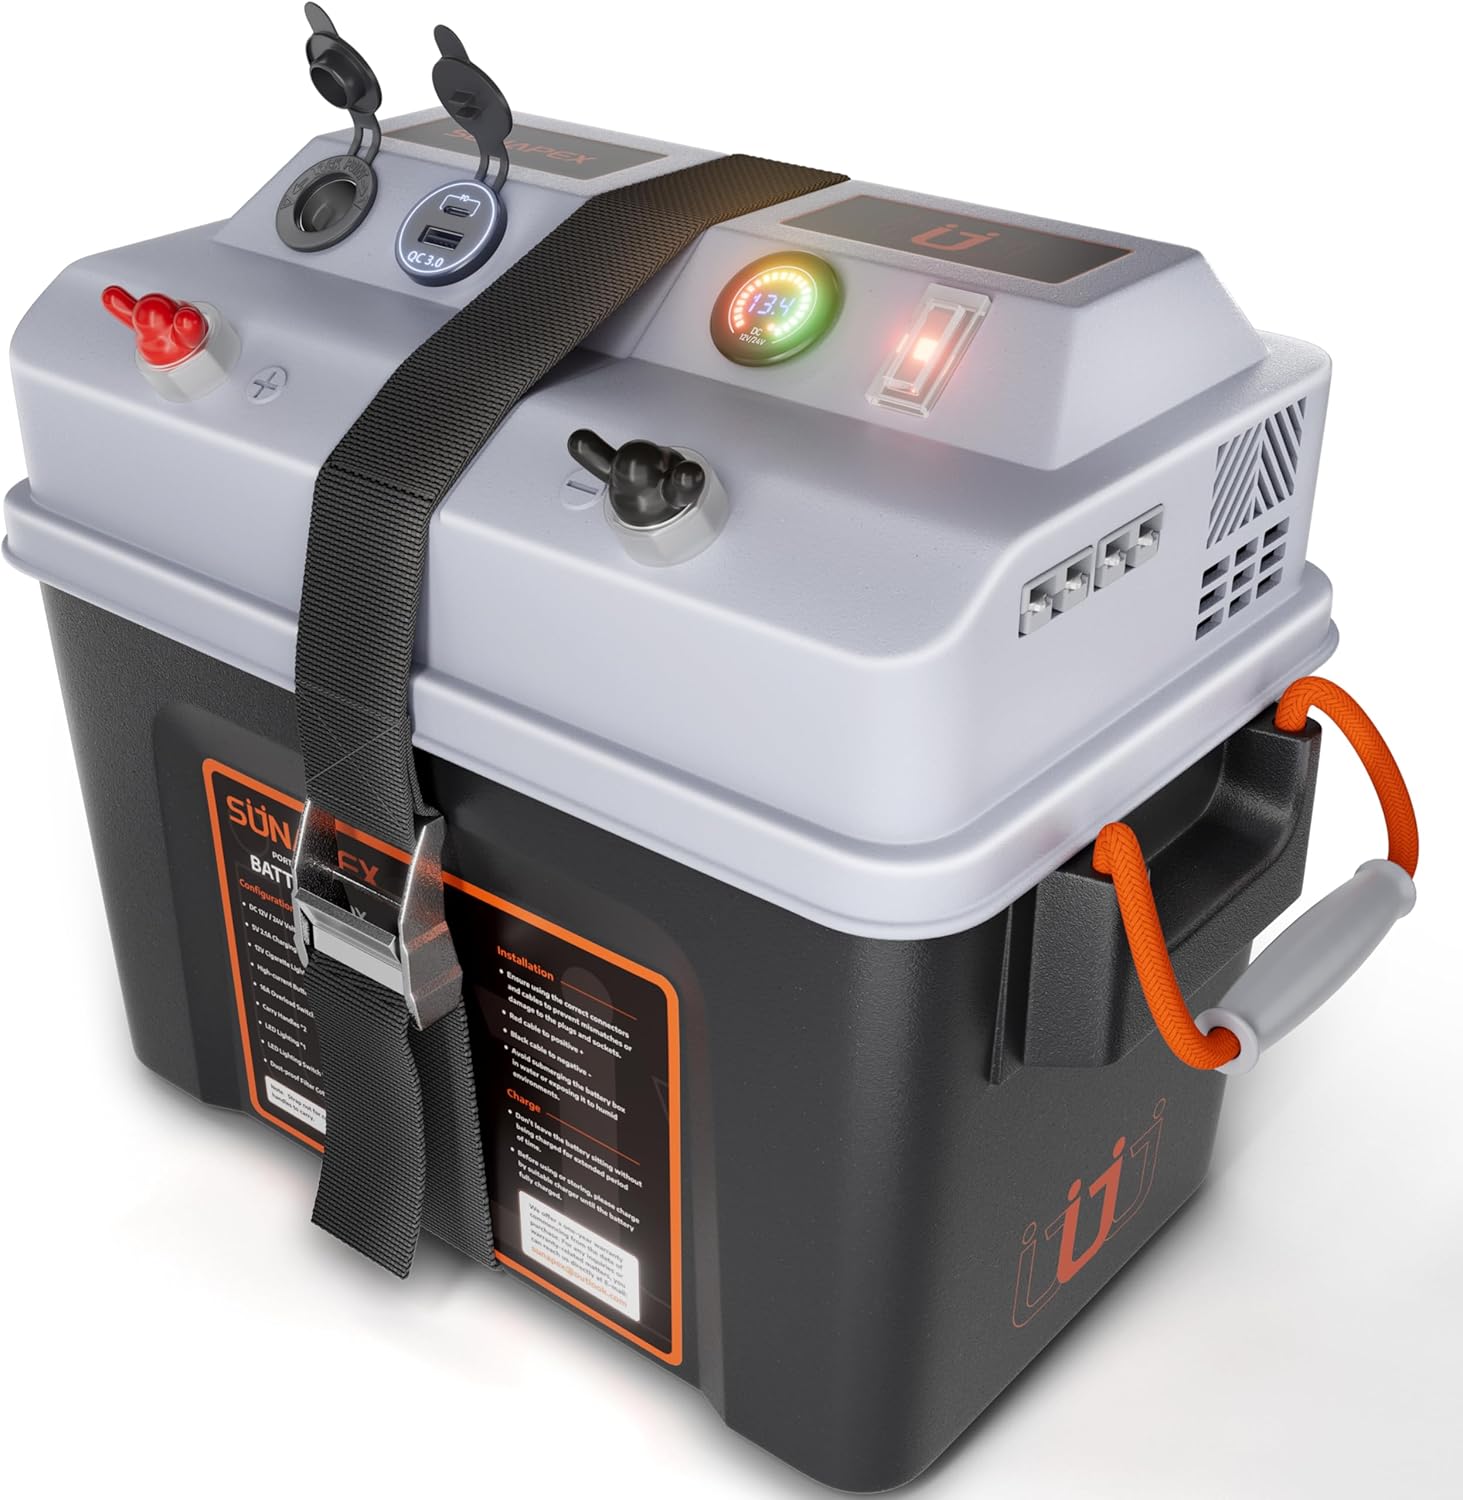
Figure 1: SUNAPEX Smart Battery Box Pro. This image shows the overall design of the battery box, highlighting its compact form factor and the various ports and controls on the top panel.
2. Safety Information
Please read and understand all safety instructions before operating the SUNAPEX Smart Battery Box Pro. Failure to follow these instructions may result in electric shock, fire, serious injury, or property damage.
- Always ensure the battery box is placed on a stable, non-conductive surface.
- Do not expose the battery box to excessive moisture or immerse it in water. While designed for outdoor use, it is not fully waterproof.
- Ensure proper ventilation around the battery box to prevent overheating. The side vents are designed for heat dissipation.
- Only use batteries compatible with 12V or 24V systems as specified. Refer to Section 4 for battery compatibility.
- Do not short-circuit the terminals. Always connect positive to positive and negative to negative.
- Do not attempt to open or modify the battery box or its internal components. There are no user-serviceable parts inside.
- Keep children and pets away from the battery box during operation.
- In case of smoke, unusual odors, or excessive heat, immediately disconnect all power sources and contact customer support.
3. Product Features
The SUNAPEX Smart Battery Box Pro is equipped with a comprehensive set of features for efficient and safe power management:
- 16A Overload Protection Switch: Automatically cuts off power if the output from the 12V cigarette lighter socket, QC3.0 plug, or PD Type-C connector exceeds 16A, protecting your devices and battery from overloads and short circuits.
- 12V Cigarette Lighter Socket: Standard output port for connecting car accessories or adapters.
- QC3.0 & PD Type-C Ports: Fast charging ports compatible with smartphones, tablets, and power banks.
- 30A Anderson Plugs: High-current input/output ports, ideal for connecting trolling motors, solar panels, or other high-power devices. Each Anderson connector is fitted with a 30A fuse. Combined maximum current for two plugs is 50A.
- High-Current Terminal Connectors: Input and output terminals capable of handling high input and output currents, featuring a 30A fuse. Suitable for connecting solar panels to charge batteries.
- Digital Voltmeter: Provides real-time monitoring of battery voltage, allowing for precise control and proactive management of power usage. Displays voltage levels in Red (Low), Yellow (Medium), and Green (High).
- Integrated Lighting: A built-in light on the left side provides illumination for visibility in low-light conditions, enhancing convenience and safety during nighttime operations.
- Portable Design: Ergonomic carry handles on both sides facilitate easy transport. The durable construction ensures reliability for mobile power needs.
- Side Vents with Sponge Filters: Designed to help dissipate heat and reduce dust accumulation, contributing to the longevity of the unit.
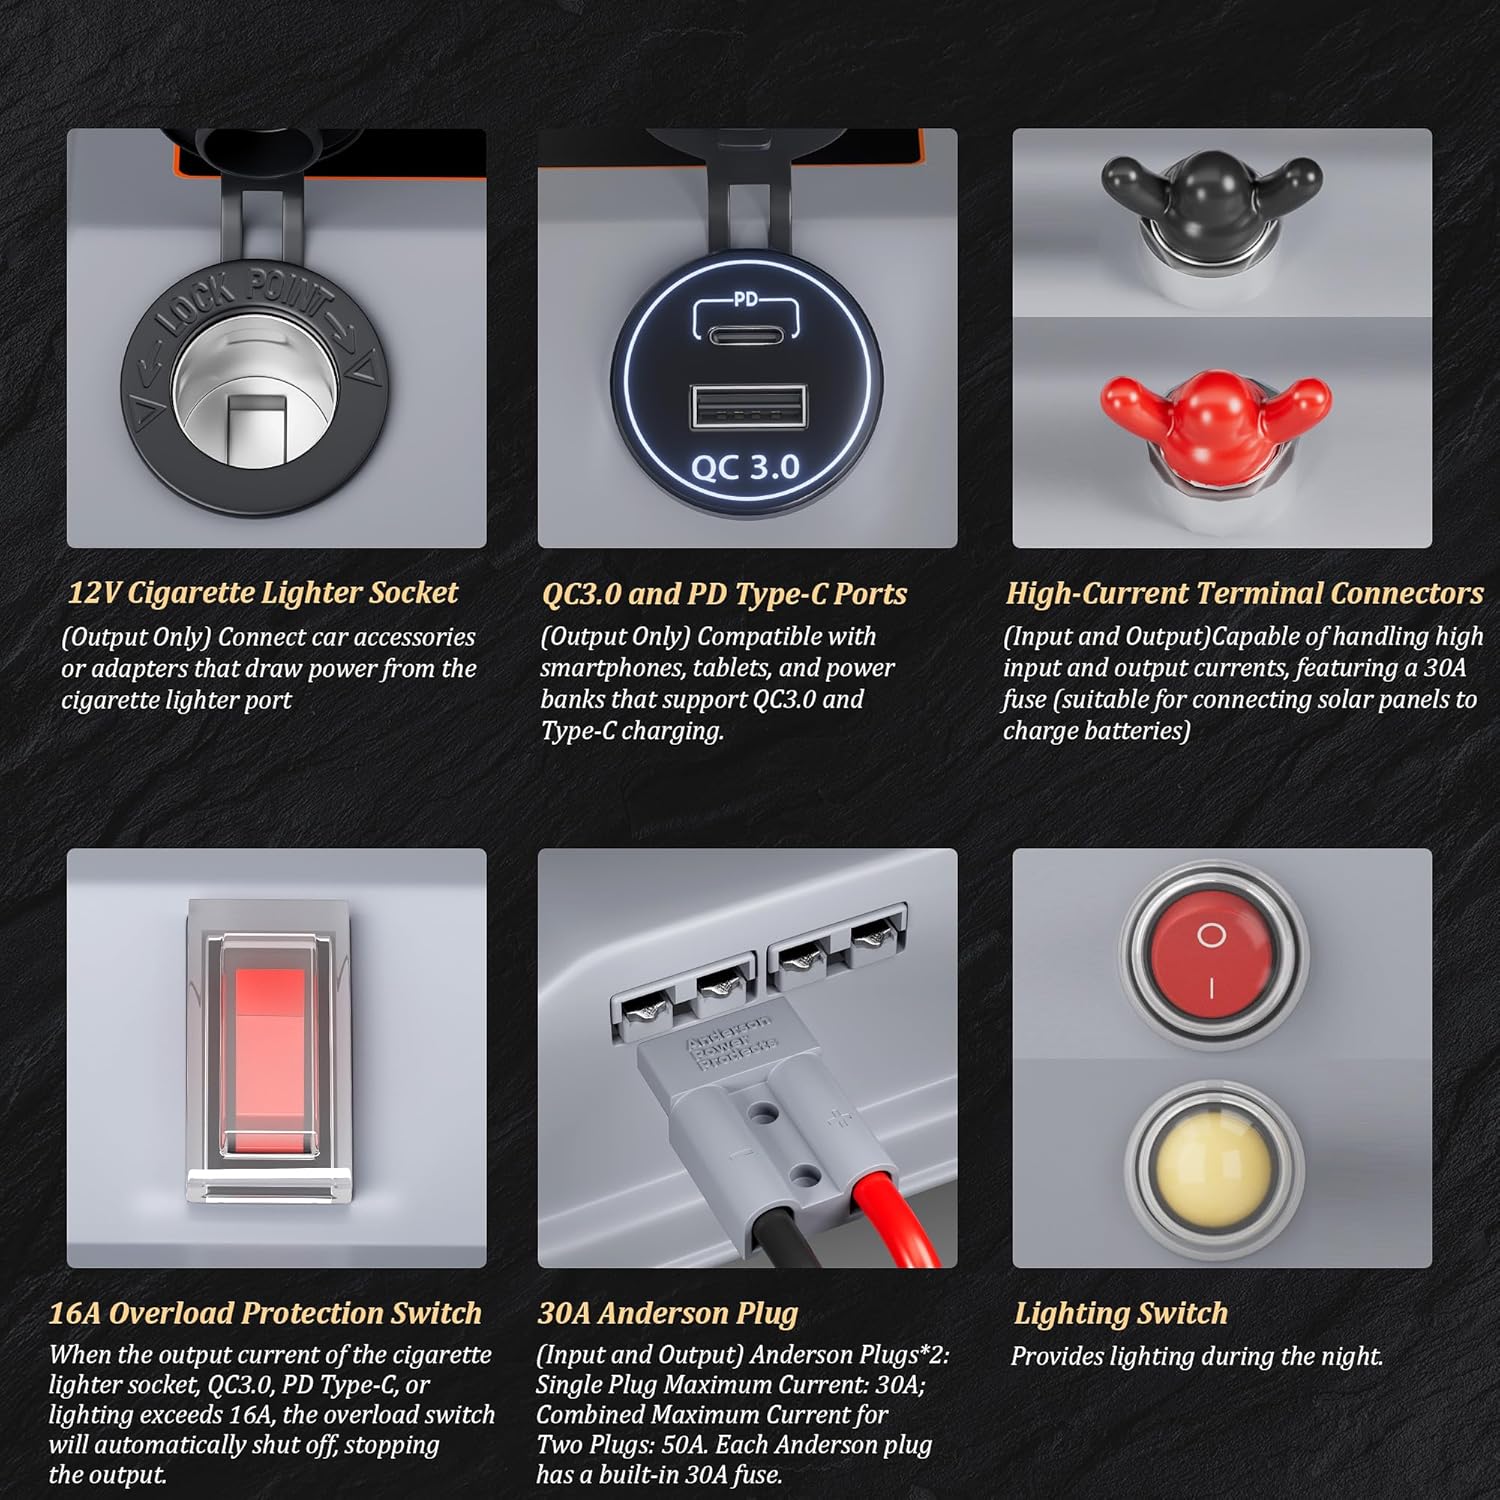
Figure 2: Detailed view of the various ports and switches on the SUNAPEX Smart Battery Box Pro, including the 12V cigarette lighter socket, QC3.0 & PD Type-C ports, high-current terminal connectors, 16A overload protection switch, 30A Anderson plug, and lighting switch.

Figure 3: Close-up of the Digital Voltage Display, showing how different colors (Red, Yellow, Green) indicate battery voltage levels.

Figure 4: Illustration of the portable design with ergonomic carry handles and the included fixing strap for securing the lid.
4. Setup and Battery Installation
The SUNAPEX Smart Battery Box Pro is compatible with 12V and 24V batteries. It supports series or parallel connection of two batteries to achieve the desired voltage.
- Open the Battery Box: Unlatch the fixing strap and carefully lift the top cover of the battery box.
- Insert Battery(ies): Place your 12V or 24V battery (or two batteries for series/parallel connection) inside the box. Ensure the battery fits securely within the internal dimensions (approximately 13.19" L x 7.87" W x 8.27" H).
- Connect Battery Terminals: Connect the red positive (+) cable from the battery box to the positive terminal of your battery and the black negative (-) cable to the negative terminal. Ensure connections are tight and secure. If connecting two batteries, follow the appropriate wiring diagram for series (for 24V) or parallel (for increased 12V capacity) connections.
- Secure the Lid: Carefully place the top cover back onto the battery box, ensuring all cables are properly routed and not pinched. Secure the lid with the provided fixing strap.

Figure 5: Diagrams illustrating how to connect a single 12V battery, a single 24V battery, and two batteries in series or parallel to achieve 12V or 24V output.
5. Operating Instructions
Once your battery is installed and the box is secured, you can begin using the various features of the SUNAPEX Smart Battery Box Pro:
- Digital Voltmeter: The digital display on the top panel will show the current battery voltage.
- Red: Indicates low battery voltage levels.
- Yellow: Indicates medium battery voltage levels.
- Green: Indicates high battery voltage levels.
- Using Output Ports (12V Cigarette Lighter, QC3.0, PD Type-C): Simply plug your compatible devices into the respective ports. The 16A overload protection switch will automatically trip if the combined current draw from these ports exceeds 16A. Reset the switch by toggling it off and then on again after reducing the load.
- Using Anderson Plugs: Connect your high-current devices (e.g., trolling motor) or charging sources (e.g., solar panel) to the Anderson plugs. Ensure the polarity is correct. These ports are protected by 30A fuses.
- Using High-Current Terminal Connectors: These large terminals provide direct access to the battery for high-power applications or charging. They are protected by 30A fuses.
- Integrated Lighting: Use the dedicated lighting switch on the top panel to turn the integrated light on or off. This is useful for illuminating your workspace or surroundings in low-light conditions.
6. Maintenance
Regular maintenance ensures the longevity and optimal performance of your SUNAPEX Smart Battery Box Pro:
- Cleaning: Wipe the exterior of the battery box with a soft, damp cloth. Do not use harsh chemicals or abrasive cleaners. Ensure all ports are free of dust and debris.
- Terminal Inspection: Periodically check the battery terminals and all connections for corrosion or looseness. Clean any corrosion with a wire brush and ensure all connections are tight.
- Ventilation: Ensure the side vents are clear of obstructions to allow for proper heat dissipation. The internal sponge filters can be gently cleaned if accessible and necessary.
- Storage: When not in use for extended periods, store the battery box in a cool, dry place. If a battery is installed, ensure it is charged to a suitable storage voltage as recommended by the battery manufacturer.
7. Troubleshooting
This section addresses common issues you might encounter with your Smart Battery Box Pro.
| Problem | Possible Cause | Solution |
|---|---|---|
| No power output from 12V, QC3.0, or Type-C ports. | 16A Overload Protection Switch has tripped. Battery is depleted. Loose connection. | Reduce the connected load and toggle the 16A overload switch OFF then ON to reset. Check battery voltage on the digital display and recharge if necessary. Ensure all battery connections are secure. |
| Digital Voltmeter shows low voltage (Red indicator). | Battery is low on charge. | Recharge the battery using a compatible charger connected to the high-current terminals or Anderson plugs. |
| Anderson plugs or high-current terminals have no power. | Associated 30A fuse has blown. Loose connection. | Check and replace the 30A fuse if blown (consult manufacturer for fuse replacement guidance). Ensure connections are secure. |
| Integrated lighting does not turn on. | Lighting switch is off. Battery is depleted. | Ensure the lighting switch is in the ON position. Check battery voltage and recharge if needed. |
| Lid does not stay securely closed. | Fixing strap is too short or not properly secured. | Ensure the fixing strap is correctly routed and tightened. If the strap is genuinely too short, contact SUNAPEX customer support for assistance. |
8. Specifications
| Attribute | Detail |
|---|---|
| Brand | SUNAPEX |
| Model | SA-Battery Box Pro |
| Color | Black |
| Voltage Compatibility | 12V / 24V (DC) |
| Product Dimensions (External) | 8.1"D x 13.2"W x 12.6"H (20.5cm D x 33.5cm W x 32cm H) |
| Internal Dimensions (Approx.) | 13.19" L x 7.87" W x 8.27" H (33.5cm L x 20cm W x 21cm H) |
| Item Weight | 5.09 pounds (2.31 kg) |
| Overload Protection | 16A (for 12V, QC3.0, Type-C ports) |
| Anderson Plug Fuse | 30A per plug, 50A combined max |
| High-Current Terminal Fuse | 30A |
| UPC | 717325417832 |

Figure 6: Detailed dimensions of the SUNAPEX Smart Battery Box Pro, including external and internal measurements.
9. Warranty and Support
For warranty information, technical support, or any inquiries regarding your SUNAPEX Smart Battery Box Pro, please contact SUNAPEX customer service. Refer to the product packaging or the official SUNAPEX website for the most current contact details.
Website: Visit the SUNAPEX Store on Amazon


