MU MUMUJ13PA
MU Over The Toilet Storage Cabinet User Manual
Model: MUMUJ13PA
Introduction
Thank you for choosing the MU Over The Toilet Storage Cabinet. This manual provides detailed instructions for assembly, operation, maintenance, and troubleshooting to ensure safe and efficient use of your new storage solution. Please read this manual thoroughly before beginning assembly and retain it for future reference.
Safety Information
- Always follow assembly instructions carefully.
- Ensure all hardware is securely tightened before use. Periodically check and re-tighten as needed.
- Do not overload shelves. Distribute weight evenly.
- This cabinet is designed for indoor use only.
- Keep small parts and packaging materials away from children.
- Use caution when moving the assembled unit to prevent damage or injury.
- It is recommended to secure the cabinet to the wall using the provided anti-tipping hardware to prevent accidental tipping, especially in households with children or pets.
Parts List
Before assembly, verify that all components are present and undamaged. If any parts are missing or damaged, please contact customer support.
- Top Panel
- Side Panels (Left & Right)
- Back Panels
- Adjustable Shelves
- Sliding Barn Door
- Barn Door Rail and Hardware
- Side Cabinet Door
- Handles
- Assembly Hardware (screws, dowels, cam locks, etc.)
- Anti-tipping Hardware
Setup and Assembly
Assembly typically requires two adults. Follow the numbered steps provided in the included instruction manual. All parts are labeled for easy identification.
- Prepare the Area: Clear a spacious, clean, and flat area for assembly. Lay down a blanket or cardboard to protect the cabinet components from scratches.
- Identify Components: Unpack all parts and hardware. Match each piece to the corresponding label in the parts list.
- Assemble Main Frame: Begin by connecting the main vertical supports and horizontal crossbars. Ensure all connections are secure.
- Install Side Cabinet: The lower side storage cabinet can be installed on either the left or right side of the unit based on your preference. Follow the specific instructions for attaching this section.
- Insert Adjustable Shelves: Place the adjustable shelves into the desired positions within the main cabinet and side cabinet. The shelves offer 2.5-inch height variations for customized storage.
- Attach Sliding Barn Door: Install the barn door rail at the top of the main cabinet. Attach the rollers to the barn door and carefully hang it on the rail. Ensure smooth sliding motion.
- Secure Back Panels: Fasten the back panels to the rear of the cabinet frame.
- Install Handles: Attach the black metal handles to the sliding barn door and the side cabinet door.
- Position and Secure: Carefully move the assembled cabinet over your toilet. Secure the cabinet to the wall using the provided anti-tipping hardware to ensure stability.
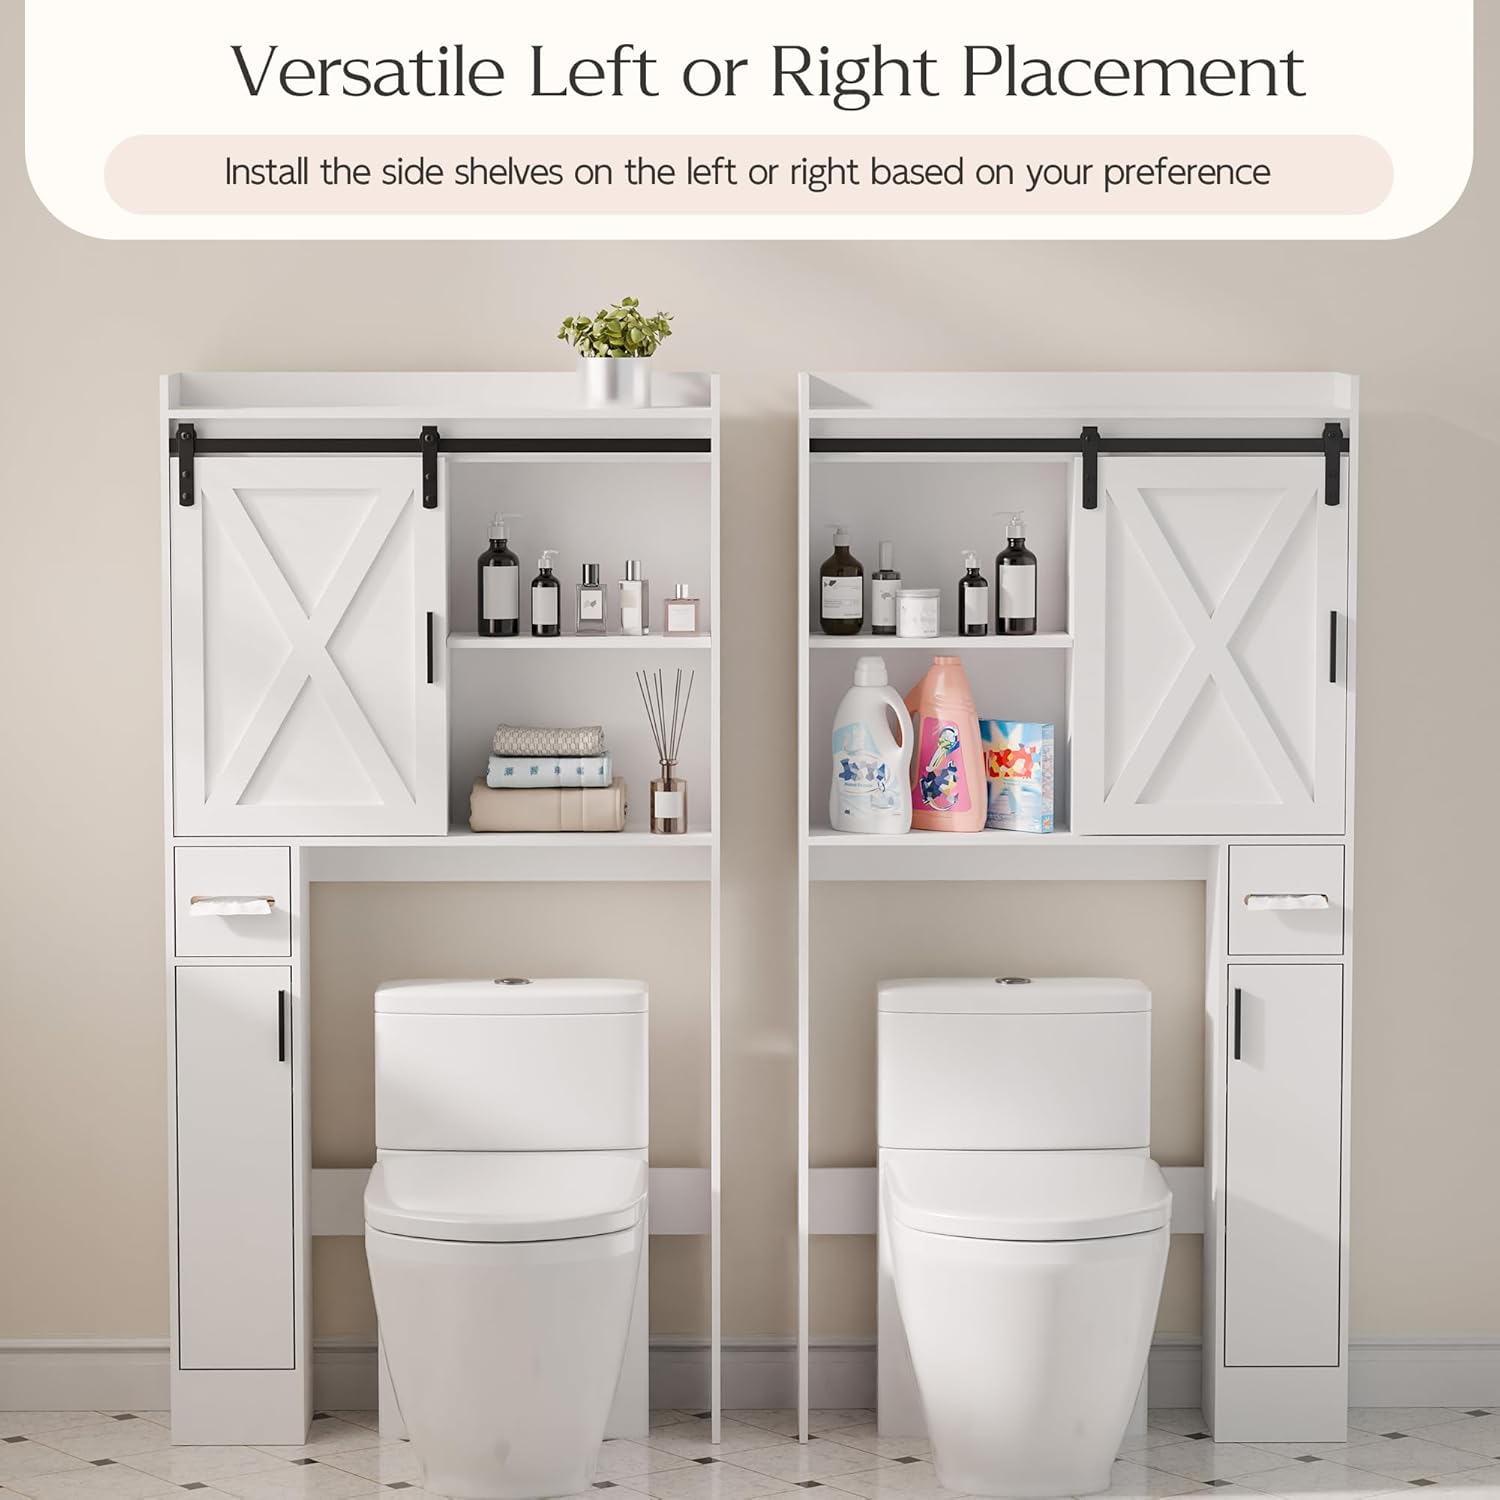
Figure 1: Versatile Left or Right Placement of the Side Cabinet

Figure 2: Adjustable Shelves for Custom Storage
Operating Instructions
The MU Over The Toilet Storage Cabinet is designed for convenient organization in your bathroom or laundry room.
- Sliding Barn Door: Gently slide the barn door along its track to access or conceal items on the main shelves. The door can cover either the left or right section of the upper cabinet.
- Adjustable Shelves: Reposition the shelves within the main and side cabinets as needed to accommodate items of various heights. Ensure shelves are securely seated on their pegs before placing items on them.
- Side Cabinet: Utilize the side cabinet for smaller items or those you wish to keep out of sight.

Figure 3: Sliding Barn Door Mechanism

Figure 4: Cabinet Use in a Laundry Room Setting
Maintenance
Proper care will extend the life and appearance of your storage cabinet.
- Cleaning: Wipe surfaces with a soft, damp cloth. Avoid harsh chemicals or abrasive cleaners, which can damage the painted finish. Dry immediately after cleaning.
- Spills: Promptly wipe up any spills, especially water, to prevent damage to the wood material.
- Hardware Check: Periodically check all screws and fasteners to ensure they remain tight. Re-tighten if necessary.
- Environment: Avoid placing the cabinet in direct sunlight or near heat sources, which can cause warping or discoloration.
Troubleshooting
| Problem | Possible Cause | Solution |
|---|---|---|
| Cabinet feels wobbly or unstable. | Loose hardware; uneven floor; not secured to wall. | Ensure all screws are tightened. Move to a level surface. Use the anti-tipping hardware to secure the cabinet to the wall. |
| Sliding barn door does not move smoothly. | Track obstruction; misaligned rollers; dirty track. | Check the track for any debris. Ensure rollers are properly aligned on the track. Clean the track with a dry cloth. |
| Parts do not align during assembly. | Incorrect orientation of parts; manufacturing variation. | Double-check the assembly instructions and part labels for correct orientation. If issues persist, contact customer support. |
| Missing or damaged parts. | Packaging error; shipping damage. | Do not proceed with assembly. Contact MU customer support immediately for replacement parts. |
Specifications
| Feature | Detail |
|---|---|
| Brand | MU |
| Model Number | MUMUJ13PA |
| Color | White |
| Product Dimensions (D x W x H) | 7.67" x 32.06" x 61.76" |
| Item Weight | 40.8 Pounds |
| Material | Wood |
| Finish Type | Painted |
| Mounting Type | Wall Mount (with anti-tipping hardware) |
| Number of Shelves | 1 (adjustable) |
| Special Feature | Adjustable Shelf, Sliding Barn Door |
| Assembly Required | Yes |
Warranty and Support
For warranty information or customer support, please refer to the purchase documentation or contact the retailer where the product was purchased. You may also visit the official MU brand store for additional resources and contact details.
MU Store Link: https://www.amazon.com/stores/MU/page/BDE25091-23D9-45B2-A4F6-C406A96523F9
Ask a question about this manual
Ask about setup, troubleshooting, compatibility, parts, safety, or missing instructions. Manuals+ will review the question and use this page’s manual context to help answer it.