1. Introduction
Thank you for choosing the Nonbliep Wireless Controller. This manual provides detailed instructions for setting up, operating, and maintaining your controller. Designed for use with PlayStation 5 (including Slim/Pro models) and Windows PCs, this controller features RGB lighting, dual vibration, turbo function, and programmable buttons to enhance your gaming experience.

Image 1.1: Nonbliep Wireless Controller (Red and Black Splice)
This image displays the Nonbliep wireless controller in a red and black splice design, highlighting its ergonomic shape and illuminated buttons and joysticks.
2. Package Contents
- Nonbliep Wireless Controller
- USB-C Charging Cable
- User Manual (this document)
3. Controller Layout
Familiarize yourself with the buttons and ports on your Nonbliep controller.

Image 3.1: Nonbliep Controller Layout
This diagram labels the various components of the Nonbliep controller, including the Touchpad, Share button, MENU button, Cross key (D-pad), Speaker, Left Stick, Right Stick, Home button, Light button, Turbo button, 3.5mm Headphone jack, USB Charging port, L1/R1/L2/R2 triggers, and PR/PL (Programmable) buttons.
4. Setup and Connection
4.1. Connecting to PlayStation 5
- For the first-time connection, connect the controller to your PS5 console using the provided USB-C cable.
- Press the HOME button on the controller. The controller will pair automatically.
- Once paired, you can disconnect the USB-C cable for wireless use.
- For subsequent connections, simply press the HOME button to reconnect wirelessly.
4.2. Connecting to PC (Windows)
- Connect the controller to your Windows PC using the provided USB-C cable.
- The PC should automatically detect and install the necessary drivers.
- The controller will function as a wired controller. Wireless connection to PC may require a compatible Bluetooth adapter and specific software (not included).

Image 4.1: Multi-Device Compatibility
This image illustrates the Nonbliep controller's compatibility with multiple devices, showing it connected to a PlayStation 5 console, a monitor, and a laptop, indicating its use across different platforms.
5. Operating Instructions
5.1. RGB Light Modes
The controller features 9 vibrant RGB lighting effects.
- Press the LIGHT button to cycle through the different lighting effects (e.g., breathing, strobe, static).
- The controller will automatically save your last selected color and mode.
- To turn off the lights, cycle through the modes until the "Light off mode" is selected.

Image 5.1: RGB Light Customization
This image demonstrates the various RGB light modes available on the controller, including Single Color Cycle, Dazzling Color Change, Single Color Mode, and Light Off Mode, along with a color memory function.
5.2. Dual Vibration and 6-Axis Gyro
- The built-in dual haptic motors provide immersive vibration feedback during gameplay.
- The 6-axis gyroscope allows for precise motion control in compatible games.

Image 5.2: Dual Vibration Feature
This image visually represents the dual motor vibration feedback system within the controller, showing waves emanating from the handles to indicate haptic response.

Image 5.3: Advanced Control Features
This image highlights the controller's sensitive 6-axis somatosensory and sensitive 3D joystick features, indicating enhanced precision and responsiveness.
5.3. Macro Programming (PR/PL Buttons)
The controller features two programmable back keys (PR and PL) that can record up to 16 key values for complex command sequences.
- Press and hold the SET button (located on the back) until the indicator light flashes.
- Press either the PR or PL button you wish to program.
- Input the sequence of buttons you want to record (e.g., R2 + Triangle + L3).
- Press the SET button again to save the macro. The indicator light will stop flashing.
- To use the macro, simply press the programmed PR or PL button.
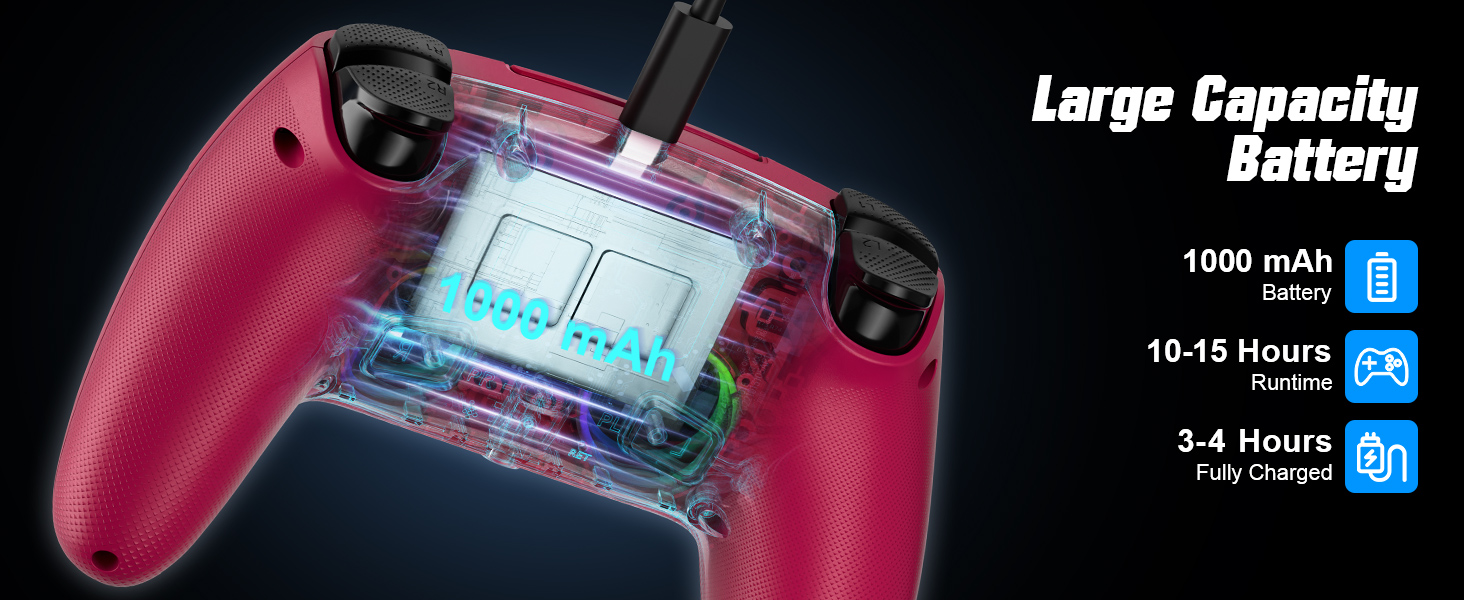
Image 5.4: Programmable Back Keys
This image details the location of the PR and PL programmable back keys and illustrates how they can be used to record up to 16 key values for macro functions.
5.4. Turbo Mode
Activate Turbo mode for rapid, automatic button presses.
- Press and hold the TURBO button.
- While holding TURBO, press the action button you wish to apply Turbo to (e.g., X, Square, R1).
- Release both buttons. Now, holding down the action button will result in rapid, repeated presses.
- To deactivate Turbo for that button, repeat the process: hold TURBO and press the action button again.

Image 5.5: Turbo Functionality
This image illustrates the Turbo function, showing that a single press of a button with Turbo activated equates to multiple rapid presses, enhancing gameplay.
5.5. Audio Jack and Speaker
- The controller includes a built-in speaker for in-game audio cues.
- A 3.5mm audio jack is provided for connecting headphones or a headset.

Image 5.6: Audio Features
This image shows a user holding the controller, highlighting its support for both wired and Bluetooth audio functions, including the 3.5mm headphone jack.
6. Charging the Controller
The controller is equipped with a 1000 mAh battery.
- Connect the controller to a USB power source (e.g., PS5 console, PC, USB wall adapter) using the provided USB-C cable.
- The indicator light on the controller will show charging status.
- A full charge typically takes 3-4 hours.
- The battery provides approximately 10-15 hours of runtime, depending on usage and RGB lighting settings.

Image 6.1: Battery Information
This image displays the internal battery of the controller, indicating a 1000 mAh capacity, with an estimated runtime of 10-15 hours and a charging time of 3-4 hours.
7. Maintenance and Care
- Keep the controller clean by wiping it with a soft, dry cloth.
- Avoid exposing the controller to extreme temperatures, humidity, or direct sunlight.
- Do not disassemble the controller, as this may void the warranty and cause damage.
- Store the controller in a safe place when not in use to prevent accidental drops or damage.
8. Troubleshooting
8.1. Controller Not Connecting/Pairing
- Ensure the controller is sufficiently charged.
- For first-time PS5 connection, always use the USB-C cable to pair.
- Try resetting the controller by inserting a small pin into the reset hole (usually located on the back).
- Ensure your PS5 or PC system software is up to date.
8.2. Input Lag or Unresponsive Buttons
- Ensure there are no obstructions or excessive distance between the controller and the console/PC.
- Minimize interference from other wireless devices.
- If using wirelessly, try connecting via USB-C cable to check if the issue persists.
- Reset the controller as described above.
8.3. RGB Lights Not Working
- Press the LIGHT button to cycle through modes and ensure it's not in "Light off mode".
- Ensure the controller has enough battery charge.
9. Specifications
| Brand | Nonbliep |
| Model | LED for PS5 Controller |
| Compatibility | PlayStation 5 (Slim/Pro), Windows PC |
| Connectivity | Wireless, USB-C (wired) |
| Battery Capacity | 1000 mAh |
| Battery Life | 10-15 hours (approx.) |
| Charging Time | 3-4 hours (approx.) |
| Dimensions | 6.81 x 4.76 x 2.76 inches |
| Weight | 11.99 ounces (approx. 12 ounces) |
| Audio | Built-in speaker, 3.5mm audio jack |
| Special Features | 9 RGB Light Modes, Dual Vibration, 6-Axis Gyro, Turbo Function, Programmable Back Buttons |
10. Warranty and Support
For warranty information and technical support, please refer to the retailer where you purchased the product or visit the official Nonbliep website. Keep your proof of purchase for any warranty claims.
Note: Disassembling the product may void the warranty.


