Mars Gaming MCVISION
MARSGAMING MC Vision Gaming Case User Manual
Model: MCVISION | Brand: Mars Gaming
1. Introduction
The Mars Gaming MC Vision is a premium ATX gaming case designed to showcase your PC components with its triple frameless tempered glass panels. Featuring a dual-chamber design, it ensures optimal thermal performance and supports extensive liquid cooling and multiple fans. This manual provides detailed instructions for setting up, operating, and maintaining your MC Vision gaming case.
2. Key Features
- 3D Panoramic View: Triple frameless tempered glass on the front, side, and top for an immersive view of internal components.
- Extreme Cooling Support: Accommodates liquid cooling up to 360mm and up to 7 x 120mm fans for efficient airflow.
- Dual Chamber Design: Separates the power supply from main components to optimize heat dissipation.
- Custom Edition: Designed without pre-installed components, allowing full customization of fans, cooling, and hardware.
- Reverse Connection Compatibility: Fully compatible with motherboards featuring reverse connection for hidden cable management and improved aesthetics.
- Optimized Internal Capacity: Supports ATX, MicroATX, and Mini-ITX motherboards, GPUs up to 415mm, CPU coolers up to 156mm, 7 expansion slots, 1 x 3.5" HDD, and 3 x 2.5" SSDs.
3. Package Contents
Please check the package carefully to ensure all items are present and in good condition. If any items are missing or damaged, please contact your retailer.
- Mars Gaming MC Vision ATX Gaming Case
- Accessory Box (screws, standoffs, cable ties, etc.)
- User Manual (this document)
4. Specifications
| Feature | Detail |
|---|---|
| Model Name | MCVISION |
| Dimensions (LxWxH) | 16.57 x 11.02 x 17.4 inches (421 x 280 x 442 mm) |
| Weight | 13.64 pounds (6.2 kg) |
| Material | Tempered Glass, Steel |
| Motherboard Compatibility | ATX, Micro ATX, Mini ITX |
| Expansion Slots | 7 |
| Drive Bays | 1 x 3.5" HDD, 3 x 2.5" SSD |
| GPU Length Clearance | Up to 415 mm |
| CPU Cooler Height Clearance | Up to 156 mm |
| Liquid Cooling Support | Up to 360mm radiators |
| Fan Support | Up to 7 x 120mm fans |
| Front I/O Ports | 2 x USB 3.0, Audio In/Out |
| Color | Black |
5. Setup and Installation
Before beginning installation, ensure you have all necessary components and tools. It is recommended to work on a clean, static-free surface.
5.1 Preparing the Case
Carefully remove the tempered glass panels. The MC Vision features triple frameless tempered glass panels on the front, side, and top. Handle them with care to avoid breakage.

Figure 5.1: The MC Vision case showcasing its panoramic view and internal components.
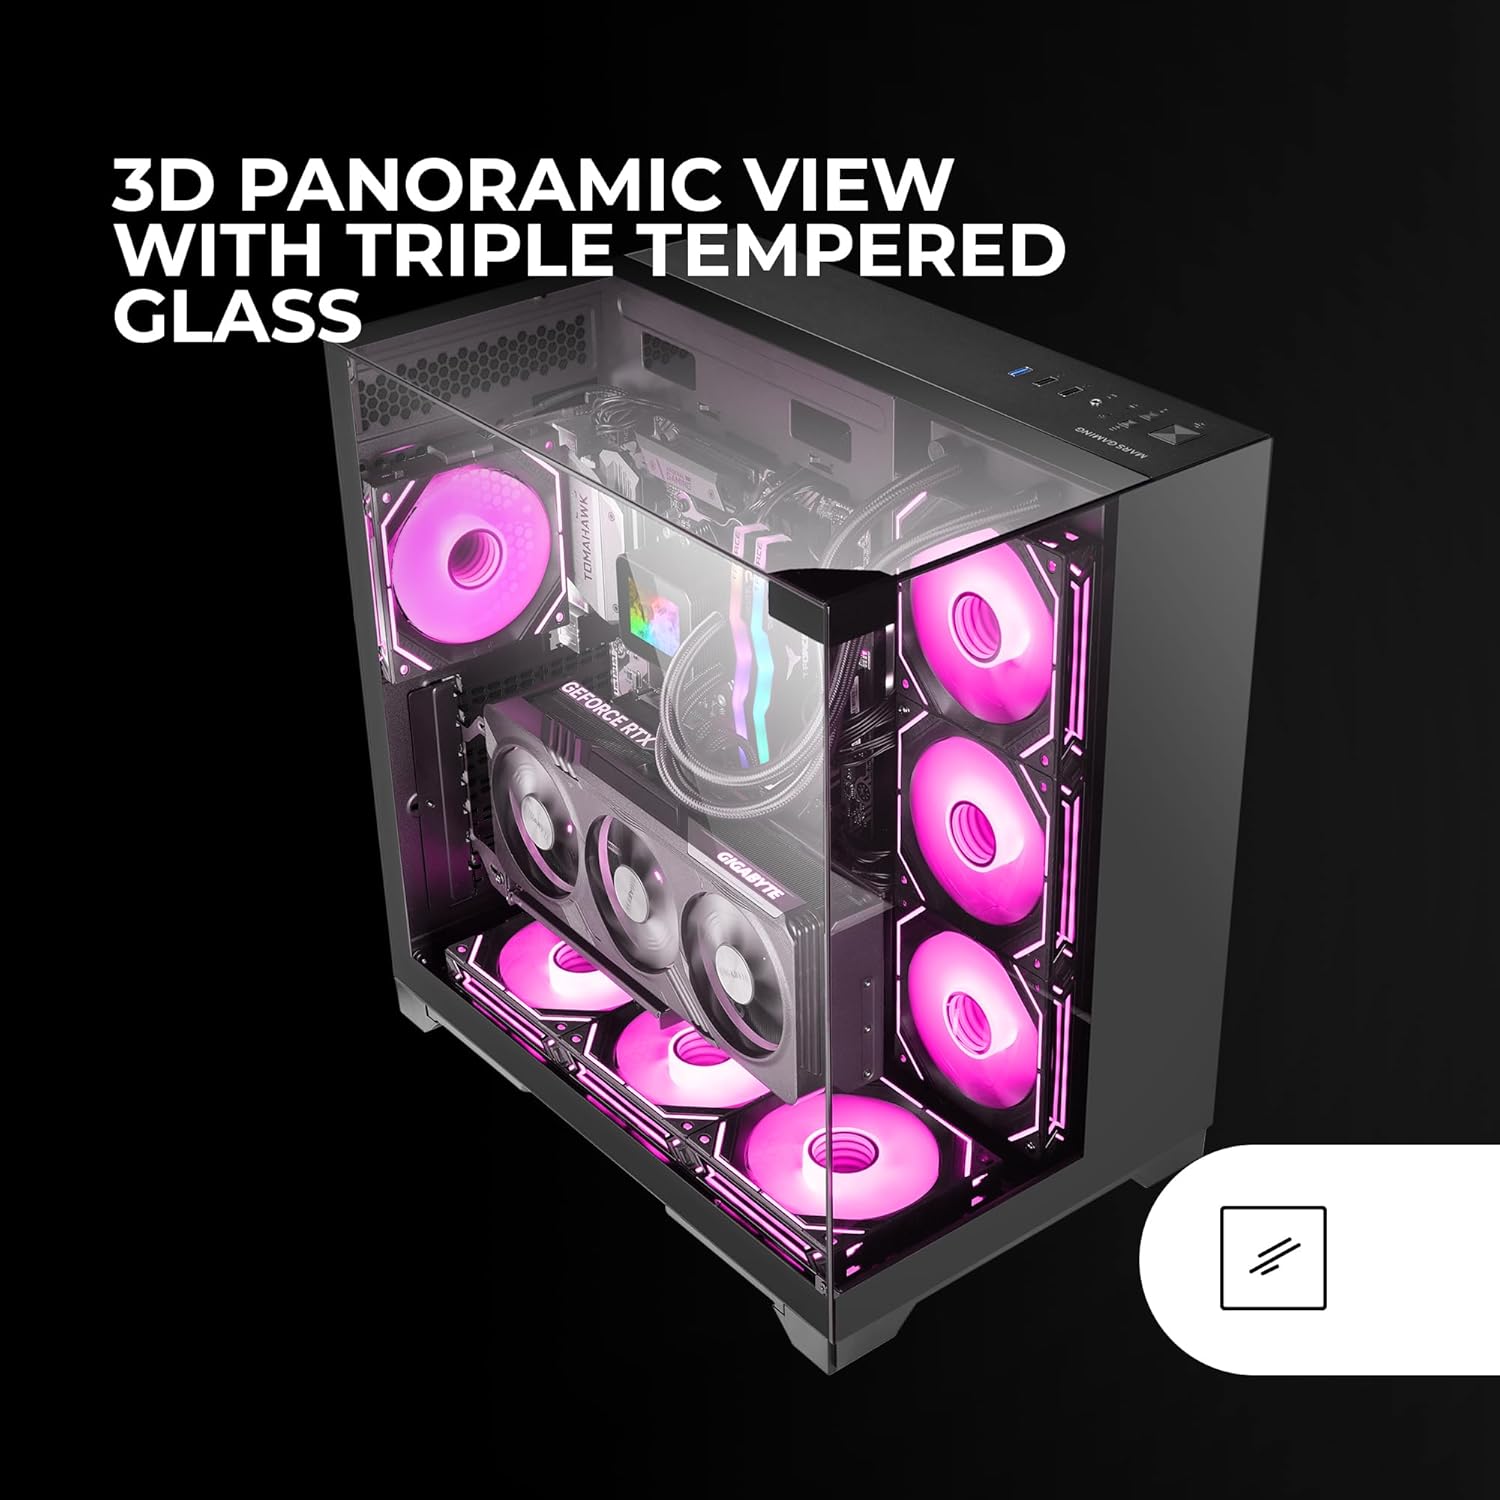
Figure 5.2: The triple frameless tempered glass design provides a comprehensive 3D panoramic view of your PC's interior.
5.2 Motherboard Installation
- Install the necessary motherboard standoffs into the case tray according to your motherboard's form factor (ATX, Micro ATX, Mini ITX).
- Carefully place your motherboard onto the standoffs, aligning the screw holes.
- Secure the motherboard with the provided screws.
- For motherboards with reverse connection, route cables through the designated cutouts behind the motherboard tray for a clean setup.

Figure 5.3: The case supports back-connect motherboards, allowing for superior cable management and a cleaner interior.
5.3 Component Installation
5.3.1 Graphics Card (GPU)
- Remove the necessary expansion slot covers from the rear of the case.
- Insert your GPU into the PCIe slot on the motherboard.
- Secure the GPU with screws. The case supports GPUs up to 415mm in length.
5.3.2 CPU Cooler
Install your CPU cooler according to its manufacturer's instructions. The MC Vision supports CPU coolers up to 156mm in height.
5.3.3 Storage Drives (HDD/SSD)
- Locate the drive bays for 3.5" HDDs and 2.5" SSDs.
- Install your drives into the designated bays and secure them with screws.

Figure 5.4: The optimized internal layout provides ample space for various components, including large GPUs and multiple storage drives.
5.4 Cooling System Installation (Fans/Liquid Cooling)
The MC Vision case offers extensive cooling options.
- Fans: Install up to 7 x 120mm fans in the designated mounting points (front, top, rear, bottom).
- Liquid Cooling: Radiators up to 360mm can be installed. Refer to your liquid cooler's manual for specific installation steps.

Figure 5.5: The case provides full support for liquid cooling solutions, ensuring efficient heat dissipation for high-performance systems.
5.5 Front I/O Panel Connections
Connect the front I/O cables from the case to the corresponding headers on your motherboard. These include:
- USB 3.0 (2 ports)
- HD Audio (Headphone/Microphone)
- Power Button
- Reset Button
- Power LED
- HDD LED

Figure 5.6: The conveniently located front I/O panel provides easy access to USB 3.0 ports and audio jacks.
6. Operation
Once all components are installed and connected, replace the tempered glass panels carefully. Ensure all screws are tightened securely but do not overtighten.
- Power On: Press the power button on the front I/O panel to start your system.
- Power Off: Shut down your system through the operating system.
- Restart: Use the reset button on the front I/O panel for a quick system restart if needed.
Monitor your system's temperatures, especially during initial setup and heavy loads, to ensure optimal cooling performance.
7. Maintenance
Regular maintenance helps ensure the longevity and optimal performance of your gaming PC.
- Dust Cleaning: Periodically clean dust from inside the case, especially from fans, radiators, and dust filters. Use compressed air or a soft brush.
- Glass Panel Cleaning: Use a soft, lint-free cloth and a glass cleaner (non-abrasive) to clean the tempered glass panels. Avoid harsh chemicals.
- Cable Management: Periodically check cable routing to ensure no cables are obstructing airflow or fan blades.
8. Troubleshooting
This section addresses common issues you might encounter.
| Problem | Possible Cause | Solution |
|---|---|---|
| System does not power on. | Power supply not connected, front panel power switch not connected correctly, faulty power supply. | Ensure power supply is plugged in and switched on. Verify front panel power switch cable is correctly connected to motherboard. Test with a known good power supply if possible. |
| Fans are not spinning. | Fans not connected to motherboard/controller, faulty fans. | Check fan connections to motherboard fan headers or fan controller. Ensure fan headers are enabled in BIOS. |
| High internal temperatures. | Insufficient airflow, dust buildup, improper fan orientation. | Ensure proper fan configuration (intake/exhaust). Clean dust filters and internal components. Verify CPU cooler and GPU cooler are properly seated. |
| Front I/O ports not working. | Cables not connected to motherboard. | Verify USB and audio cables from the front panel are securely connected to the correct headers on the motherboard. |
9. Warranty and Support
Mars Gaming products are designed and manufactured to the highest quality standards. This product is covered by a limited warranty from the date of purchase. Please refer to the official Mars Gaming website or your local retailer for detailed warranty terms and conditions.
For technical support or customer service, please visit the Mars Gaming official website or contact their support team through the contact information provided on their website.
Website: www.marsgaming.eu