1. Introduction
The MedEduQuest Wound Packing Arm Trainer is a realistic simulation device designed for hemorrhage control training. It features multiple lifelike upper limb wounds and an independently controlled bleeding system to facilitate practical exercises in tourniquet application and wound packing. This manual provides instructions for the setup, operation, maintenance, and troubleshooting of the trainer.
2. Product Components
The MedEduQuest Wound Packing Arm Trainer kit includes the following components:
- Hemorrhage Control Arm Trainer (Dark skin tone)
- Bag Stand
- Liquid Bags (x2)
- Compressed Gauzes (x4)
- Fake Blood Powder
- Absorbent Cloth
- Gloves (x4)
- Portable Storage Bag

Image 2.1: Overview of all components included in the MedEduQuest Hemorrhage Control Arm Trainer kit.
3. Setup Instructions
3.1 Preparing Simulated Blood
- Open the Fake Blood Powder container.
- Mix the powder with water according to the instructions on the container to create simulated blood.
- Pour the simulated blood into the Liquid Bags.
3.2 Assembling the Bleeding System
- Assemble the Bag Stand according to its instructions.
- Hang the filled Liquid Bags onto the Bag Stand.
- Connect the tubing from the Liquid Bags to the corresponding ports on the Hemorrhage Control Arm Trainer. Ensure all connections are secure to prevent leaks.
- Place the Absorbent Cloth underneath the arm trainer to manage any spills during training.
4. Operating Instructions
4.1 Wound Types Overview
The arm trainer features four distinct upper limb wounds for varied training scenarios:
- Junctional Wound (A): Located near the shoulder.
- Large-Caliber Gunshot Wounds (GSW) (B1 & B2): Entry and exit wounds. The penetrating gunshot wound includes an immediate feedback mechanism, stopping bleeding upon correct tourniquet application.
- Deep Laceration (C): A significant cut wound on the forearm.
- Severed Fingers (D): Located on the hand.

Image 4.1: Diagram illustrating the various wound types on the arm trainer.
4.2 Controlling Bleeding
Each wound has an independent bleeding control mechanism via Robert clamps on the tubing. To activate bleeding for a specific wound, open its corresponding clamp. To stop bleeding, close the clamp.
- Single Bleeding Wound: Open the Robert clamp for the desired wound.
- Multiple Bleeding Wounds: Open the Robert clamps for all wounds intended to bleed simultaneously.

Image 4.2: Activating a single bleeding wound.

Image 4.3: Activating multiple bleeding wounds.
4.3 Wound Packing Techniques
Practice packing deep lacerations and gunshot wounds using the provided compressed gauzes. Apply direct pressure and pack the wound cavity firmly to control simulated bleeding.

Image 4.4: Demonstration of wound packing on the arm trainer.
4.4 Tourniquet Application
The trainer is suitable for practicing tourniquet application, particularly for the gunshot wound which provides immediate feedback. Apply the tourniquet proximal to the wound and tighten until simulated bleeding ceases.
4.5 Bandaging Severed Fingers
Utilize the severed finger wound to practice proper bandaging techniques. Apply pressure and secure dressings as appropriate for this type of injury.
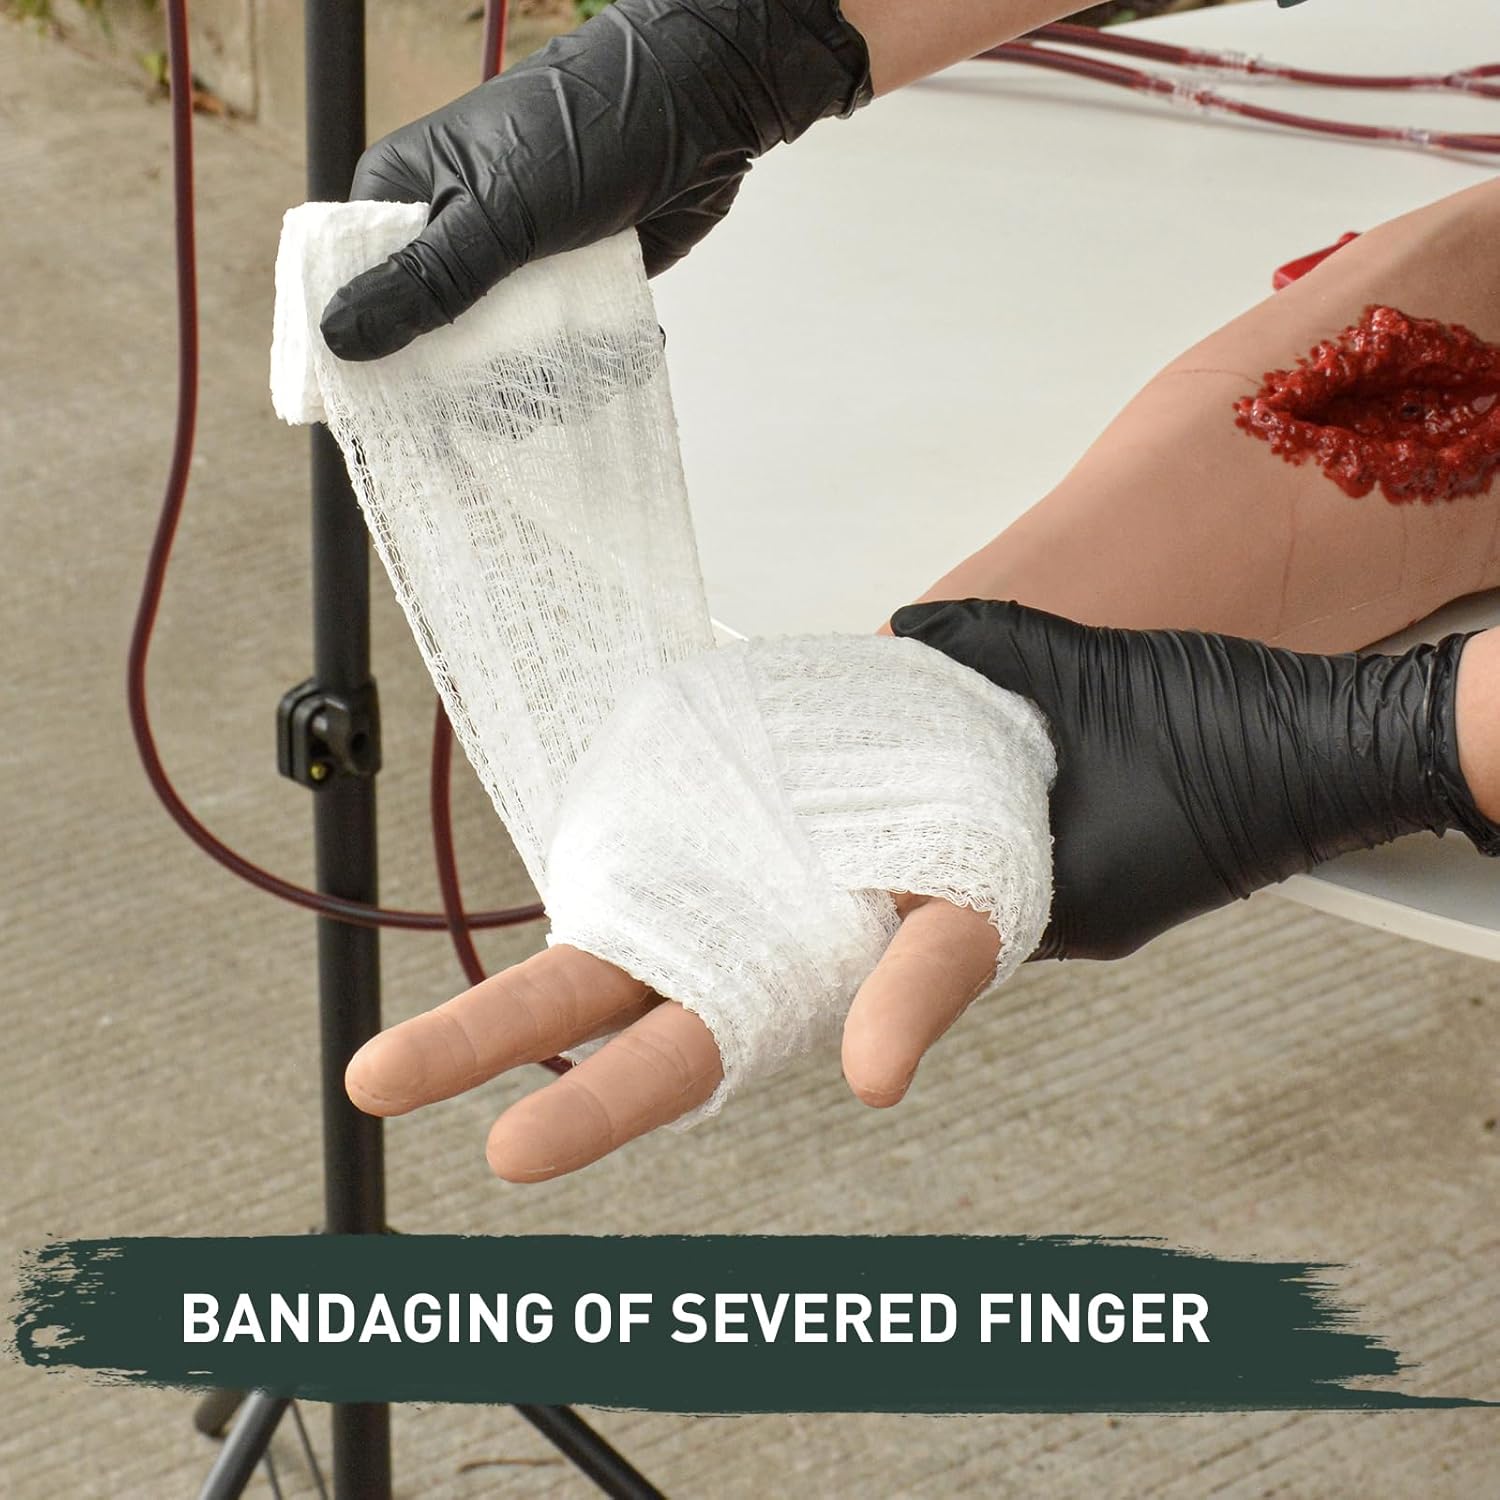
Image 4.5: Demonstration of bandaging a severed finger wound.
5. Maintenance and Care
5.1 Cleaning
After each training session:
- Drain any remaining simulated blood from the liquid bags and tubing.
- Rinse the arm trainer, liquid bags, and tubing with clean water.
- Use a mild soap solution if necessary to clean any residue from the silicone arm.
- Ensure all components are thoroughly dried before storage to prevent mold or damage.
5.2 Storage
Store the MedEduQuest Wound Packing Arm Trainer and its components in the provided Portable Storage Bag in a cool, dry place, away from direct sunlight and extreme temperatures. This helps preserve the integrity of the silicone and other materials.
6. Troubleshooting
- Issue: Simulated blood not flowing.
Solution: Check if the Robert clamps for the desired wounds are fully open. Ensure the liquid bags contain simulated blood and are positioned correctly on the stand to allow gravity feed. Verify that tubing connections are not kinked or blocked.
- Issue: Leaks from connections.
Solution: Tighten all tubing connections. Inspect tubing and ports for any damage or cracks. Replace damaged components if necessary.
- Issue: Difficulty cleaning simulated blood residue.
Solution: Use a soft brush and mild soap with warm water. For stubborn stains, a silicone-safe cleaner may be used, followed by thorough rinsing.
7. Specifications
| Feature | Detail |
|---|---|
| Package Dimensions | 34.7 x 9 x 6.9 inches |
| Weight | 17.2 Pounds |
| Manufacturer | MedEduQuest |
| ASIN | B0DWS25516 |
| Special Feature | Portable |
| Number of Pieces | 11 |
| Recommended Uses | Classroom Training |
| Color | Dark |
8. Warranty and Support
Warranty information for the MedEduQuest Wound Packing Arm Trainer is not provided in this manual. For specific warranty details, please refer to the product packaging or contact MedEduQuest customer support directly.
For technical support, replacement parts, or further assistance, please contact MedEduQuest through their official website or the retailer from whom the product was purchased.
9. Official Product Videos
No official product videos from the seller are available in the provided data for this instruction manual.