Eujgoov Eujgoov6ibkpxv7nw
Eujgoov 16A Digital Smart Thermostat User Manual
Model: Eujgoov6ibkpxv7nw
1. Introduction
This manual provides comprehensive instructions for the installation, operation, and maintenance of your Eujgoov 16A Digital Smart Thermostat (Model: Eujgoov6ibkpxv7nw). Please read this manual thoroughly before using the product to ensure safe and efficient operation. Keep this manual for future reference.
2. Product Overview
The Eujgoov 16A Digital Smart Thermostat is designed for precise temperature control in various heating systems, including floor heating and wall ovens. It features smart APP mobile remote control, touch control, and programmable period control for enhanced convenience and energy efficiency.
2.1 Key Features
- 7-Day Schedule Planning: Customize daily heating schedules for home, sleep, and away modes.
- Remote APP Control: Manage temperature settings from anywhere via a smartphone application.
- Accurate Temperature Control: Maintains temperature with an accuracy of ±1°C/°F.
- Intelligent Touch Controls: User-friendly interface with clear temperature display.
- Energy Saving Efficiency: Optimized heating management for reduced energy consumption.
2.2 Package Contents
- 1 x Eujgoov Digital Thermostat
- 1 x User Manual (this document)
- 1 x Temperature Sensor
- 2 x Mounting Screws

Image 1: Eujgoov Digital Thermostat, external temperature sensor, and mounting screws. This image shows the main thermostat unit on the left, a coiled white temperature sensor cable with a red tip on the right, and two small gold-colored screws.
3. Specifications
| Parameter | Value |
|---|---|
| Brand | Eujgoov |
| Model Number | Eujgoov6ibkpxv7nw |
| Safety Level, Shell Material | IP20, Flame Retardant PC |
| Temperature Sensor | NTC (External) |
| Temperature Accuracy | ±1°C |
| Display | LED |
| Operating Environment | -5 to 50°C |
| Power Consumption | <1W |
| Temperature Setting Range | 5 to 60°C |
| Display Range | 0 to 50°C |
| Input Voltage | AC 90-240V |
| Maximum Load | 16A |
| Control Methods | Remote Control, Smart Timing, Touch Control, Programmable Period Control |
| Item Weight | 8.5 ounces (approx. 241g) |
| Package Dimensions | 4.33 x 3.94 x 2.36 inches |
4. Safety Information
Please observe the following safety precautions to prevent damage to the product or injury to yourself:
- Installation should only be performed by a qualified electrician.
- Ensure power is disconnected before installation or maintenance.
- Do not expose the thermostat to water or excessive moisture.
- Do not attempt to disassemble or repair the unit yourself. Contact customer support for assistance.
- Operate the device within the specified voltage range (AC 90-240V).
5. Installation
Important: Installation must be carried out by a qualified professional and in accordance with local electrical codes. Ensure the main power supply is turned off before beginning installation.
5.1 Wiring Diagram
Refer to the wiring diagram on the back of the thermostat unit for correct connections. The terminals are typically labeled as follows:
- L: Live wire input
- N: Neutral wire input
- N1, L1: Load output (to heating element)
- NTC: External temperature sensor connection
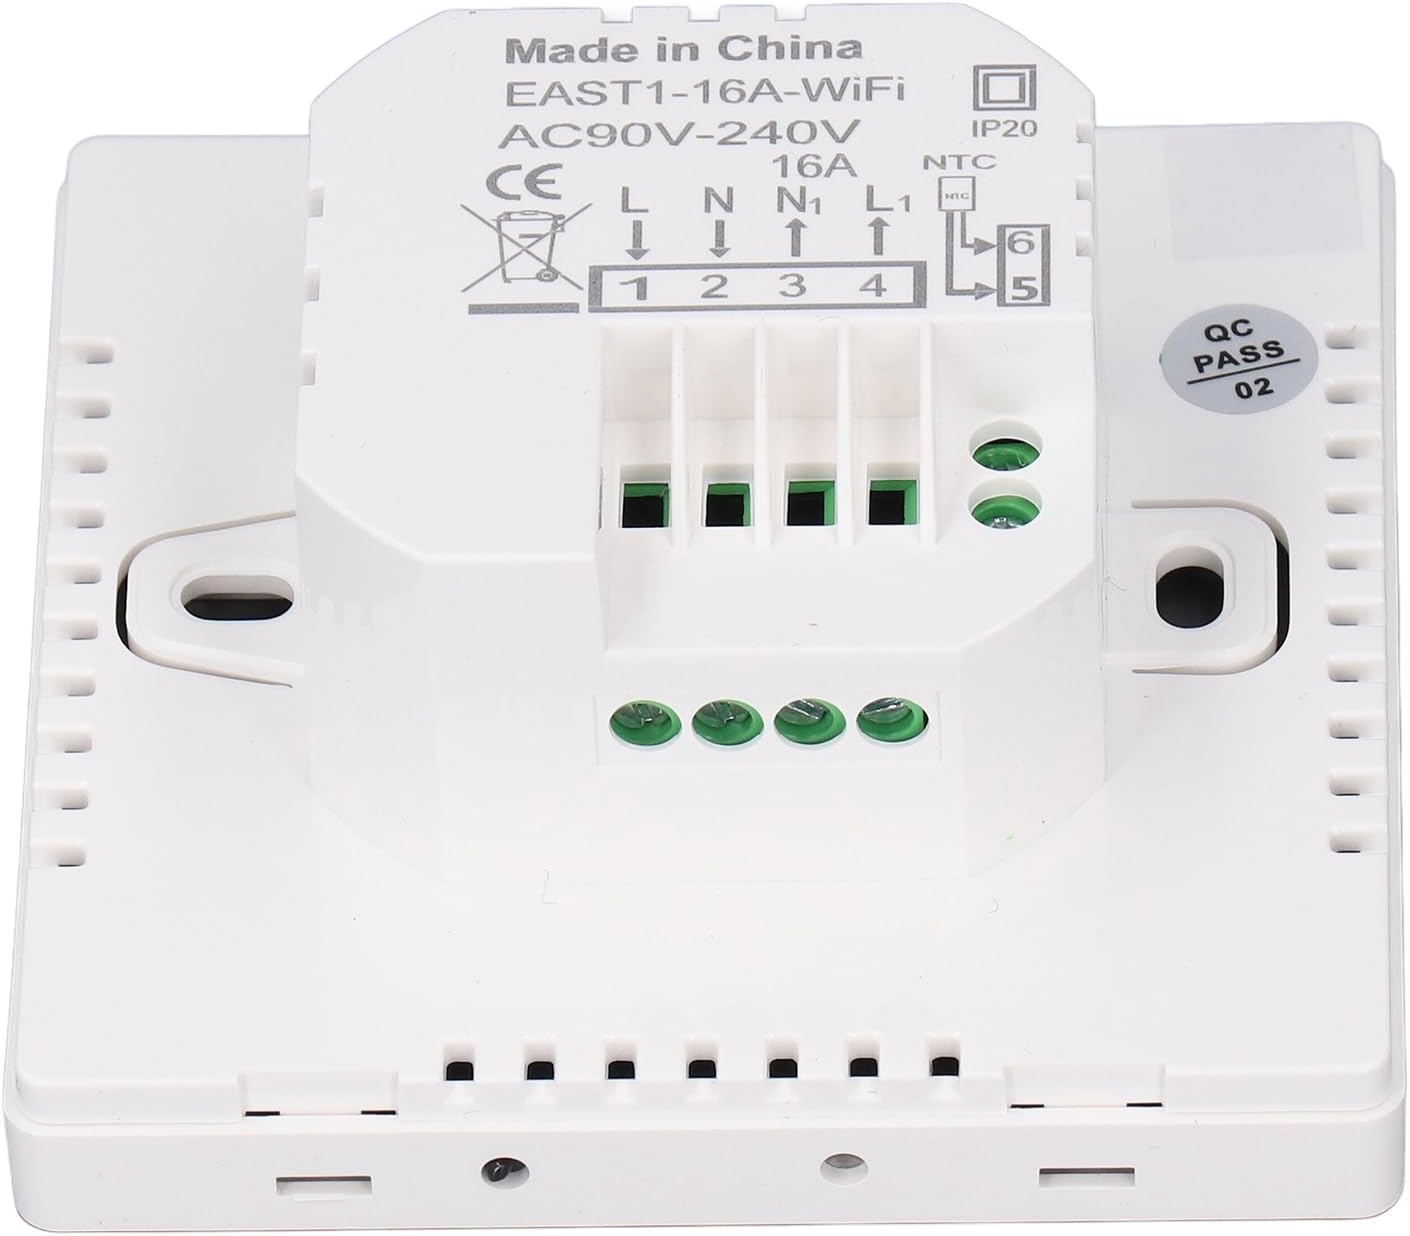
Image 2: Rear view of the Eujgoov Digital Thermostat, displaying the wiring terminals and labels. The image clearly shows the terminal block with labels L, N, N1, L1, and NTC for the external sensor.
5.2 Mounting Steps
- Disconnect Power: Turn off the main power supply at the circuit breaker.
- Prepare Wall Box: Ensure you have a standard electrical wall box installed at the desired location.
- Separate Front and Back Panels: Gently separate the front display panel from the back mounting plate.
- Wire Connections: Connect the electrical wires from your heating system and the external NTC sensor to the corresponding terminals on the back mounting plate, following the wiring diagram.
- Mount Back Plate: Secure the back mounting plate to the wall box using the provided screws.
- Attach Front Panel: Carefully reattach the front display panel to the mounted back plate, ensuring it clicks securely into place.
- Restore Power: Turn the main power supply back on.
6. Operating Instructions
6.1 Display Overview

Image 3: Front view of the Eujgoov Digital Thermostat display. The screen shows the current day (Wed), time (12:27h), current temperature (15.0°C), and various icons indicating Wi-Fi status, lock, heating mode, and schedule.
The LED display shows current temperature, time, day, and various status icons. Touch-sensitive buttons are located below the display for manual control.
6.2 Basic Operation
- Power On/Off: Press the ⏻ (Power) button to turn the thermostat on or off.
- Adjust Temperature: Use the ⌃ (Up) and ⌄ (Down) buttons to manually adjust the target temperature.
- Mode Selection: Press the ⏱ (Mode/Clock) button to cycle through different operating modes (e.g., Manual, Programmed).
- Child Lock: Press and hold the ⏻ (Power) and ⏱ (Mode/Clock) buttons simultaneously for 3 seconds to activate/deactivate the child lock. A lock icon will appear on the display.
6.3 Smart APP Control
The thermostat can be controlled remotely via a smartphone application. Follow these steps to connect your device:
- Download App: Search for the "Graffiti Smart APP" or similar application (refer to the quick start guide for exact app name) on your smartphone's app store (iOS or Android).
- Register/Login: Create an account or log in to the application.
- Add Device: Follow the in-app instructions to add a new device. This typically involves putting the thermostat into pairing mode (often by pressing and holding a specific button combination until a Wi-Fi icon flashes) and connecting to your home Wi-Fi network.
- Control: Once connected, you can control temperature, set schedules, and monitor the thermostat from anywhere.

Image 4: A smartphone screen showing the mobile application interface for controlling the Eujgoov Smart Thermostat. The app displays a circular temperature dial set to 22°C and control buttons.

Image 5: The Eujgoov Smart Thermostat installed on a wall in a modern living room setting, with Wi-Fi signal icons emanating from it, illustrating its smart connectivity.
6.4 Programming Schedules (7-Day Planning)
The thermostat supports 7-day programmable scheduling. This feature allows you to set different temperature targets for various times of the day and days of the week (e.g., Home, Sleep, Away). Detailed programming instructions are typically found within the mobile application interface, offering a more intuitive setup process.
Consult the specific instructions within the "Graffiti Smart APP" for setting up daily and weekly schedules.
7. Maintenance
- Cleaning: Wipe the thermostat's display and casing with a soft, dry cloth. Do not use abrasive cleaners or solvents.
- Inspection: Periodically check the wiring connections for any signs of wear or looseness. Ensure the external sensor is free from obstructions.
- Software Updates: Keep the mobile application updated to the latest version for optimal performance and new features.
8. Troubleshooting
| Problem | Possible Cause | Solution |
|---|---|---|
| Thermostat not powering on. | No power supply; incorrect wiring. | Check circuit breaker. Verify wiring connections (L, N). |
| Temperature reading is inaccurate. | Faulty or disconnected external sensor; sensor placed in an unsuitable location. | Check NTC sensor connection. Relocate sensor away from direct heat sources or drafts. |
| Heating system not responding. | Incorrect wiring to load (N1, L1); thermostat in off mode; heating system fault. | Verify load wiring. Ensure thermostat is powered on and in heating mode. Check heating system independently. |
| Cannot connect to Wi-Fi/APP. | Incorrect Wi-Fi password; thermostat not in pairing mode; router issues; 5GHz Wi-Fi network. | Ensure correct Wi-Fi password. Put thermostat into pairing mode. Restart router. Ensure you are connecting to a 2.4GHz Wi-Fi network. |
| Display is locked. | Child lock activated. | Press and hold Power and Mode/Clock buttons simultaneously for 3 seconds to unlock. |
9. Warranty and Support
For warranty information and technical support, please refer to the contact details provided with your purchase or visit the official Eujgoov brand store on Amazon:
Please have your model number (Eujgoov6ibkpxv7nw) and purchase date ready when contacting support.
Ask a question about this manual
Ask about setup, troubleshooting, compatibility, parts, safety, or missing instructions. Manuals+ will review the question and use this page’s manual context to help answer it.