1. Introduction
This manual provides detailed instructions for the safe and effective operation, setup, and maintenance of the LHQYA 1000N Digital Force Gauge Push Pull Test Stand. This device is designed for precise measurement of push and pull forces in various applications, including tensile testing, destructive testing, and plugging/unplugging tests.
The system combines a digital force gauge with a wheel-operated test stand, offering stable and accurate measurements. It features a 1000N load capacity, USB data output, and an LCD digital display.

Figure 1.1: Overview of the LHQYA 1000N Digital Force Gauge Push Pull Test Stand. This image displays the complete assembly, including the digital force gauge, the wheel-operated test stand, and the clamps.
2. Safety Precautions
- Always operate the device within its specified load capacity of 1000N (100KG). Exceeding this limit will damage the sensor and is not covered under warranty.
- Ensure the test stand is placed on a stable, level surface before operation.
- Do not attempt to disassemble or modify the device. Refer all servicing to qualified personnel.
- Keep hands and loose clothing clear of moving parts, especially the wheel and clamps, during operation.
- Disconnect the power supply before cleaning or performing any maintenance.
3. Setup and Assembly
Follow these steps to set up your LHQYA 1000N Digital Force Gauge Push Pull Test Stand:
- Unpacking: Carefully remove all components from the packaging. Verify that all parts listed in the product contents are present.
- Base and Column Assembly: Place the test stand base on a stable workbench. Securely attach the vertical column to the base if it is not pre-assembled.
- Force Gauge Installation: Mount the digital force gauge onto the designated slot on the test stand column. Ensure it is firmly secured to prevent movement during testing.
- Clamp Attachment: Select the appropriate clamps for your testing application. The device includes 5 clamps suitable for various materials. Attach the clamps to both the upper and lower ends of the force gauge or test stand as required for tensile or compression testing. The clamp opening is adjustable from 0-10mm.

Figure 3.1: The test stand shown with various accessories, including different types of clamps. This image also highlights key specifications such as digital display, table load, frame travel, and frame size.
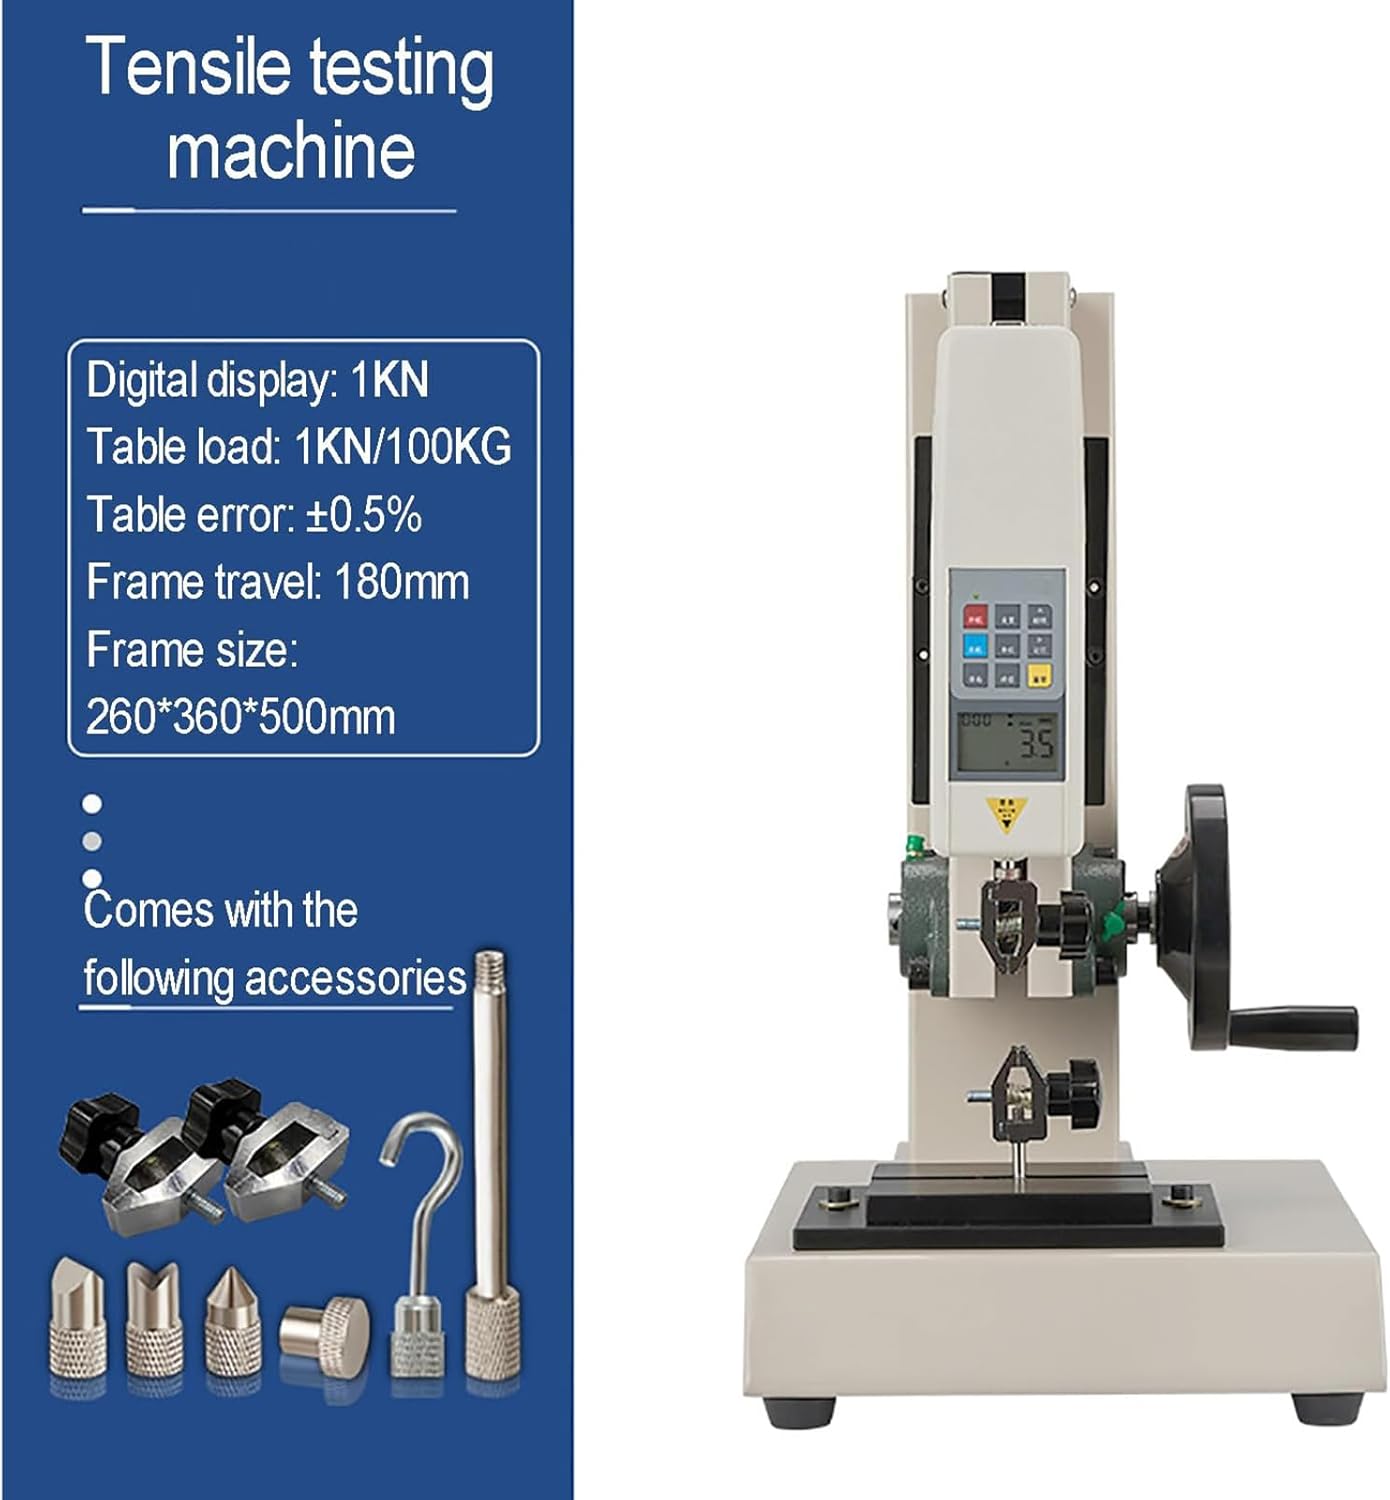
Figure 3.2: Detailed view of the clamp mechanism, illustrating the 0-10mm adjustable clamp opening. This feature ensures a firm and stable grip on test samples.
4. Operating Instructions
4.1 Powering On/Off and Display
- Power On: Press the "ON" button on the digital force gauge. The LCD backlight will illuminate automatically.
- Unit Conversion: Use the "UNIT" button to cycle through available measurement units: KN/N, Kg/g, and Ib.
- Screen Flip: The display can be flipped for easier viewing depending on the orientation of the gauge. Refer to Figure 4.1.
- Power Off: Press the "OFF" button to turn off the device.

Figure 4.1: Comparison of the force gauge display in normal and flipped orientations. This feature enhances readability in various testing setups.
4.2 Performing a Test
- Prepare Sample: Securely mount the test sample between the upper and lower clamps. Ensure the sample is centered and held firmly.
- Zeroing: Before applying force, press the "ZERO" button on the force gauge to reset the reading to zero.
- Apply Force: Rotate the handwheel to move the upper clamp up or down, applying either tensile (pull) or compression (push) force to the sample. The upper rocking handle is equipped with a reduction gear for precise control.
- Monitor Reading: Observe the force reading on the LCD display. The gauge can display real-time force and peak values.
- Peak Value Hold: Press the "PEAK" button to hold the maximum force recorded during the test.
- Data Storage: The force gauge can store up to 999 sets of test data. Refer to the device's specific button layout for saving data.

Figure 4.2: The push and pull force test bench during operation, demonstrating how a sample is subjected to force. The handwheel mechanism allows for controlled application of force.
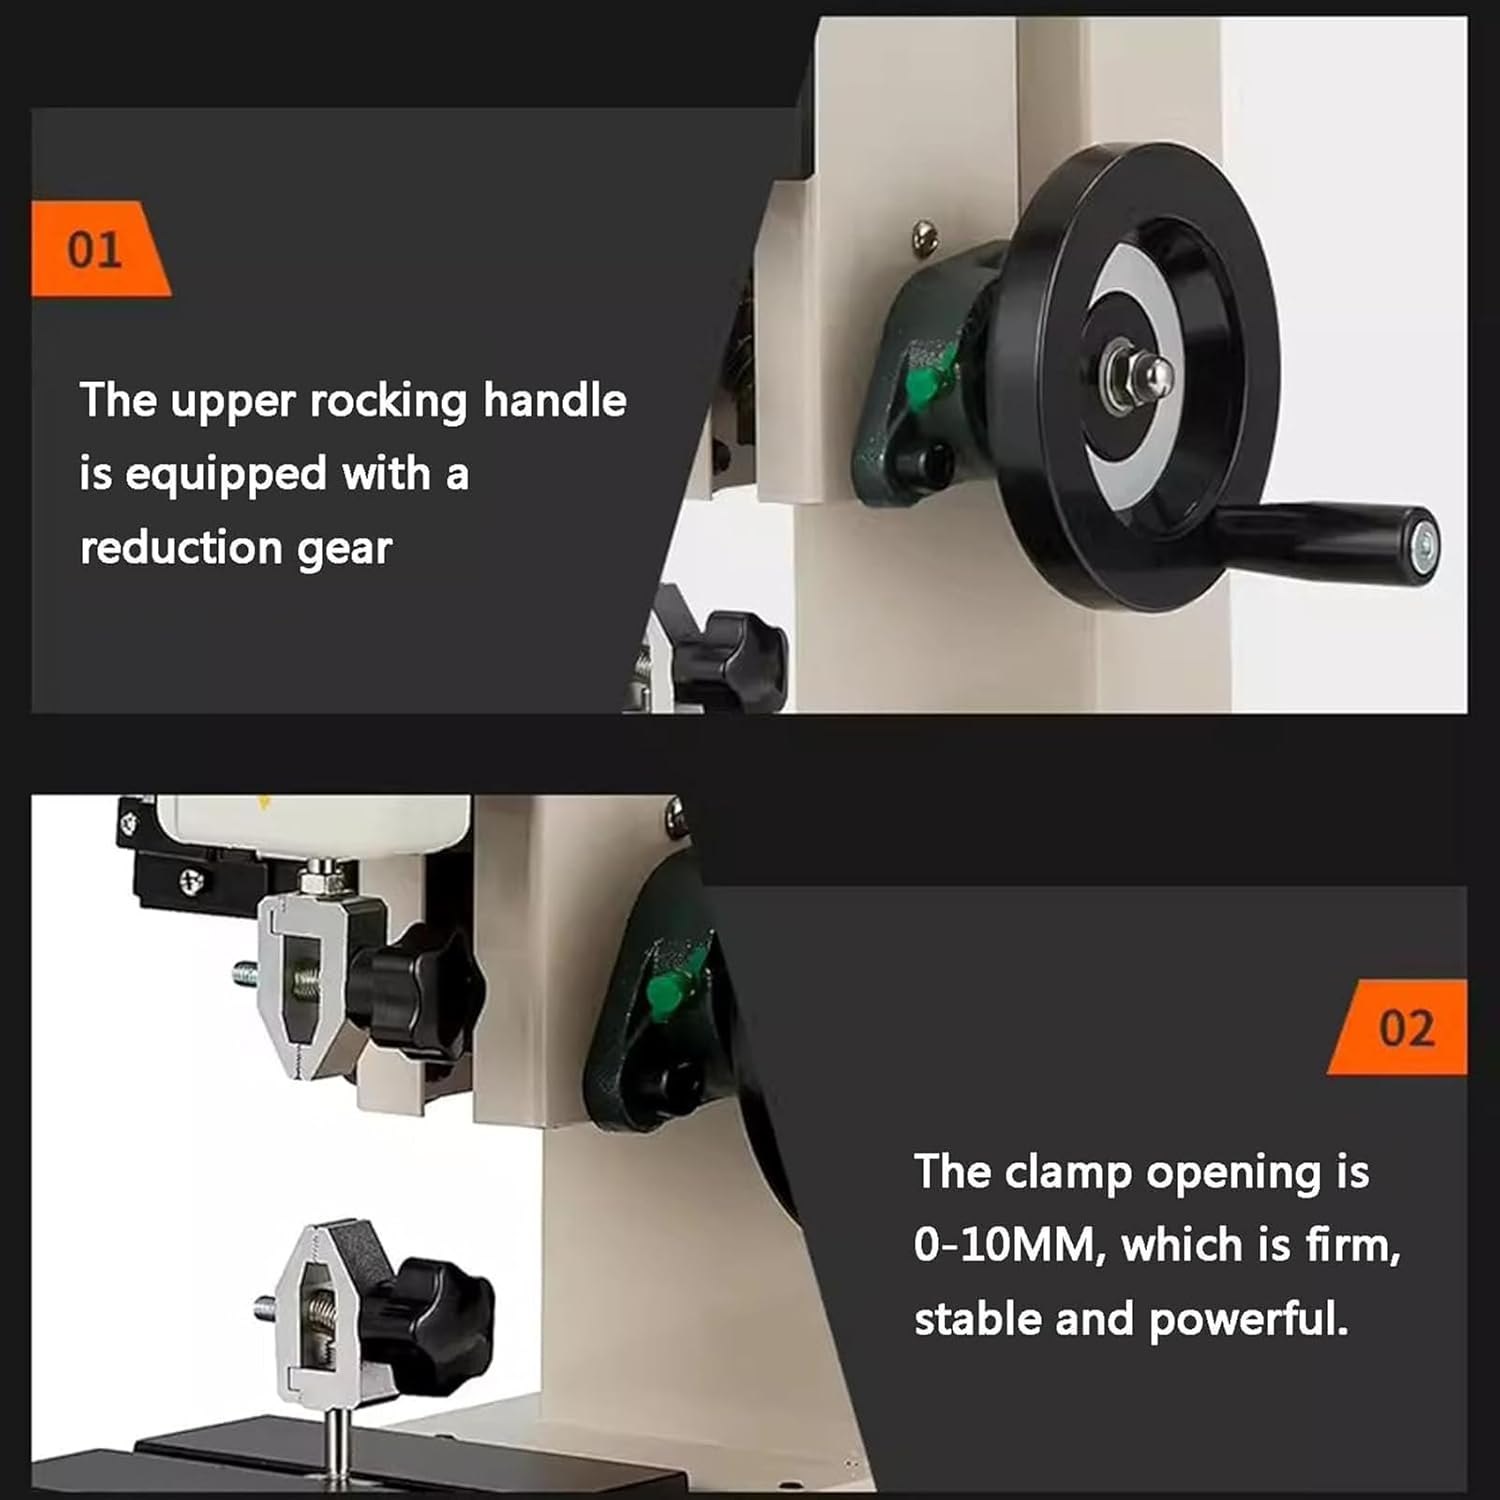
Figure 4.3: A close-up view of the upper rocking handle, which incorporates a reduction gear. This design provides enhanced precision and control when adjusting the test stand's position.

Figure 4.4: The digital display of the force gauge, showing options for peak value hold, three unit conversions (KN/N, Kg/g, Ib), and the capability to store up to 999 sets of data.
4.3 Data Output
The Digital Force Gauge 1000N supports USB data output. Use the provided USB data cable to connect the force gauge to a computer. Software (not included, typically provided by manufacturer or third-party) may be required to export and analyze real-time measurement data.
4.4 Important Overload Warning
Regardless of whether the product is turned on or off, any push or pull force applied to the sensor will cause it to work. If the applied force exceeds the specified range (1000N/100KG), the sensor will be permanently damaged. Overloading is considered user-induced damage and is not covered under warranty. Always ensure the appropriate range is selected and do not overload the device.
5. Maintenance
- Cleaning: Wipe the device with a soft, dry cloth. Do not use abrasive cleaners or solvents. Ensure no liquids enter the electronic components.
- Storage: Store the test stand and force gauge in a clean, dry environment, away from direct sunlight and extreme temperatures.
- Sensor Protection: Always be mindful of the load capacity. Avoid sudden impacts or forces that could damage the internal sensor.
- Calibration: Regular calibration by a qualified technician is recommended to maintain measurement accuracy, especially after prolonged use or if accuracy is critical.
6. Troubleshooting
6.1 Common Issues and Solutions
- Device Not Powering On:
- Check battery level or power connection.
- Ensure the power button is fully pressed.
- Inaccurate Readings:
- Ensure the device was zeroed before the test.
- Verify the sample is securely clamped and aligned.
- Check for any physical obstructions or damage to the sensor or clamps.
- Consider professional calibration if issues persist.
- USB Data Transfer Issues:
- Ensure the USB cable is securely connected to both the gauge and the computer.
- Verify that the necessary software or drivers are installed on your computer.
- Try a different USB port or cable.
- Display Not Clear:
- Check for sufficient lighting. The LCD has an automatic backlight.
- Ensure the screen is clean and free from smudges.
If you encounter problems not listed here or if solutions do not resolve the issue, please contact customer support.
7. Specifications
| Feature | Specification |
|---|---|
| Brand | LHQYA |
| Model | 1000N Digital Force Gauge Push Pull Test Stand |
| Load Capacity | 1000N / 100KG |
| Frame Travel | 0-180mm |
| Measurement Units | KN/N, Kg/g, Ib |
| Clamp Opening | 0-10MM |
| Frame Size | 260mm * 360mm * 500mm |
| Data Storage | Up to 999 sets |
| Data Output | USB |
| Material | Metal, ABS |
8. Warranty and Support
Specific warranty information for the LHQYA 1000N Digital Force Gauge Push Pull Test Stand is not provided within this manual. Please refer to the product packaging, purchase documentation, or the manufacturer's official website for detailed warranty terms and conditions.
For technical support, service, or inquiries regarding your product, please contact LHQYA customer service through the vendor from whom you purchased the device or visit the official LHQYA support channels.