1. Important Safety Instructions
Please read all instructions carefully before using this appliance. Keep this manual for future reference.
- Always ensure the appliance is unplugged before cleaning or when not in use.
- Do not immerse the appliance, power cord, or plug in water or other liquids.
- Keep the appliance out of reach of children.
- Do not operate the appliance with a damaged cord or plug.
- Use only accessories recommended by the manufacturer.
- Place the appliance on a stable, flat, heat-resistant surface.
- Exercise caution when handling hot surfaces and steam.
2. Product Overview
The SUNVIVI 20 Bar Espresso Machine is a versatile 3-in-1 coffee maker designed for brewing espresso, iced coffee, and Americano, featuring an integrated milk frother.

Image: The SUNVIVI 20 Bar Espresso Machine, showcasing its main unit, a separate milk frothing container, and a glass of iced coffee.
Key Features:
- 20 Bar High-Pressure Extraction: Ensures rich crema and full-bodied coffee flavor.
- 3-in-1 Functionality: Brews espresso, iced coffee, and Americano.
- Milk Frothing System: 360° adjustable steam wand for dense, creamy milk foam.
- LED Touchscreen Control: Intuitive interface for easy operation.
- 52OZ Removable Water Tank: Large capacity for continuous brewing and easy cleaning.

Image: Diagram showing the dimensions of the SUNVIVI Espresso Machine and its separate milk frothing container. The main unit measures approximately 13 inches high, 8 inches wide, and 10.5 inches deep. The milk frother measures approximately 9.25 inches high and 3.4 inches wide/deep.
3. Setup
- Unpacking: Carefully remove all packaging materials and ensure all components are present.
- Placement: Place the machine on a dry, stable, and level surface, away from heat sources and direct sunlight. Ensure adequate ventilation.
- Clean Components: Wash the water tank, portafilter, filter baskets, and drip tray with warm, soapy water. Rinse thoroughly and dry.
- Fill Water Tank: Remove the 52OZ water tank from the back of the machine. Fill it with fresh, cold water up to the MAX line. Reinsert the tank securely.
- First Use Cycle (Priming):
- Plug the machine into a grounded electrical outlet.
- Press the ON/OFF button on the LED touchscreen. The machine will preheat.
- Place a large cup under the coffee outlet.
- Press the 'Espresso' button to run a cycle without coffee. This primes the pump and cleans the internal system.
- Repeat this process for the steam wand by pressing the 'Steam' button and turning the steam knob to release steam for a few seconds.

Image: A four-panel illustration demonstrating the initial steps for brewing coffee: 1. Adding water to the reservoir. 2. Adding ground coffee to the filter. 3. Attaching the portafilter to the espresso machine. 4. Selecting the coffee mode on the touchscreen to start extraction.
4. Operating Instructions
4.1 Brewing Espresso (Single or Double Shot)
- Ensure the water tank is filled.
- Select the appropriate filter basket (single or double shot) and place it into the portafilter.
- Add finely ground coffee to the filter basket. Tamp the coffee evenly with a tamper (not included) to create a compact puck.
- Attach the portafilter to the brewing head by aligning it and twisting it firmly to the right until secure.
- Place your espresso cup(s) on the drip tray beneath the portafilter.
- Press the 'Espresso' button for a single shot or the '2 Espresso' button for a double shot on the LED touchscreen. The machine will preheat and then begin extraction.
- Once the desired volume is reached, the machine will stop automatically. Remove your cup(s).

Image: Close-up of the espresso machine during extraction, showing rich coffee flowing into a glass cup, highlighting the 20 Bar high-pressure extraction for optimal crema.
4.2 Brewing Iced Coffee
- Fill the water tank with cold water.
- Add ground coffee to the filter basket in the portafilter.
- Attach the portafilter to the brewing head.
- Place a glass filled with ice under the portafilter.
- Press the 'Cold Brew' button on the LED touchscreen. The machine will perform a low-temperature extraction suitable for iced coffee.
- The machine will stop automatically once the cycle is complete.

Image: The LED touchscreen displaying the 'Cold Brew' option, alongside images illustrating room temperature extraction and ice water extraction for iced coffee, emphasizing reduced acidity and bitterness.
4.3 Brewing Americano
- Follow steps 1-5 for brewing espresso (Section 4.1).
- Press the 'Americano' button on the LED touchscreen. The machine will first brew an espresso shot and then dispense hot water to dilute it, creating an Americano.
- The machine will stop automatically.
4.4 Milk Frothing
- Fill the milk frothing container with cold milk (dairy or non-dairy). Do not overfill.
- Connect the milk tank to the steam wand if using the automatic frothing attachment, or position the steam wand into a separate milk pitcher.
- Press the 'Steam' button on the LED touchscreen. The indicator light will blink during preheating and become solid when ready.
- Turn the steam knob on the side of the machine to the 'ON' position to release steam.
- For manual frothing, immerse the steam wand tip just below the surface of the milk. Move the pitcher up and down to create foam.
- Once desired foam consistency is achieved, turn the steam knob to 'OFF' and press the 'Steam' button again to deactivate.
- Immediately clean the steam wand after use by wiping it with a damp cloth and briefly releasing steam into an empty cup to clear any milk residue.

Image: Close-up of the 360° adjustable steam wand in action, producing steam. Insets show the steam knob, creamy milk foam being created in a pitcher, and a finished latte with art, demonstrating its capability for specialty drinks.
Image: A four-panel illustration demonstrating the steps for milk frothing: 1. Adding milk to the milk tank. 2. Connecting the milk tank to the steam wand. 3. Pressing the 'Steam' button on the touchscreen. 4. Turning the steam knob to the 'ON' position.
5. Maintenance and Cleaning
Regular cleaning ensures optimal performance and extends the lifespan of your espresso machine.
5.1 Daily Cleaning
- Portafilter and Filter Baskets: After each use, remove the portafilter, discard spent coffee grounds, and rinse the portafilter and filter basket under warm water.
- Steam Wand: Immediately after frothing milk, wipe the steam wand with a damp cloth. Briefly open the steam valve to purge any milk residue from inside the wand.
- Drip Tray: Empty and rinse the drip tray daily.
- Water Tank: Empty any remaining water from the tank and refill with fresh water daily. Clean the tank with mild detergent and rinse thoroughly weekly.
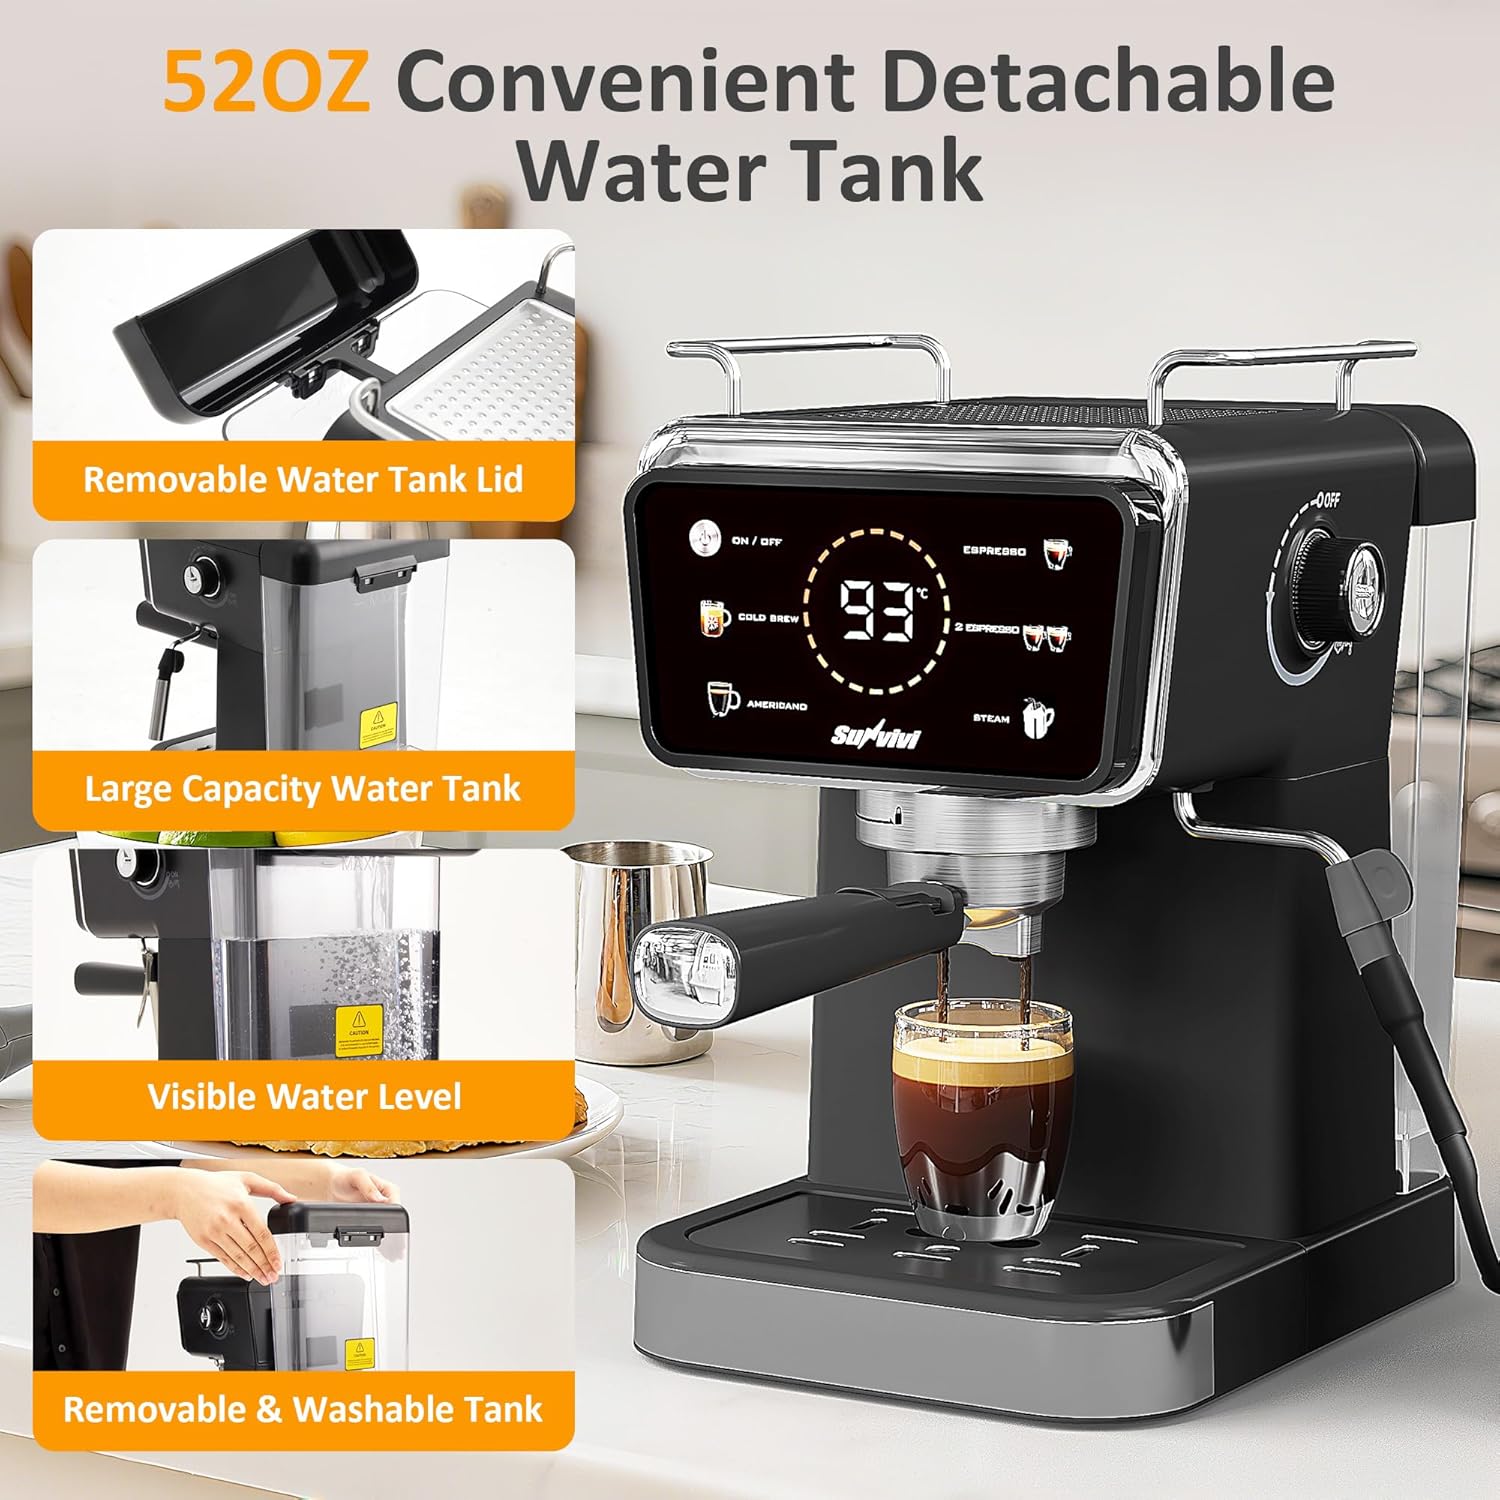
Image: Detailed view of the 52OZ removable water tank, showing its lid, large capacity, visible water level, and ease of removal and washing.
5.2 Descaling
Descaling should be performed every 2-3 months, or more frequently in areas with hard water, to prevent mineral buildup.
- Prepare a descaling solution according to the descaler manufacturer's instructions, or use a mixture of white vinegar and water (1:1 ratio).
- Fill the water tank with the descaling solution.
- Place a large container under the coffee outlet and steam wand.
- Turn on the machine and run several brewing cycles (without coffee) until half of the solution has passed through.
- Run steam through the steam wand for 30-60 seconds.
- Turn off the machine and let it sit for 15-20 minutes.
- Repeat steps 4-6 until all the descaling solution has been used.
- Rinse the water tank thoroughly and fill it with fresh water.
- Run several cycles with fresh water to flush out any remaining descaling solution.
6. Troubleshooting
| Problem | Possible Cause | Solution |
|---|---|---|
| No coffee dispenses | Water tank empty; Clogged filter; Machine not primed. | Refill water tank; Clean filter; Perform first use priming cycle. |
| Coffee brews too slowly | Coffee grounds too fine or tamped too hard; Clogged filter. | Use coarser grind or lighter tamp; Clean filter. |
| Coffee brews too quickly/weak | Coffee grounds too coarse or not enough coffee; Poorly tamped. | Use finer grind or more coffee; Tamp more firmly. |
| No steam from wand | Steam wand clogged; Machine not heated to steam temperature. | Clean steam wand; Wait for 'Steam' indicator to be solid. |
| Machine leaks water | Water tank not seated correctly; Drip tray full. | Ensure water tank is firmly in place; Empty drip tray. |
7. Specifications
- Brand: SUNVIVI
- Model Name: Sunvivi Iced Coffee Maker
- Item Model Number: ZEC005BK-11-SV-F
- Pressure: 20 Bar
- Power: 1350W (from feature bullets)
- Water Tank Capacity: 52 OZ (approximately 1.5 liters)
- Product Dimensions: 11.28"D x 4.72"W x 7.87"H (Main Unit)
- Item Weight: 11.28 pounds
- Coffee Input Type: Ground Coffee
- Operation Mode: Manual (with LED Touch Control)
- Special Feature: 3 Brewing Options (Espresso, Cold Brew, Americano), Milk Frother
8. Warranty and Support
SUNVIVI is committed to providing quality products and customer satisfaction.
- Quality Retain: 1-year quality retain period.
- Free Replacement: 365 days free replacement for eligible issues.
- Certification: UL Certified for safety standards.
- After-sales Service: Contact SUNVIVI customer support for assistance with product inquiries, troubleshooting, or warranty claims. Refer to the product packaging or official SUNVIVI website for contact information.

Image: Graphic illustrating key warranty and support details: 1-year Quality Retain, UL Certification, and After-sales Service.


