YITAHOME MAYIH3w9eu
YITAHOME 52" Farmhouse Coffee Bar Cabinet User Manual
Model: MAYIH3w9eu
Introduction
This manual provides detailed instructions for the assembly, operation, and maintenance of your YITAHOME 52" Farmhouse Coffee Bar Cabinet. Please read this manual thoroughly before beginning assembly or use to ensure safe and proper functionality. Keep this manual for future reference.
Safety Information
Always follow basic safety precautions when assembling and using this product to reduce the risk of injury or damage.
- Ensure all parts are present and undamaged before assembly.
- Assemble on a soft, clean surface to prevent scratches.
- Do not overtighten screws during assembly.
- Keep small parts away from children.
- Do not exceed the weight limits for shelves and the tabletop.
- Ensure the power outlets are used with compatible devices and within specified electrical ratings.
Parts List
Verify that all components are included in your package before starting assembly. Refer to the detailed installation guide provided with your product for specific part identification and quantities.
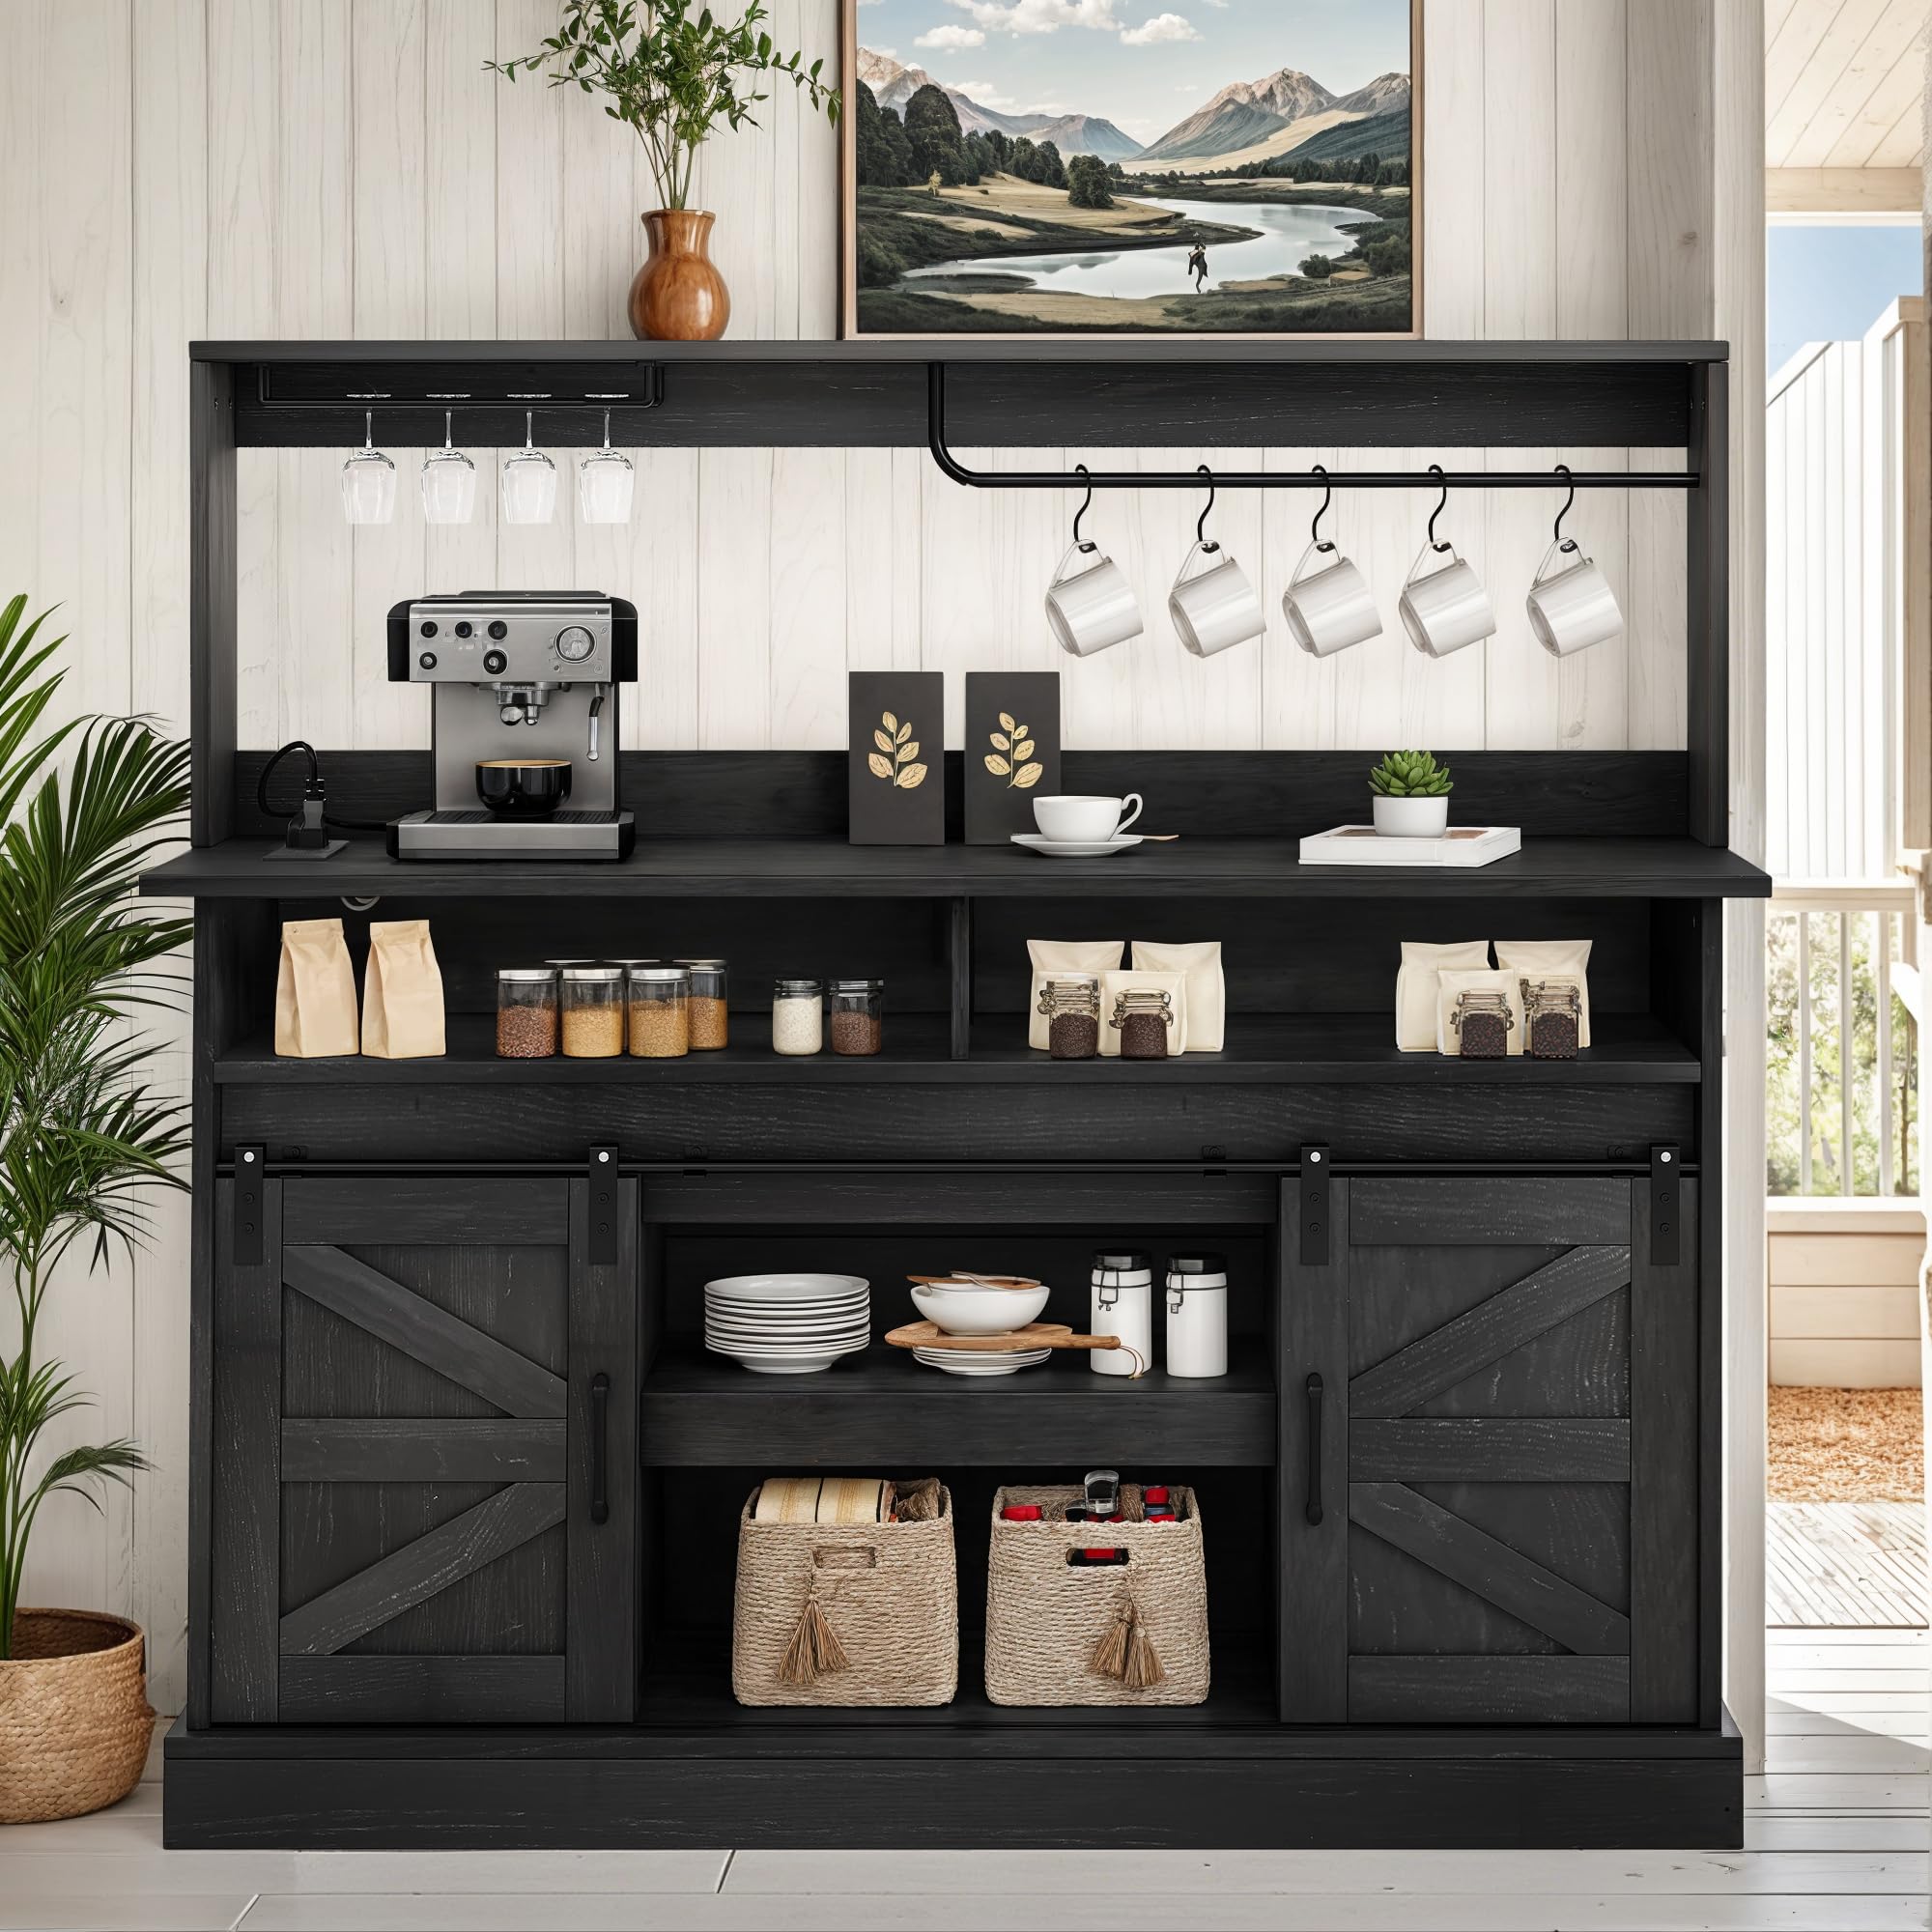
Figure 1: Overview of the YITAHOME 52" Farmhouse Coffee Bar Cabinet, showcasing its design and features.
Setup and Assembly
The YITAHOME Coffee Bar Cabinet is designed for easy assembly. A detailed installation guide and all necessary hardware are included in the packaging. Follow the step-by-step instructions provided in the separate assembly manual for a hassle-free setup.
Key Assembly Steps:
- Unpack and Identify Parts: Carefully unpack all components and lay them out on a soft, clean surface. Refer to the parts list in your assembly guide to identify each piece.
- Assemble Base Structure: Begin by assembling the main frame and base of the cabinet.
- Install Shelves and Dividers: Insert the adjustable shelves and internal dividers as per your desired configuration.
- Attach Sliding Barn Doors: Mount the sliding barn door hardware and attach the doors, ensuring smooth operation.
- Install Top Rack and Hooks: Secure the top rack, wine glass holder, and utensil hooks.
- Connect Power Outlets: Integrate the power strip with USB ports into the designated area. Ensure the power cord is routed safely.
- Final Inspection: Once assembled, ensure all screws are tightened (but not overtightened) and the cabinet is stable.
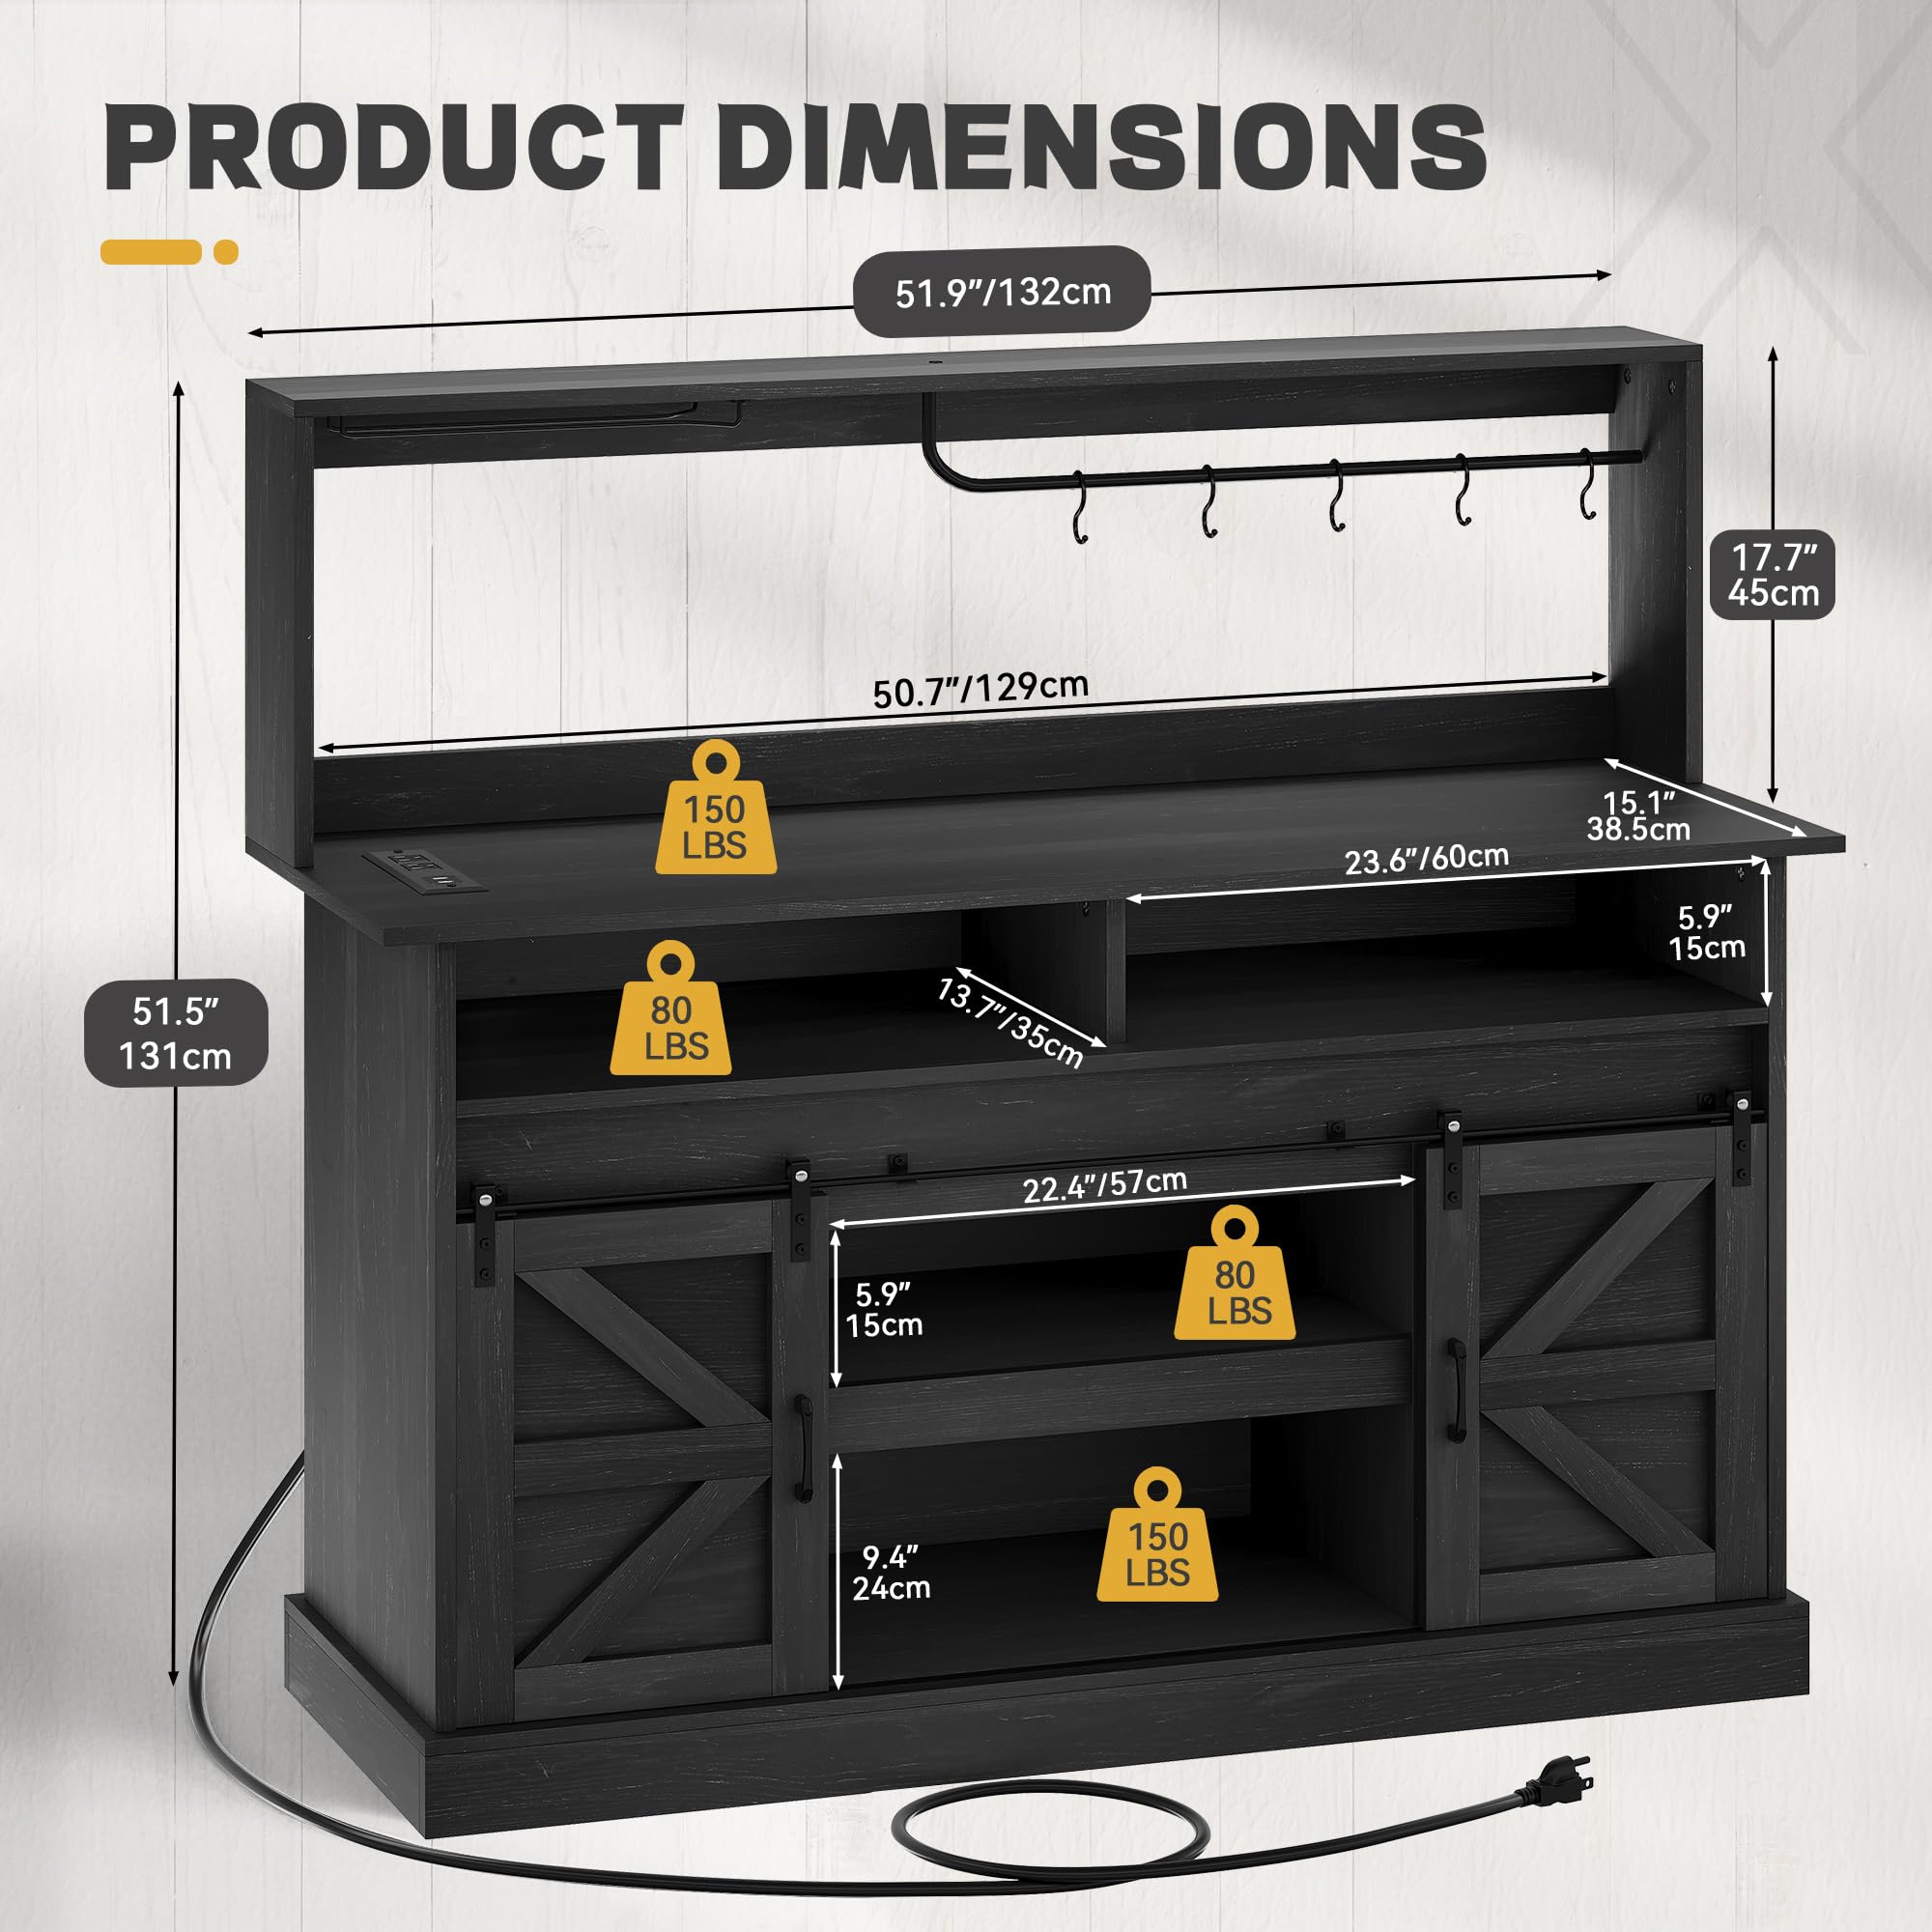
Figure 2: Product dimensions and load-bearing capacities for various sections of the cabinet. Note the 51.9" width and 51.5" height.
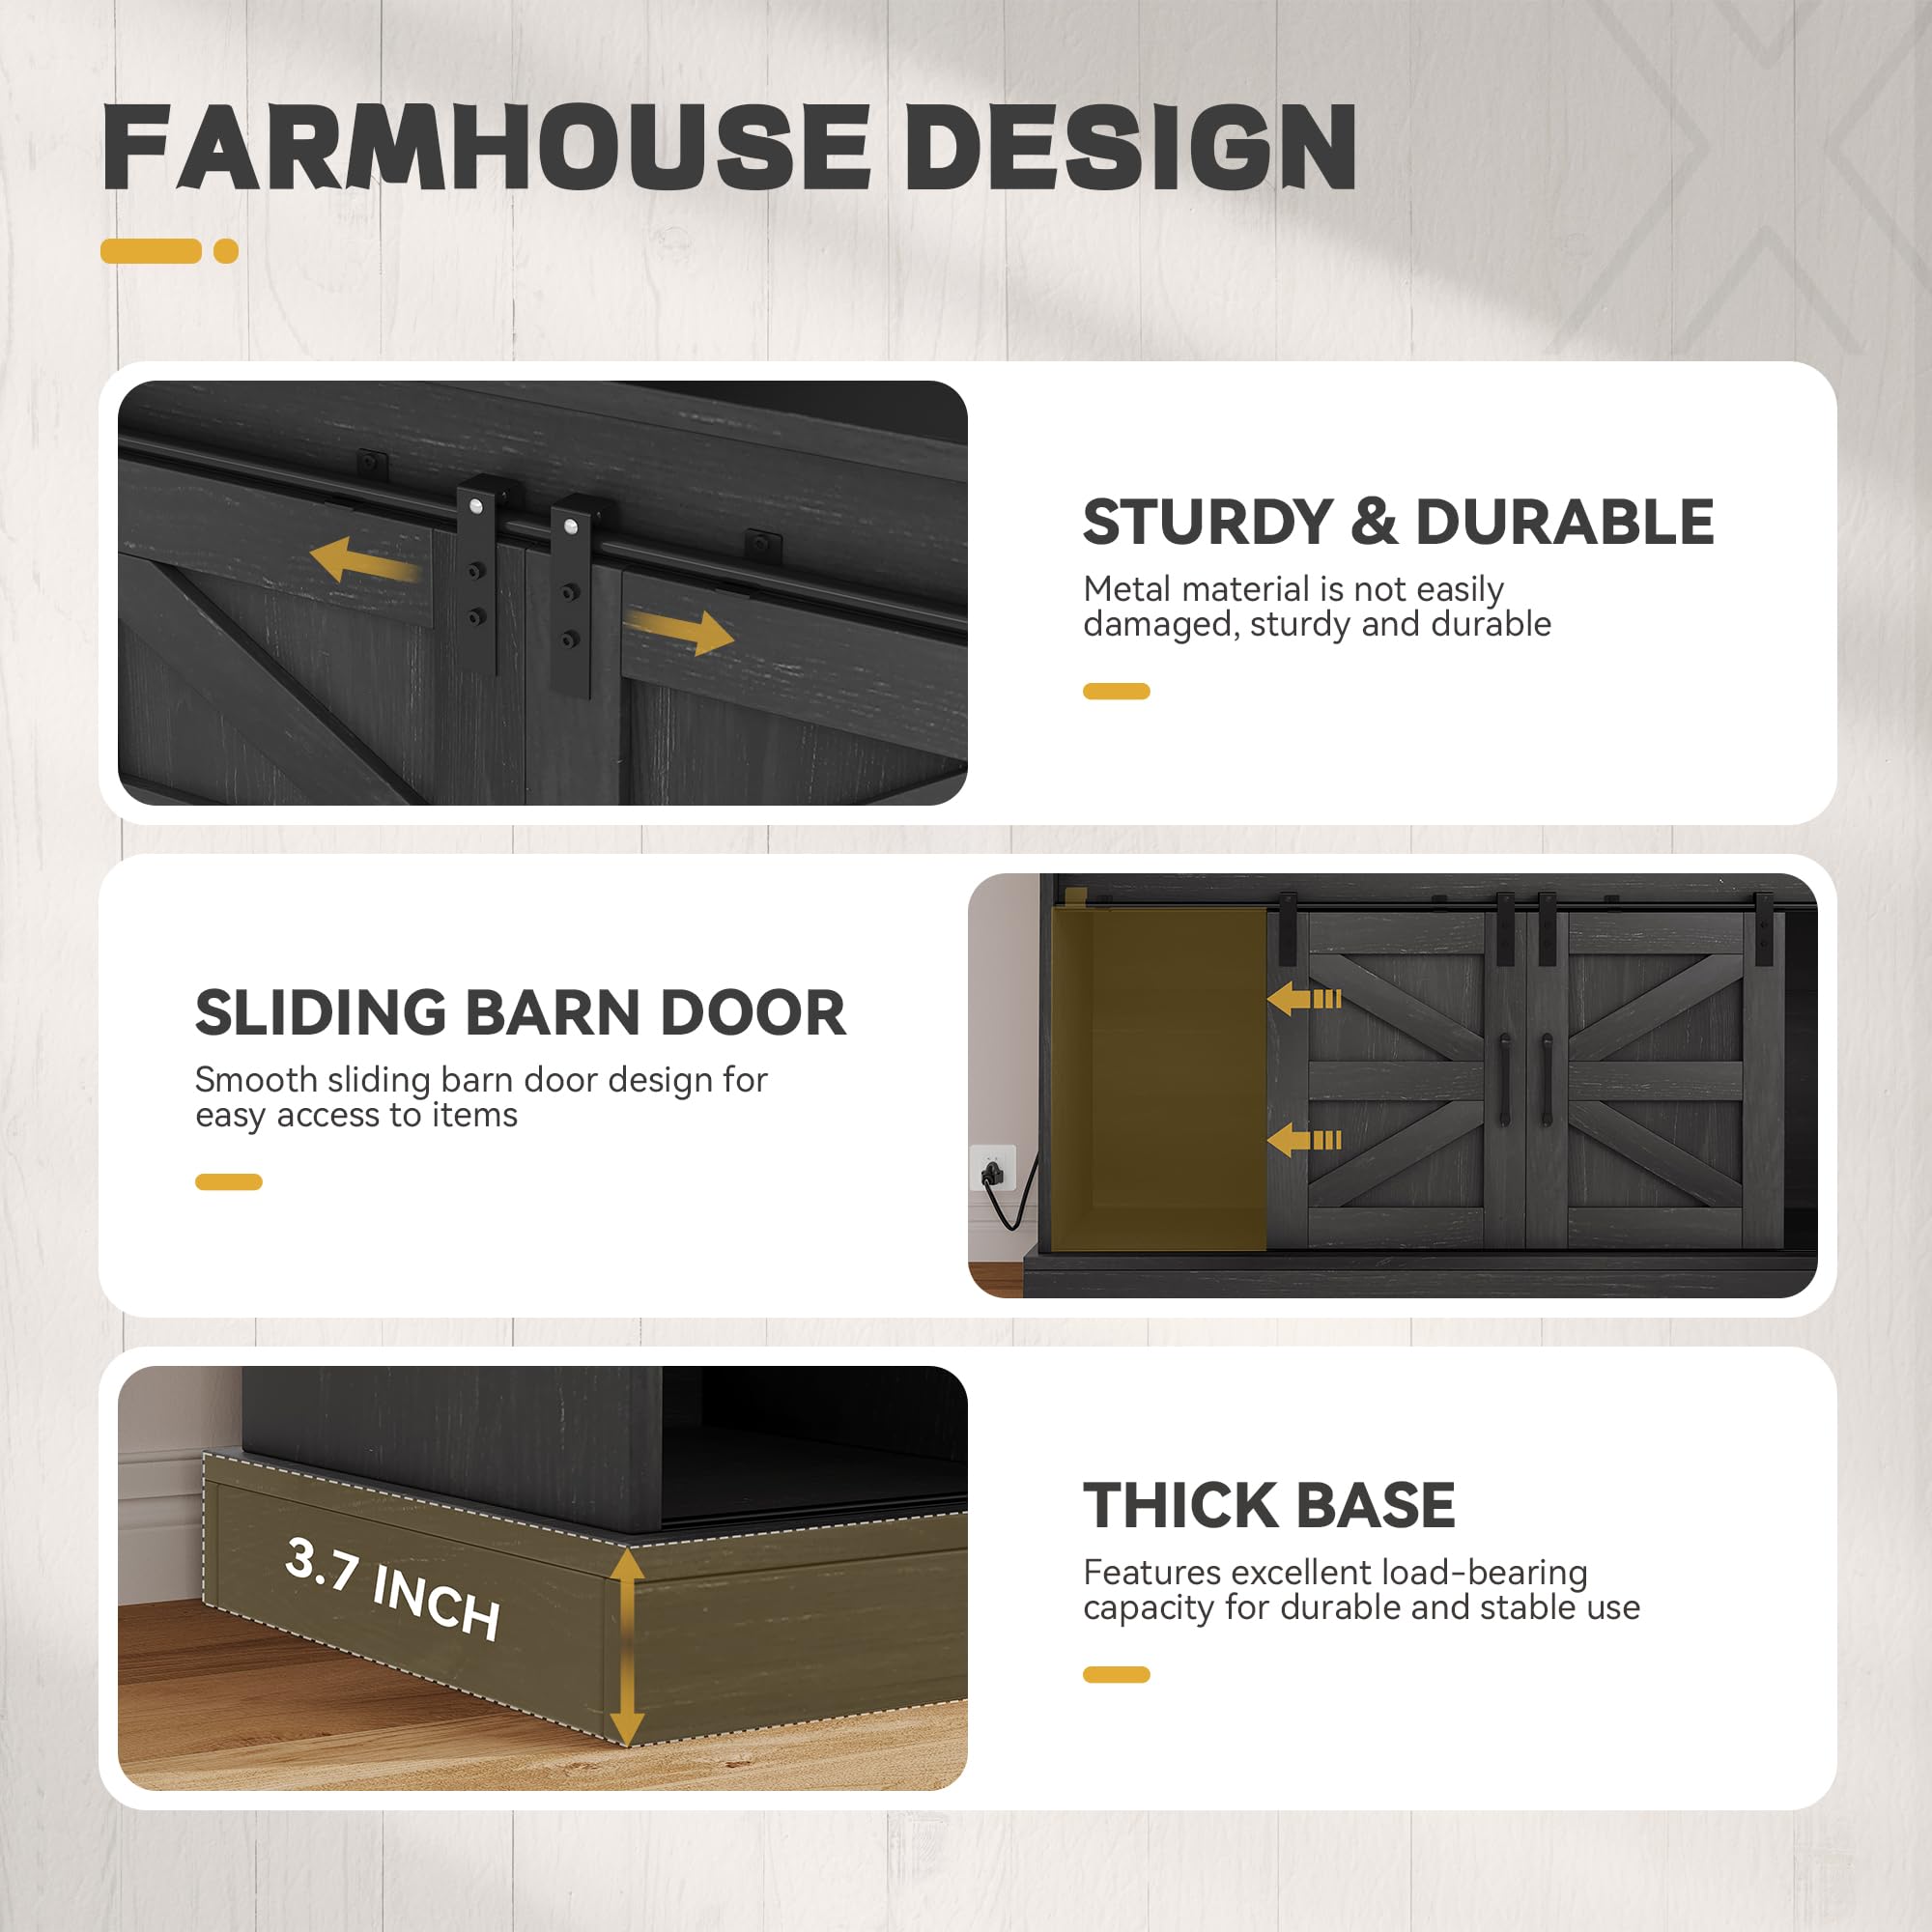
Figure 3: Details of the farmhouse design, highlighting the smooth-sliding barn doors, sturdy and durable material construction, and the thick base for stability.
Operating Instructions
Storage and Organization:
- Top Rack: Utilize the integrated wine glass holder and hanging rod for utensils or mugs.
- Tabletop: The spacious tabletop is suitable for coffee makers, blenders, or other kitchen appliances.
- Open Compartments: Use these for frequently accessed items like coffee beans, sugar, or decorative elements.
- Cabinet with Sliding Doors: The adjustable shelves inside the cabinet allow for flexible storage of various items, from dinnerware to pantry staples. Slide the barn doors smoothly to access contents.
Using the Power Outlets:
The cabinet includes a built-in power strip with 2 USB ports (5V/2A) and 2 standard 3-hole AC outlets (120V/12A). This feature allows for convenient charging of devices and powering of small appliances directly on the cabinet.

Figure 4: Integrated power strip with 2 USB ports and 2 AC outlets for convenient device charging and appliance use.
- Plug the cabinet's main power cord into a standard wall outlet.
- Connect your devices (e.g., phone, tablet) to the USB ports for charging.
- Plug small appliances (e.g., coffee maker, microwave) into the AC outlets.
- Do not overload the power strip. Refer to the maximum current rating (12A) for the AC outlets.
Maintenance and Care
- Cleaning: Wipe surfaces with a soft, damp cloth. Avoid harsh chemicals or abrasive cleaners that may damage the finish.
- Dusting: Regularly dust the cabinet to prevent buildup.
- Hardware: Periodically check all screws and fasteners to ensure they remain tight. Retighten if necessary, but do not overtighten.
- Sliding Doors: Keep the sliding tracks clean and free of debris to ensure smooth operation of the barn doors.
- Power Outlets: Ensure the power outlets are kept dry and free from spills.
Troubleshooting
| Problem | Possible Cause | Solution |
|---|---|---|
| Cabinet is wobbly/unstable. | Loose fasteners; uneven floor. | Check and tighten all screws. Ensure the cabinet is on a level surface. |
| Sliding doors are stiff or stuck. | Debris in track; misaligned hardware. | Clean the sliding tracks. Check door alignment and adjust hardware if needed. |
| Power outlets not working. | Cabinet not plugged in; circuit breaker tripped; overloaded. | Ensure the cabinet's power cord is securely plugged into a working wall outlet. Check your home's circuit breaker. Do not exceed the power strip's maximum load. |
| Missing or damaged parts during assembly. | Shipping damage; packaging error. | Contact YITAHOME customer support with your purchase details and a description of the issue. |
Specifications
| Feature | Detail |
|---|---|
| Brand | YITAHOME |
| Model Number | MAYIH3w9eu |
| Product Dimensions | 132 cm (W) x 40 cm (D) x 131 cm (H) / 52" (W) x 15.7" (D) x 51.5" (H) |
| Weight | 48.4 kg (approx. 106.7 lbs) |
| Material | Engineered Wood |
| Color | Deep Black Oak |
| Mounting Type | Floor Mount |
| Special Features | Goblet Holder, 5 Hooks, Power Outlets (2 AC, 2 USB), Sliding Barn Doors, Adjustable Shelves |
| Power Outlet Input | 120V/12A (AC), 5V/2A (USB) |
Warranty and Support
For warranty information or technical support, please refer to the documentation included with your product or contact YITAHOME customer service directly. Contact details are typically available on the manufacturer's official website or on the product packaging.
When contacting support, please have your model number (MAYIH3w9eu) and purchase details ready.
Ask a question about this manual
Ask about setup, troubleshooting, compatibility, parts, safety, or missing instructions. Manuals+ will review the question and use this page’s manual context to help answer it.