1. Introduction
This manual provides essential information for the safe and effective operation, assembly, maintenance, and troubleshooting of your Dapper Supply 24-inch Pressure Washer Surface Cleaner. Please read this manual thoroughly before use and retain it for future reference.
1.1 Intended Use
The Dapper Supply 24-inch Pressure Washer Surface Cleaner is designed for cleaning large, flat surfaces such as driveways, patios, sidewalks, porches, and decks. It is compatible with most electric and gas pressure washers with a minimum of 2500 PSI and a maximum of 4350 PSI. This device is intended for outdoor use only.
2. Safety Information
Always observe basic safety precautions when using this product to reduce the risk of injury or damage. Failure to follow these instructions may result in serious injury or property damage.
- Read all instructions: Before operating the surface cleaner, read and understand all instructions in this manual and the pressure washer manual.
- Wear appropriate personal protective equipment (PPE): Always wear eye protection (safety glasses or goggles), hearing protection, and protective footwear. Long pants and sleeves are recommended.
- Maintain a secure grip: Always hold the pressure washer gun firmly with both hands during operation.
- Keep bystanders away: Ensure children and pets are kept at a safe distance from the work area.
- Check connections: Before each use, ensure all hose connections are secure and leak-free. Use Teflon tape on threaded connections as needed.
- Operating pressure: Do not exceed the maximum rated pressure of 4350 PSI for this surface cleaner. Using a pressure washer with higher PSI can damage the unit and void the warranty.
- Surface suitability: Be aware of the surface you are cleaning. Some delicate surfaces may be damaged by high-pressure washing. Test a small, inconspicuous area first.
- Electrical safety: If using an electric pressure washer, ensure it is connected to a properly grounded outlet and follow all electrical safety guidelines provided with your pressure washer.
- Chemicals: If using cleaning detergents, follow the manufacturer's instructions for safe handling and application.
3. Package Contents
Verify that all items are present and undamaged upon opening the package. If any parts are missing or damaged, contact Dapper Supply customer service.
- 24-inch Surface Cleaner Head with Wheels
- Adjustable Handle Assembly (multiple sections)
- Pressure Washer Gun
- High-Pressure Hose (connecting gun to surface cleaner head)
- 3/8" Quick Connect (QC) Inlet
- 1/4" QC Adapter
- Teflon Tape
- Retaining Pins for Handle
4. Assembly Instructions
Follow these steps to assemble your Dapper Supply 24-inch Pressure Washer Surface Cleaner.
- Prepare the Surface Cleaner Head: Locate the central inlet on the surface cleaner head. Apply Teflon tape to the threads of the 3/8" QC inlet adapter. Screw the adapter firmly into the central inlet of the surface cleaner head.
- Attach the Handle to the Head: Align the handle assembly with the mounting brackets on the surface cleaner head. Insert the handle ends into the brackets and secure them with the provided retaining pins. Ensure the pins are fully inserted and locked.
- Assemble the Handle Sections: Connect the upper and lower sections of the handle assembly. Ensure the spring-loaded buttons snap into place, securing the sections.
- Connect High-Pressure Hose: Attach one end of the high-pressure hose to the 3/8" QC inlet on the surface cleaner head. Ensure it clicks securely into place.
- Connect Pressure Washer Gun: Attach the other end of the high-pressure hose to the inlet of the pressure washer gun. Ensure it clicks securely into place.
- Connect to Pressure Washer: Connect the pressure washer gun to your pressure washer's high-pressure outlet. Use the appropriate adapter (3/8" QC or 1/4" QC) if necessary, applying Teflon tape to threaded connections.
Video: Dapper Pressure Washer Surface Cleaner Installation. This video demonstrates the step-by-step assembly process for the surface cleaner, including connecting the handle, hose, and pressure washer gun.
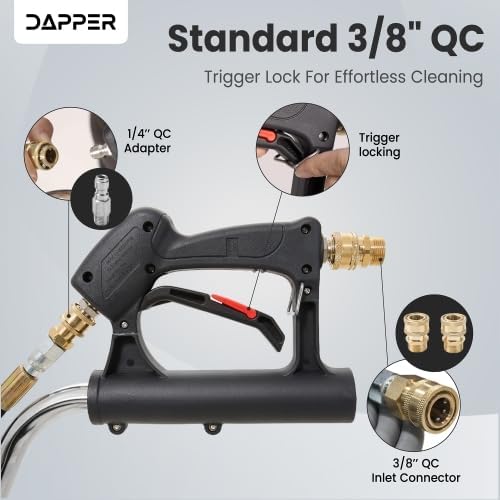
Image: This image shows the standard 3/8" Quick Connect (QC) inlet and the trigger lock mechanism on the pressure washer gun, highlighting key connection points for assembly.

Image: A detailed view of the quick connect fitting where the high-pressure hose attaches to the surface cleaner head, ensuring a secure connection.
5. Operating Instructions
Proper operation ensures efficient cleaning and prolongs the life of your surface cleaner.
- Prepare the Area: Clear the surface of any loose debris, rocks, or large objects that could interfere with the cleaning process or damage the nozzles.
- Connect Water Supply: Connect your pressure washer to a suitable water supply.
- Start Pressure Washer: Turn on the water supply and start your pressure washer according to its manufacturer's instructions.
- Engage the Surface Cleaner: Hold the pressure washer gun firmly. Release the trigger lock (if engaged) and squeeze the trigger to start the water flow. The dual rotating nozzles inside the surface cleaner head will begin to spin.
- Begin Cleaning: Slowly walk behind the surface cleaner, guiding it over the surface to be cleaned. The 360° caster wheels allow for smooth movement. Overlap each pass slightly to ensure even cleaning and prevent streaking.
- Adjust Handle Angle: The adjustable handle allows you to set a comfortable working height and angle, reducing strain during prolonged use.
- Maintain Consistent Speed: Moving too quickly may result in uneven cleaning, while moving too slowly may cause damage to the surface or leave swirl marks. Maintain a consistent, moderate pace.
- Splash-Free Operation: The circular brush skirt around the cleaning head helps contain water spray and debris, ensuring a cleaner and safer workspace.
- Finish Cleaning: Once the area is clean, release the trigger on the pressure washer gun. Engage the trigger lock for safety. Turn off your pressure washer and then the water supply.
Video: Dapper Pressure Washer Surface Cleaner Demonstration. This video illustrates the surface cleaner in action, demonstrating its effectiveness on various flat surfaces and highlighting its ease of use.

Image: This diagram highlights the efficient rotating jet nozzles that blast away dirt and grime, along with the 360-degree rotating wheels for smooth maneuverability and the flexible bristle skirt to prevent splashing.
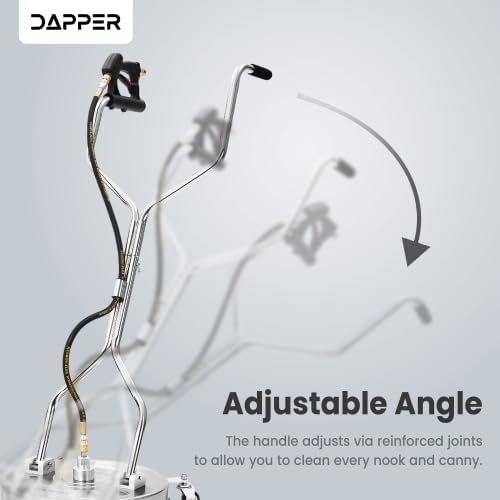
Image: A side view illustrating the adjustable angle feature of the handle, which can be modified via reinforced joints for ergonomic use and reaching various areas.
6. Maintenance
Regular maintenance ensures optimal performance and extends the lifespan of your surface cleaner.
- After Each Use: Flush the surface cleaner with clean water to remove any detergent residue or debris.
- Nozzle Cleaning: Periodically check the nozzles for clogs. If a nozzle is clogged, use a small wire or nozzle cleaning tool (often supplied with pressure washers) to clear the obstruction.
- Brush Skirt Inspection: Inspect the circular brush skirt for wear or damage. Replace if necessary to maintain splash-free operation.
- Wheel Inspection: Check the 360° caster wheels for smooth rotation and ensure they are free of debris.
- Storage: Store the surface cleaner in a clean, dry, and frost-free environment. Disconnect all hoses and drain any remaining water from the unit to prevent freezing damage.
- Lubrication: No specific lubrication is required for the rotating mechanism under normal use.
7. Troubleshooting
If you encounter issues with your surface cleaner, refer to the following common problems and solutions.
| Problem | Possible Cause | Solution |
|---|---|---|
| Nozzles not spinning or spinning slowly | Clogged nozzles; Insufficient water pressure from pressure washer; Damaged rotating mechanism. | Clean nozzles with a nozzle cleaning tool; Ensure pressure washer meets minimum PSI requirements (2500 PSI); Contact customer support if mechanism is damaged. |
| Uneven cleaning or streaking | Moving too fast; Clogged or partially clogged nozzles; Incorrect nozzle angle. | Slow down your cleaning pace and overlap passes; Clean nozzles; Ensure nozzles are correctly installed and not bent. |
| Water leaking from connections | Loose connections; Worn O-rings; Insufficient Teflon tape. | Tighten all connections; Inspect and replace O-rings if worn; Reapply Teflon tape to threaded connections. |
| Excessive splashing | Damaged or worn brush skirt. | Inspect and replace the brush skirt if damaged. |
If the problem persists after attempting these solutions, please contact Dapper Supply customer support.
8. Specifications
| Feature | Detail |
|---|---|
| Model Number | DP-SPW1117 |
| Cleaning Width | 24 inches |
| Maximum Pressure | 4350 PSI (Pound per Square Inch) |
| Minimum Recommended Pressure | 2500 PSI |
| Connection Type | 3/8" Quick Connect (QC) Inlet |
| Material | Stainless Steel |
| Wheels | Four 360° Caster Wheels |
| Handle | Adjustable, Ergonomic Dual Handles |
| UPC | 850064526233 |
9. Warranty and Support
Your Dapper Supply 24-inch Pressure Washer Surface Cleaner is backed by a 1-Year Warranty from the date of purchase. This warranty covers defects in materials and workmanship under normal use.
For warranty claims, technical assistance, or to inquire about replacement parts, please contact Dapper Supply customer service. Keep your proof of purchase for warranty validation.
Contact Information: Refer to the Dapper Supply website or your purchase documentation for the most current customer support contact details.