Introduction
This manual provides essential instructions for the safe and effective use of your Metallitrend Rifle Gun Safe. Please read this manual thoroughly before operating the safe and retain it for future reference. Proper installation, operation, and maintenance are crucial for ensuring the security and longevity of your gun safe.
Safety Information
Always prioritize safety when handling firearms and operating your gun safe. Failure to follow these instructions may result in injury, damage, or unauthorized access.
- Keep all keys, passcodes, and registered fingerprints confidential and out of reach of unauthorized individuals, especially children.
- Never store loaded firearms in the safe. Always unload firearms before storing them.
- Ensure the safe is securely mounted to prevent tipping or removal.
- Do not store flammable materials or liquids inside the safe.
- Regularly check the battery level of the electronic lock and replace batteries as needed.
- Familiarize yourself with all unlocking methods, including emergency key access.
Product Overview
The Metallitrend Rifle Gun Safe is designed to provide secure storage for your firearms. It features multiple unlocking methods, adjustable interior storage, and a robust construction.
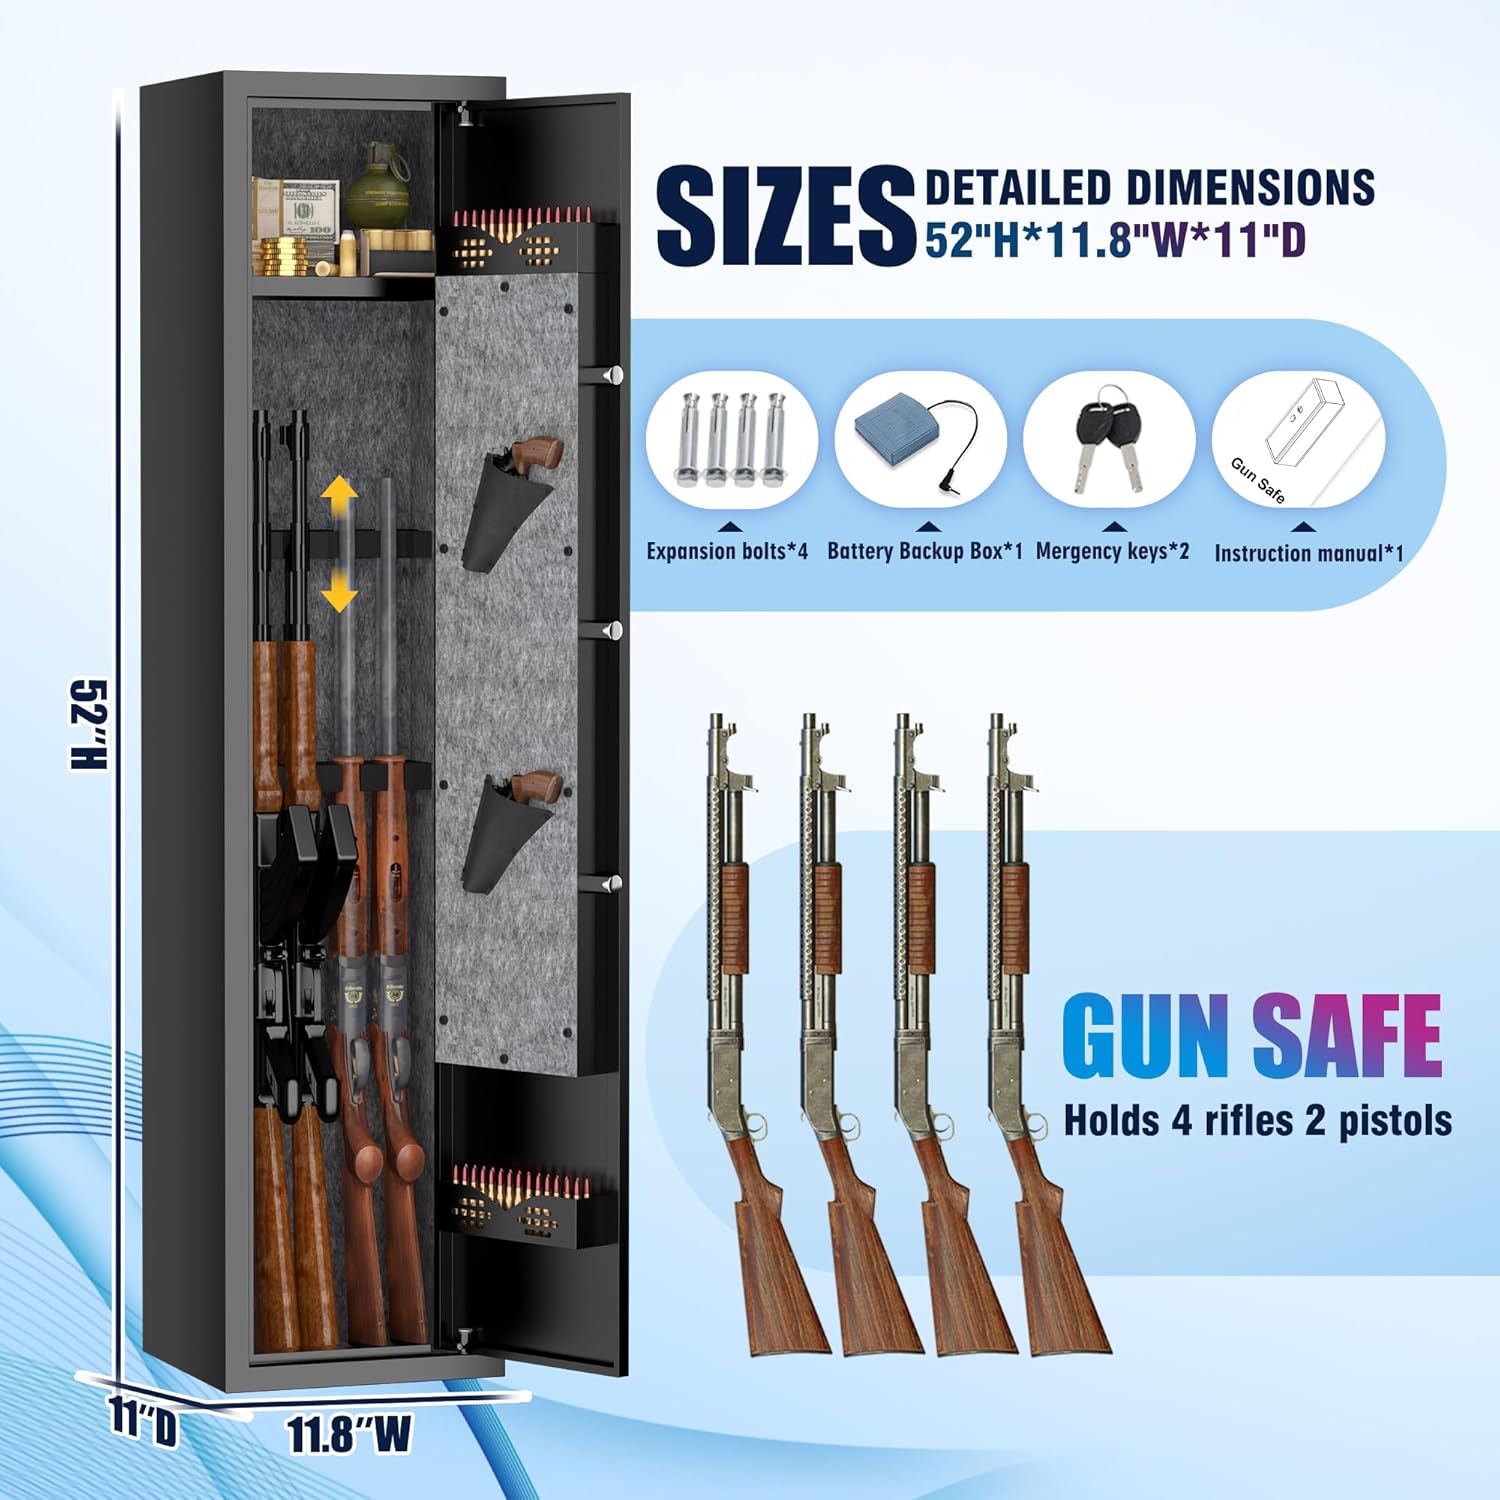
Image: Overall view of the Metallitrend Rifle Gun Safe, showing external dimensions of 52"H x 11.8"W x 11"D. The image also highlights included accessories: 4 expansion bolts, 1 battery backup box, 2 emergency keys, and 1 instruction manual.
Internal Components and Features

Image: Detailed view of the gun safe's interior and key features. It illustrates a standalone lockbox, a removable gun rack, a bullet storage unit, an LED light battery pack, a pistol holder, and the thick solid center lock mechanism.
- Electronic Keypad: For setting and entering passcodes.
- Biometric Fingerprint Sensor: For quick access via registered fingerprints.
- Emergency Key Lock: Provides manual access in case of electronic failure or forgotten codes.
- Removable Storage Shelf: Allows customization of interior space for various firearm lengths.
- Adjustable Gun Racks: Securely holds rifles and shotguns.
- Pistol Bags: Two independent bags for pistol storage.
- Ammunition Storage Units: Upper and lower compartments for ammunition.
- Alarm System: Triggers upon incorrect entry attempts or forced entry.
Setup
1. Unpacking
- Carefully remove the safe from its packaging. Inspect for any shipping damage.
- Locate all accessories: emergency keys, battery backup box, and expansion bolts.
2. Battery Installation
The electronic lock requires batteries for operation. Use the provided battery backup box if the internal battery compartment is inaccessible.
- Open the battery compartment on the back of the electronic keypad or connect the battery backup box.
- Insert the required number of AA batteries (typically 4, not included) ensuring correct polarity.
- Close the compartment securely.
3. Mounting the Safe
For maximum security, it is highly recommended to secure the safe to a wall or floor using the provided expansion bolts.

Image: Visual guide demonstrating the three steps to mount the gun safe to a wall. Step 1 shows drilling holes, Step 2 shows inserting the expansion bolts into the safe's pre-drilled holes, and Step 3 shows the safe securely mounted. A tip advises securing the safe to the wall using the four mounting bolts provided.
- Choose a suitable location, preferably a solid wall or floor.
- Mark the drilling points through the pre-drilled holes at the back or bottom of the safe.
- Drill holes at the marked points using an appropriate drill bit.
- Position the safe and align the holes.
- Insert the expansion bolts through the safe and into the drilled holes.
- Tighten the bolts securely to anchor the safe.
Operating Instructions
1. Unlocking Methods
Your safe offers multiple ways to unlock for quick and secure access.

Image: Close-up of the safe's door, highlighting the electronic keypad and fingerprint sensor. It illustrates the multiple unlocking methods available: fingerprint, passcode, and key, emphasizing ultra-fast unlocking with a built-in sensitive chip and 99.9% sensitivity.
a. Fingerprint Unlocking
- Place a registered finger firmly on the fingerprint sensor.
- The safe will emit a confirmation sound or light, indicating successful recognition.
- Turn the handle to open the door.
b. Passcode Unlocking
- Enter your programmed passcode on the electronic keypad.
- Press the '#' or 'Enter' key (refer to specific model instructions if different).
- The safe will emit a confirmation sound or light.
- Turn the handle to open the door.
c. Emergency Key Unlocking
Use the emergency key only when the electronic system fails or batteries are depleted.
- Locate the emergency keyhole, usually concealed behind a cover on the keypad.
- Insert the emergency key and turn it.
- Turn the handle to open the door.
2. Programming Fingerprints and Passcodes
Refer to the specific instructions provided with your safe for detailed steps on programming new fingerprints and passcodes. Generally, this involves pressing a program button inside the safe and following prompts on the keypad.
3. Alarm System
The safe is equipped with an alarm system to deter unauthorized access.

Image: Illustration of the gun safe's dual alarm system. It shows a vibration alarm triggered by forced opening and a wrong password alarm activated by continuously entering an incorrect password or fingerprint.
- Wrong Passcode/Fingerprint Alarm: The alarm will sound after multiple consecutive incorrect entries.
- Vibration/Impact Alarm: The alarm will activate if the safe detects significant vibration or attempts at forced entry.
- To silence the alarm, unlock the safe using a correct method (fingerprint, passcode, or key).
4. Interior Organization
The safe's interior is designed for flexible storage.
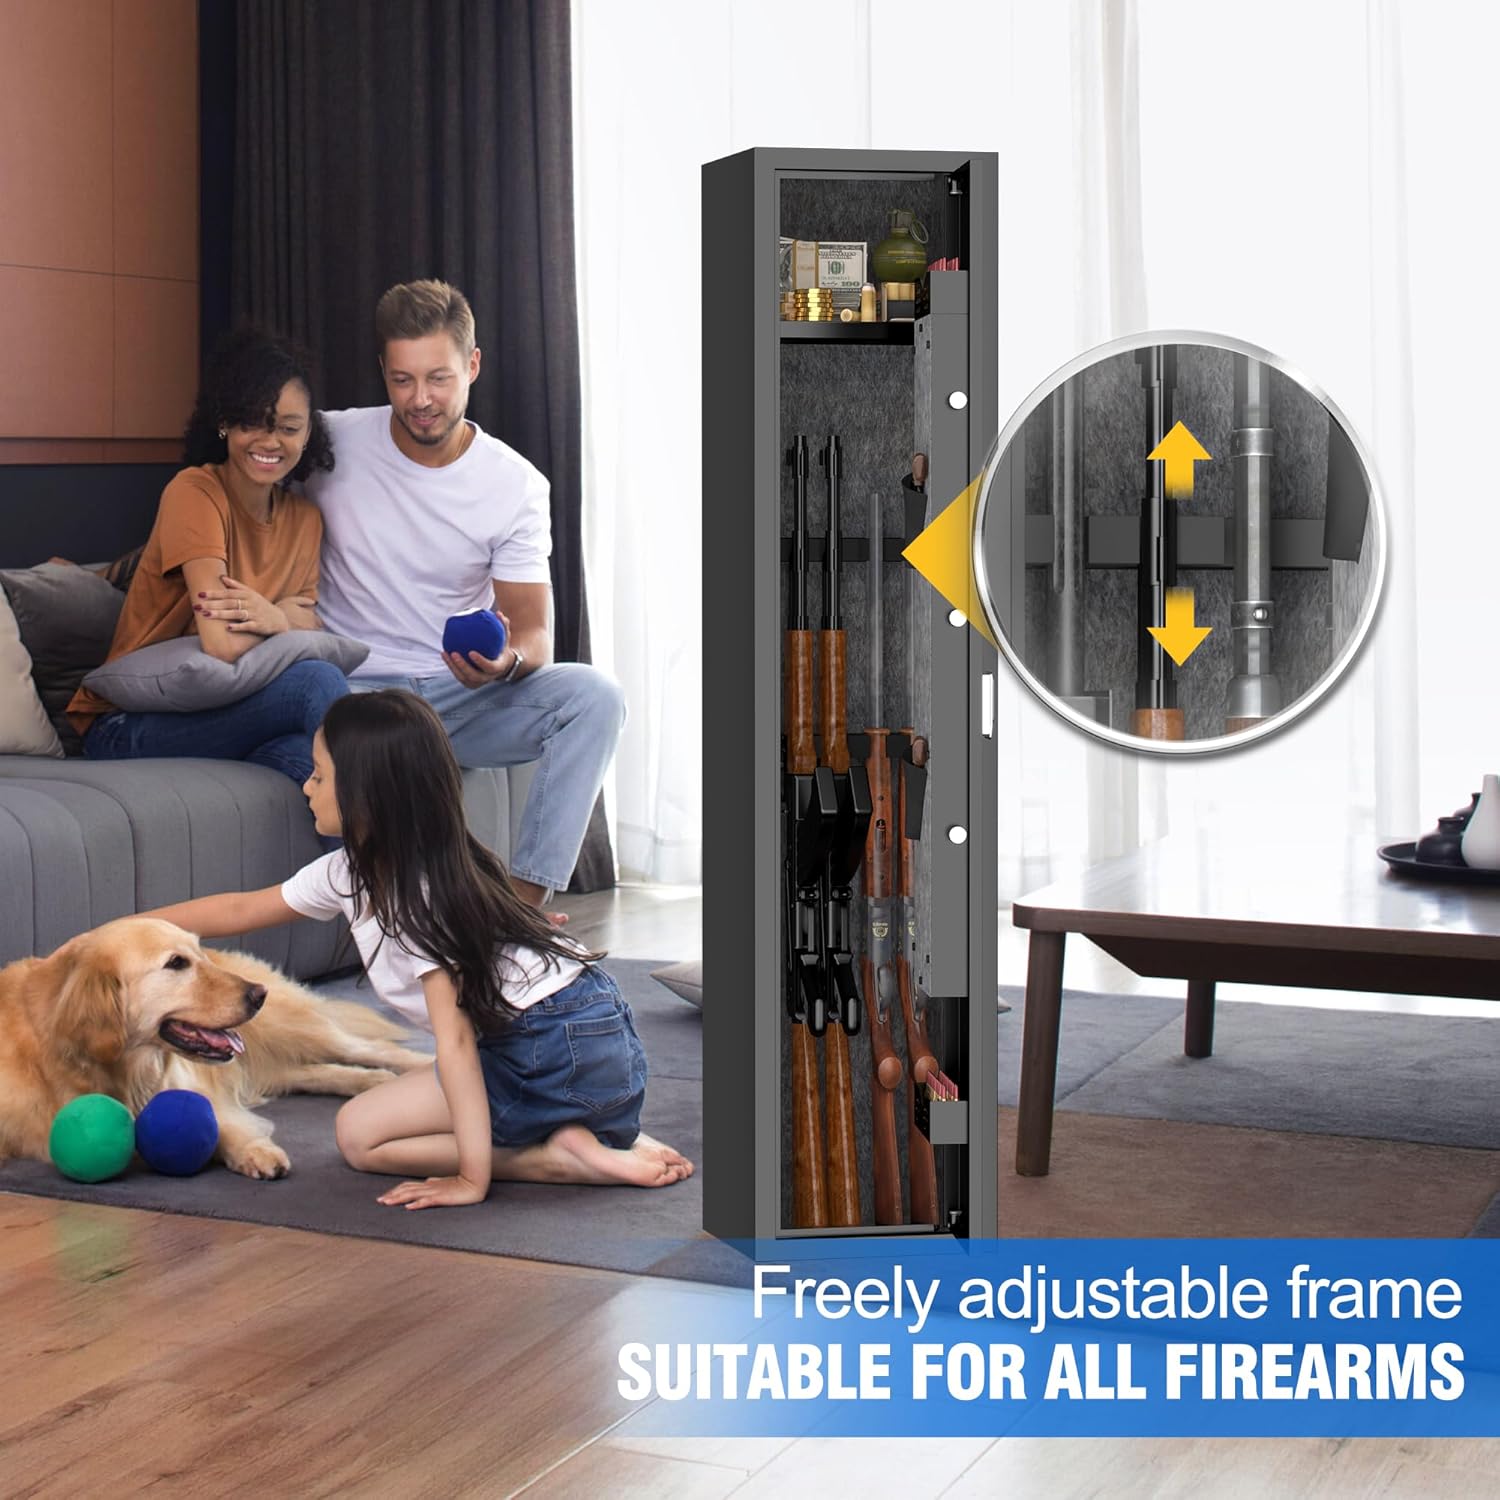
Image: Interior view of the gun safe, highlighting the freely adjustable frame and gun racks. Arrows indicate the upward and downward adjustability of the racks, making it suitable for various firearm sizes.
- Removable Shelf: The upper partition can be removed to accommodate longer firearms.
- Adjustable Gun Racks: Position the gun racks to fit your rifles and shotguns securely.
- Pistol Holders: Utilize the two independent pistol bags for handguns.
- Ammunition Storage: Use the dedicated units for organizing ammunition.
Maintenance
1. Battery Replacement
Replace the batteries in the electronic lock annually or when the low battery indicator appears. Use high-quality alkaline batteries.
2. Cleaning
Clean the exterior of the safe with a soft, damp cloth. Avoid abrasive cleaners or solvents that could damage the finish. Do not use liquids near the electronic components.
3. Lock Mechanism
Do not lubricate the electronic lock mechanism. If the lock mechanism feels stiff, contact customer support.
Troubleshooting
| Problem | Possible Cause | Solution |
|---|---|---|
| Safe does not open with passcode/fingerprint. | Low batteries, incorrect entry, unregistered fingerprint. | Replace batteries. Re-enter passcode carefully. Re-register fingerprint. Use emergency key. |
| Alarm sounds unexpectedly. | Incorrect entries, impact detected, sensitive setting. | Unlock the safe with a correct method. Check for external impacts. Refer to specific model instructions for alarm sensitivity adjustment. |
| Door does not close properly. | Obstruction, misaligned door. | Check for items blocking the door or bolts. Ensure the safe is on a level surface. |
Specifications
| Feature | Detail |
|---|---|
| Product Dimensions | 11"D x 11.8"W x 52"H |
| Item Model Number | 8ff906d3-d061-470d-b09e-c1efdc62e7a3 |
| Lock Type | Biometric, Electronic Combination Lock, Key |
| Capacity | 3.14 Cubic Feet (Holds 4-5 rifles up to 40 inches) |
| Material | Thickened Cold-Rolled Steel |
| Special Features | Alarm System, Biometric Fingerprint, Combination Lock, Removable Shelf, Sensor Light |
| Mounting Type | Floor Mount (Wall mountable with expansion bolts) |
| Alarm Triggers | Violent impact or consecutive incorrect password input |
Support and Warranty
Customer Support
For any questions, technical assistance, or issues with your Metallitrend Rifle Gun Safe, please contact our customer support team. We are committed to providing timely assistance.
Please refer to your purchase documentation or the Metallitrend website for the most current contact information.
Warranty Information
This product is covered by a manufacturer's warranty. Details regarding the warranty period and coverage are typically provided with your purchase. Please retain your proof of purchase for warranty claims.