1. Introduction and Overview
The Topeak Nano Shock Pump is an ultra-lightweight, compact pump designed for precise adjustment of bicycle suspension components. Featuring a durable aluminum construction and a 360-degree rotating braided hose, it allows for easy connection and inflation up to 300 PSI. The integrated Pressure Rite valve ensures accurate pressure setting and minimizes air loss during disconnection, making it an essential tool for maintaining optimal suspension performance.
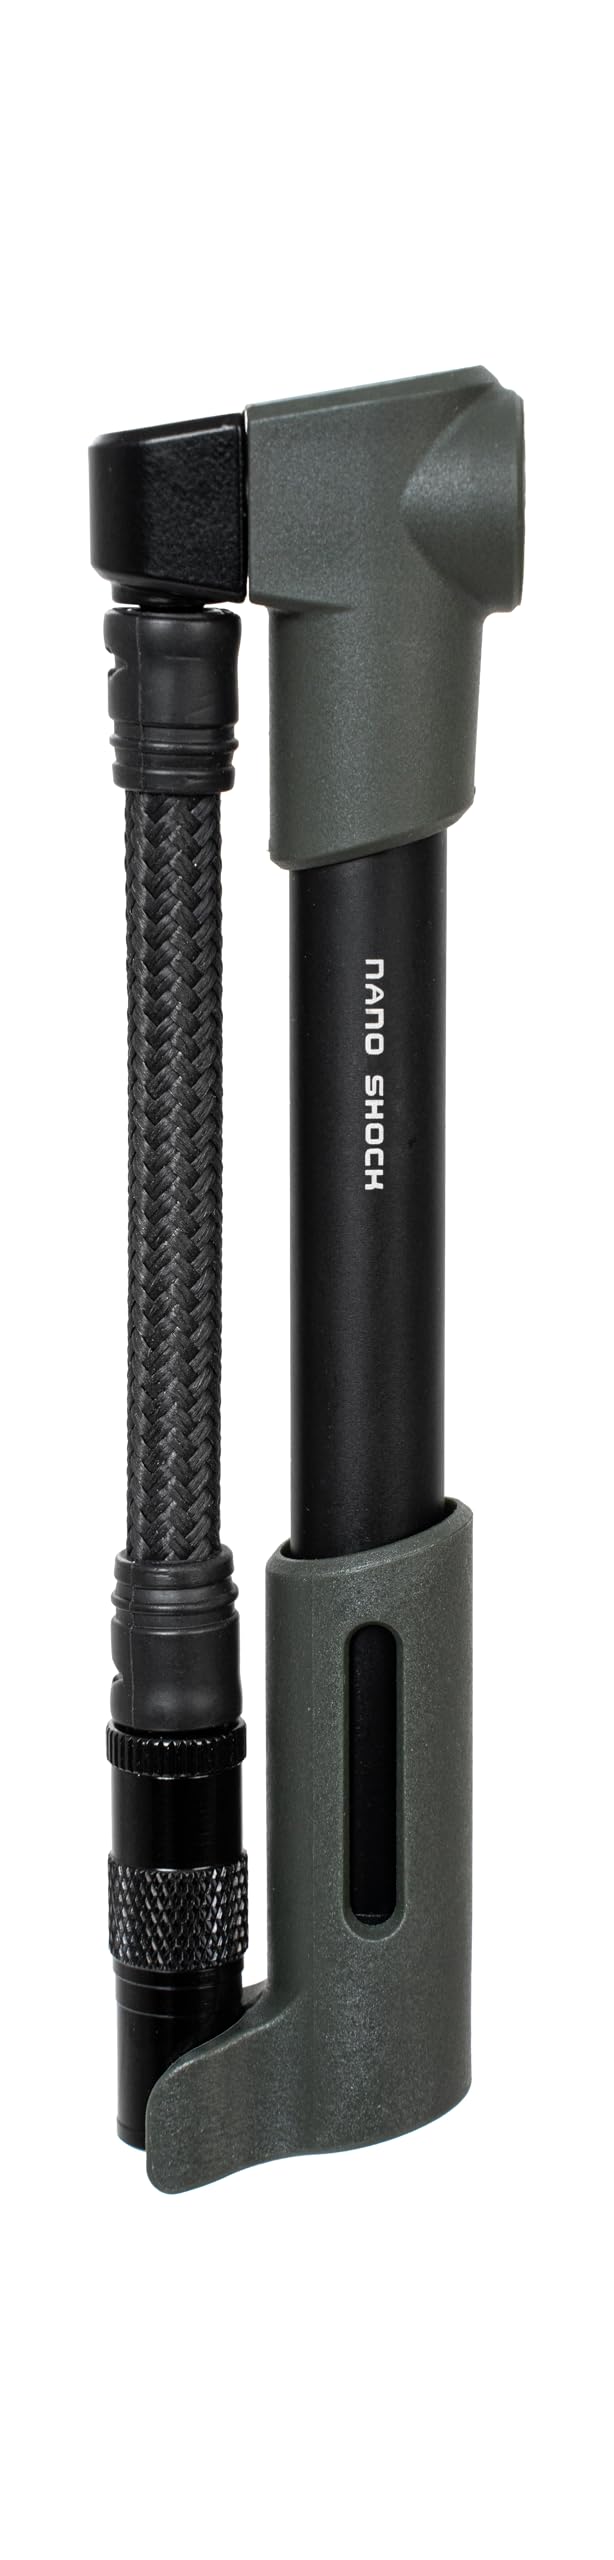
Image 1.1: The Topeak Nano Shock Pump, showcasing its compact design and braided hose.
2. Safety Information
Please read and understand all safety instructions before operating the pump. Failure to do so may result in injury or damage to your equipment.
- Do not exceed the maximum pressure rating of your bicycle's suspension components (forks, rear shocks). Refer to your suspension manufacturer's guidelines.
- Always wear appropriate eye protection when inflating suspension components.
- Keep the pump and its components out of reach of children.
- Avoid exposing the pump to extreme temperatures or direct sunlight for prolonged periods.
- Do not attempt to disassemble or modify the pump. Refer all servicing to qualified personnel.
3. Package Contents
Verify that all items are present in the package:
- 1 x Topeak Nano Shock Pump
4. Setup
The Topeak Nano Shock Pump is designed for immediate use with minimal setup.
- Inspect the Pump: Before first use, visually inspect the pump for any signs of damage or wear. Ensure the hose and valve connector are securely attached.
- Familiarize with the Rotating Hose: The pump features a 360-degree rotating braided hose. This allows for flexible positioning of the pump body relative to the shock valve, reducing stress on the valve stem during inflation.
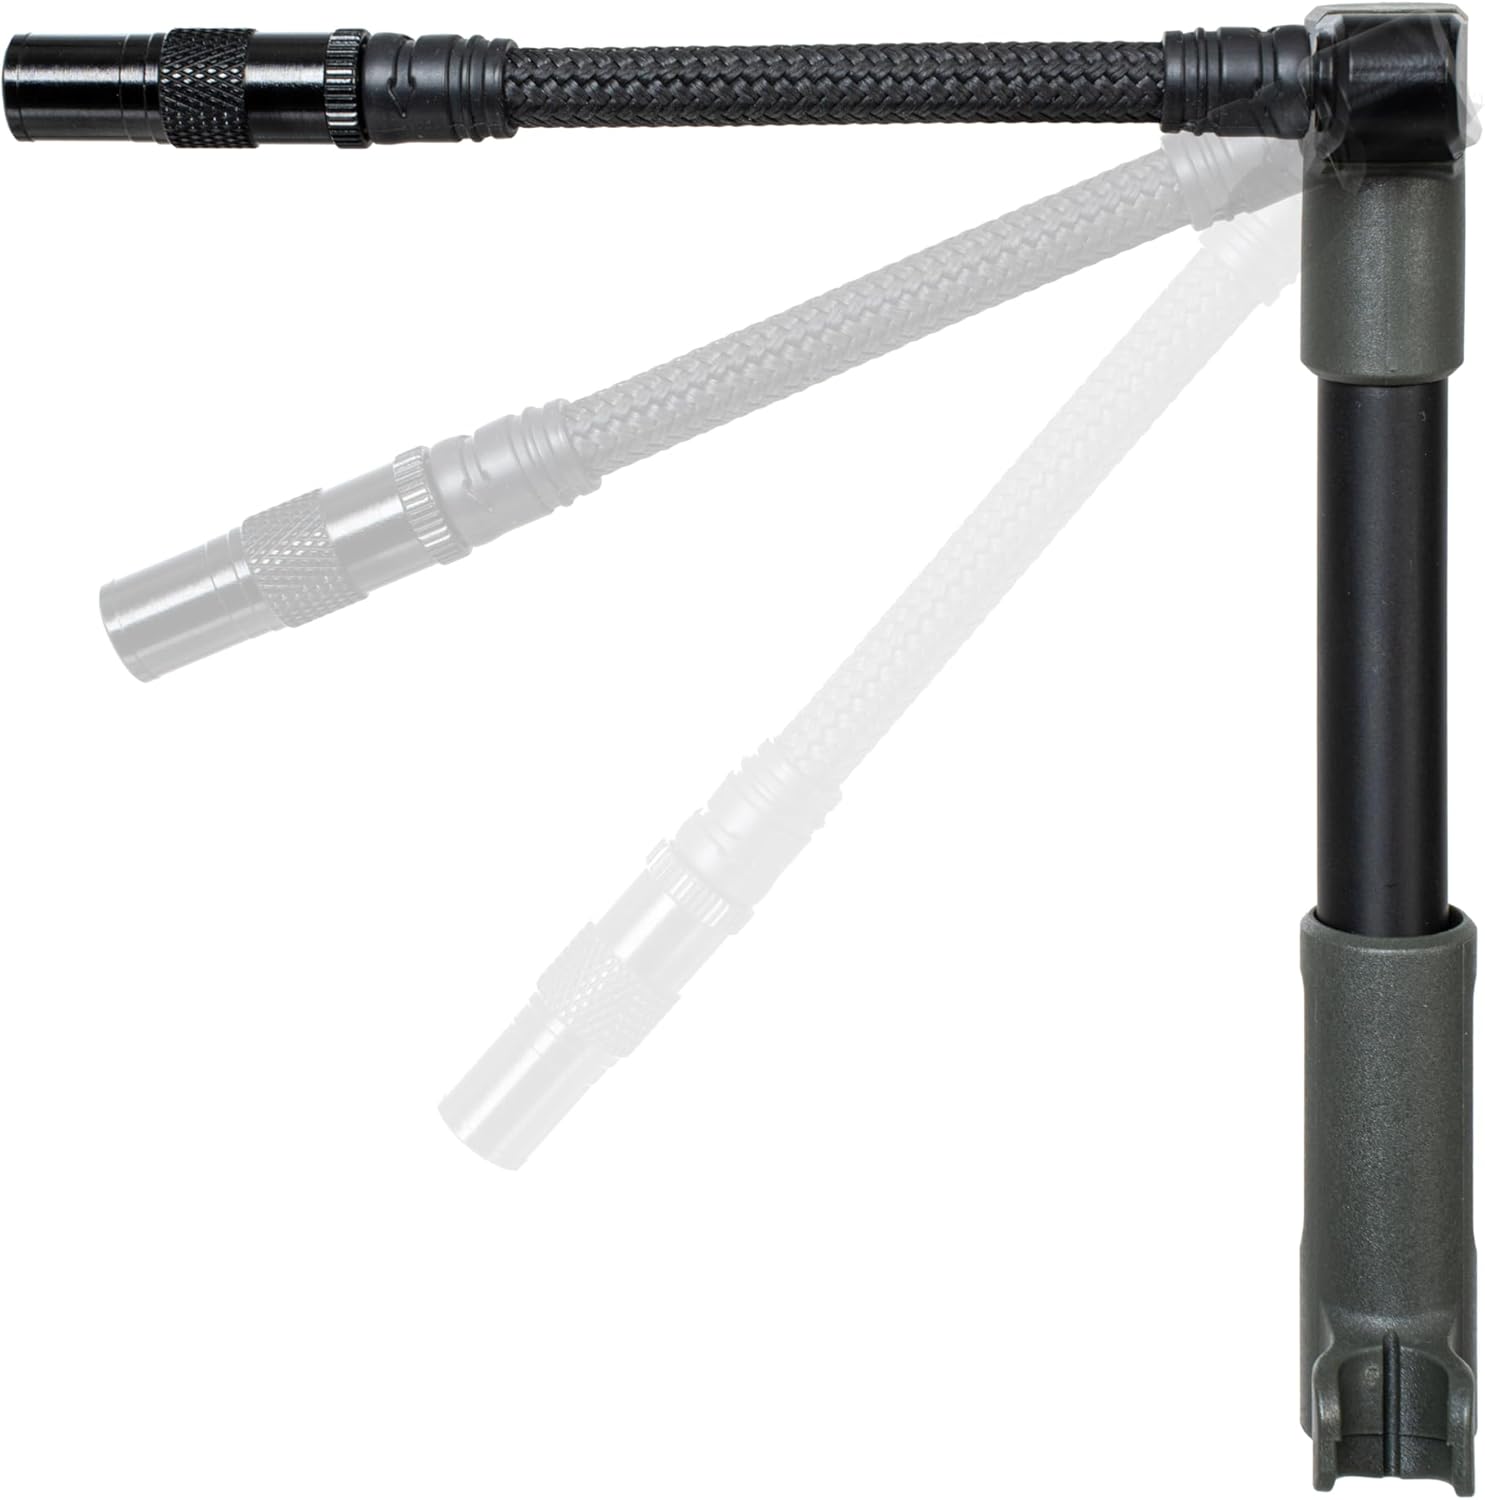
Image 4.1: The 360-degree rotating hose feature of the Nano Shock Pump.
5. Operating Instructions
Follow these steps to accurately inflate or adjust the pressure in your bicycle's suspension components:
- Prepare the Shock Valve: Remove the protective cap from your suspension fork or rear shock valve.
- Connect the Pump: Thread the pump's valve connector onto the shock valve. Turn clockwise until it is finger-tight and fully engaged. Ensure a secure connection to prevent air leakage.
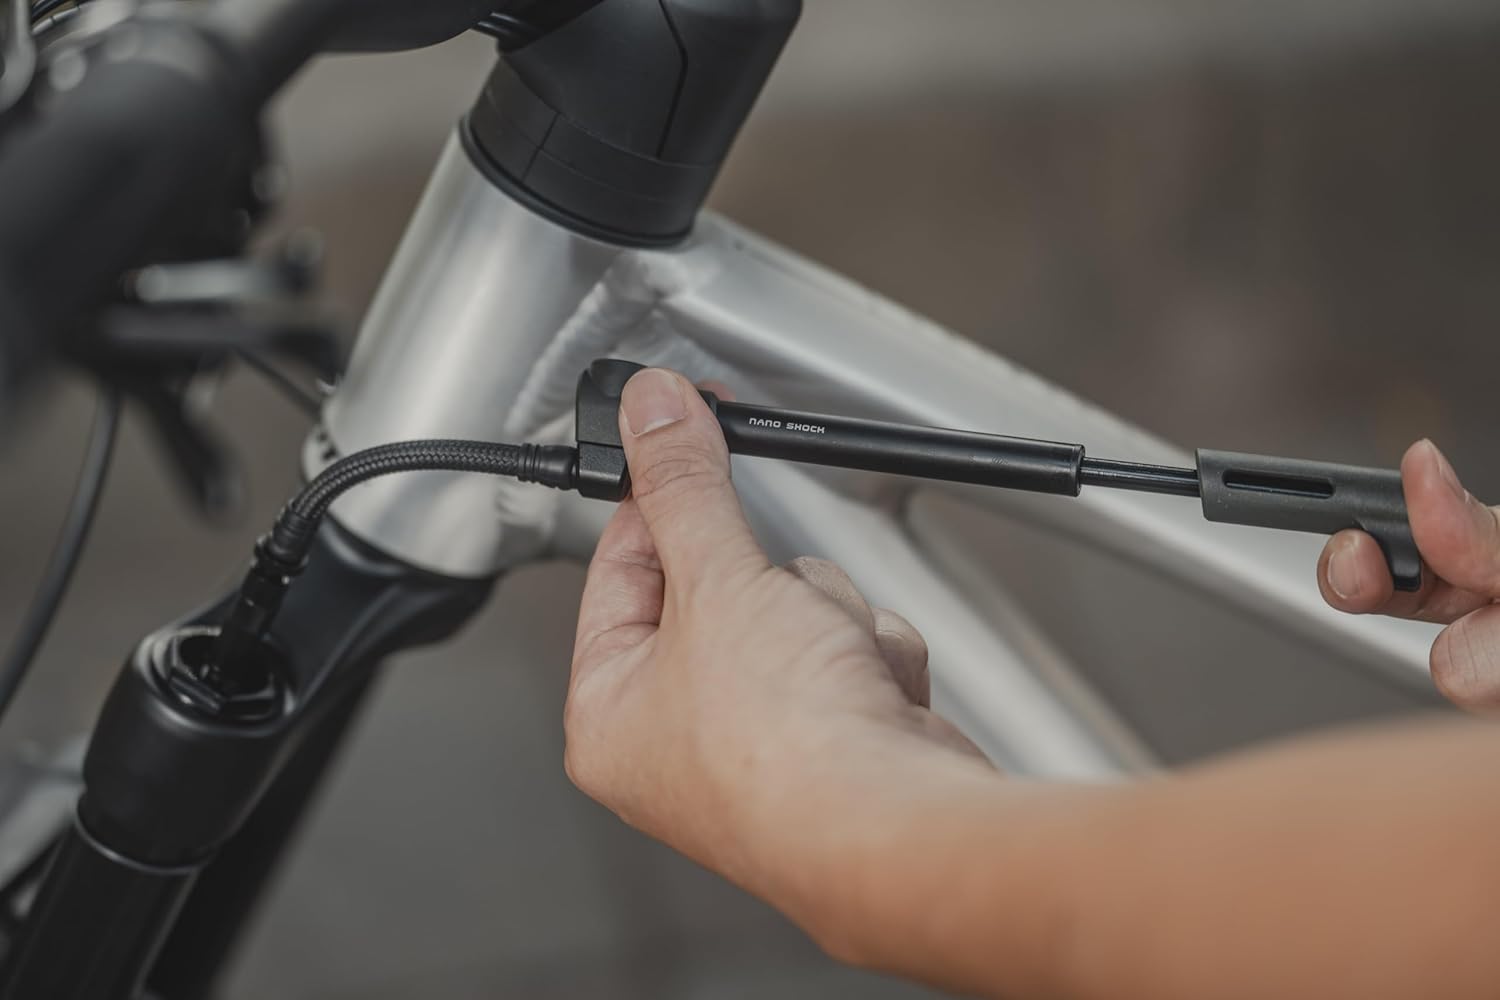
Image 5.1: Connecting the pump to a suspension fork.

Image 5.2: Detailed view of the pump's connection to the shock valve.
- Inflate to Desired Pressure: Begin pumping the handle to increase the air pressure. The pump is capable of reaching up to 300 PSI. Monitor the pressure gauge (if applicable, or use an external gauge for precise measurement) and pump until the desired pressure is reached according to your suspension manufacturer's recommendations.
- Utilize Pressure Rite Valve: The Pressure Rite valve is designed to prevent air loss when disconnecting. Once the desired pressure is achieved, slowly unscrew the valve connector from the shock valve. The Pressure Rite feature will minimize air escaping from the shock during this process.

Image 5.3: Close-up of the Pressure Rite valve mechanism.
- Replace Valve Cap: Once disconnected, replace the protective cap on your suspension valve.
6. Maintenance
Proper maintenance ensures the longevity and reliable performance of your Topeak Nano Shock Pump.
- Cleaning: Wipe the pump body and hose with a clean, damp cloth after each use to remove dirt and debris. Avoid using harsh chemicals or abrasive cleaners.
- Storage: Store the pump in a dry, cool place away from direct sunlight and extreme temperatures.
- Inspection: Periodically inspect the hose and valve connector for any signs of wear, cracks, or damage. If any damage is found, discontinue use and seek professional advice.
7. Troubleshooting
If you encounter issues with your Topeak Nano Shock Pump, refer to the following common problems and solutions:
- Problem: Air leaks during inflation.
Solution: Ensure the pump's valve connector is fully and securely threaded onto the shock valve. Check the shock valve core for damage or looseness. - Problem: Difficulty connecting or disconnecting the pump.
Solution: Ensure the shock valve threads are clean and free of debris. The 360-degree rotating hose should help align the pump without straining the valve. Do not overtighten. - Problem: Pump does not reach desired pressure.
Solution: Verify that the shock valve is not faulty. Check for any visible damage to the pump's piston or seals.
8. Specifications
| Feature | Specification |
|---|---|
| Model Number | 15700260 |
| Material | Aluminum |
| Color | Black |
| Power Source | Manual |
| Maximum Pressure | 300 PSI (20.7 bar) |
| Airflow Capacity | 4.7 Cubic centimeters per minute |
| Dimensions (L x W x H) | 3.18 x 1.57 x 13.49 cm (1.25 x 0.62 x 5.31 inches) |
| Weight | 54.43 grams (1.92 ounces) |
| Hose Feature | 360-degree Rotating Braided Hose |
| Valve Type | Pressure Rite (no air loss during disconnection) |
9. Warranty Information
This Topeak product is covered by a standard manufacturer's warranty. For detailed information regarding warranty terms, conditions, and registration, please refer to the official Topeak website or contact your local dealer. Please retain your proof of purchase for any warranty claims.
10. Support
For further assistance, technical support, or inquiries about your Topeak Nano Shock Pump, please visit the official Topeak website. You can typically find FAQs, product manuals, and contact information for customer service on their support pages.
Official Topeak Website: www.topeak.com


