SPH-P500242-031
Clarion 1 Light Black Clear Glass Transitional Pendant
Model: SPH-P500242-031
Important Safety Information
Please read and understand all instructions before beginning installation. Failure to do so may result in electric shock, fire, or other injuries that could be fatal or cause property damage. All wiring connections must be in accordance with local codes and ordinances. If you are unsure about any part of these instructions, consult a qualified electrician.
- Turn off electricity at the main fuse box or circuit breaker before installation.
- Do not install this fixture in wet locations.
- Ensure all electrical connections are secure and properly insulated.
- Use only the specified bulb type and wattage.
- This fixture is designed for indoor use only.
Package Contents
Carefully unpack your new fixture and lay out all parts on a clear area. Ensure all components listed below are present before discarding packaging materials.
- Mounting Plate
- Canopy
- Downrod(s)
- Fixture Body with Socket
- Clear Glass Shade
- Mounting Hardware (screws, wire nuts)
Tools Required (Not Included)
- Phillips Head Screwdriver
- Flat Head Screwdriver
- Wire Strippers
- Pliers
- Electrical Tape
- Ladder
Setup and Installation
This section provides step-by-step instructions for installing your pendant light. It is recommended to have a second person assist with installation.
Step 1: Prepare for Installation
- Turn off power: Locate the circuit breaker or fuse box and turn off the power to the junction box where you will be installing the fixture.
- Remove existing fixture: If replacing an old fixture, carefully remove it and disconnect all wiring.
- Unpack components: Remove all parts from the packaging and inspect for any damage.
Step 2: Attach Mounting Plate
- Attach the mounting plate to the junction box using the provided mounting screws. Ensure the plate is securely fastened.
Step 3: Assemble Downrod and Fixture Body
- Determine the desired hanging height. Connect the appropriate downrod(s) to the fixture body and then to the canopy. Thread the fixture wires through the downrod(s) and canopy.
Step 4: Make Electrical Connections
Refer to the image below for a visual guide to the pendant's design. Note that the actual product features a black finish, while the image illustrates the overall structure.
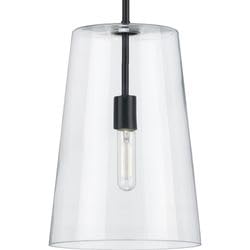
Image: Illustrative example of the Clarion 1 Light Pendant design. The actual product features a black finish.
- Connect the black wire from the fixture to the black (hot) wire from the junction box using a wire nut.
- Connect the white wire from the fixture to the white (neutral) wire from the junction box using a wire nut.
- Connect the ground wire from the fixture (usually bare copper or green) to the ground wire from the junction box and to the mounting plate's ground screw.
- Carefully tuck all wires into the junction box.
Step 5: Secure Canopy and Glass Shade
- Align the canopy with the mounting plate and secure it with the provided screws.
- Carefully attach the clear glass shade to the fixture body according to the design. Ensure it is stable and secure.
Step 6: Install Bulb
- Screw in one A19 medium base bulb (not included) into the socket. Do not exceed the maximum wattage of 60 Watts.
Step 7: Restore Power
- Return to the main fuse box or circuit breaker and turn the power back on. Test the light fixture.
Operating Instructions
This pendant light is designed for simple operation.
- Power On/Off: Control the light using a standard wall switch connected to the fixture's circuit.
- Bulb Type: Uses one A19 medium base bulb.
- Wattage: Maximum 60 Watts.
- Dimmable: The fixture is dimmable when used in conjunction with a dimmable bulb and a compatible dimmer switch (both sold separately).
Maintenance
Regular maintenance will help preserve the appearance and functionality of your pendant light.
- Cleaning: Always turn off the power before cleaning. Wipe the fixture with a soft, dry cloth. Do not use abrasive cleaners, solvents, or polishes as they may damage the finish.
- Glass Shade: The clear glass shade can be gently wiped with a damp cloth and then dried with a soft, lint-free cloth.
- Bulb Replacement: Ensure the power is off and the bulb has cooled before attempting to replace it. Screw in a new A19 medium base bulb, not exceeding 60 Watts.
Troubleshooting
If you experience issues with your pendant light, refer to the following common problems and solutions.
| Problem | Possible Cause | Solution |
|---|---|---|
| Light does not turn on | No power to the fixture Loose wire connections Faulty bulb | Check circuit breaker/fuse. Ensure all wire connections are secure (power off first). Replace bulb with a new one. |
| Light flickers | Loose wire connections Incorrect bulb type Incompatible dimmer switch | Check wire connections (power off first). Ensure bulb is correct type and wattage. If using a dimmer, ensure it is compatible with LED/dimmable bulbs. |
| Glass shade is loose | Shade not properly secured | Carefully re-secure the glass shade to the fixture body. |
If the problem persists after attempting these solutions, please contact customer support.
Specifications
| Feature | Detail |
|---|---|
| Model Number | SPH-P500242-031 |
| Brand | Generic |
| Color | Black (with Clear Glass) |
| Lamp Type | A19 (Medium Base) |
| Max Wattage | 60 Watts |
| Dimmable | Yes (with dimmable bulb and compatible dimmer) |
| Energy Star Rated | No |
| Dimensions | 10.5 inches (diameter) x 15.87 inches (height) |
Warranty and Support
This product comes with a 1-year manufacturer's warranty from the date of purchase, covering defects in materials and workmanship.
For warranty claims, technical assistance, or replacement parts, please contact the retailer or manufacturer directly. Keep your proof of purchase for warranty validation.
Ask a question about this manual
Ask about setup, troubleshooting, compatibility, parts, safety, or missing instructions. Manuals+ will review the question and use this page’s manual context to help answer it.