1. Introduction
This manual provides detailed instructions for the assembly, operation, maintenance, and troubleshooting of your Medical King Toilet Seat Riser with Handles. Please read this manual thoroughly before use to ensure safe and proper functionality. This product is designed to provide stable support and elevated seating for individuals requiring assistance with toilet use, such as seniors, those with mobility issues, or pregnant individuals.

Image 1: Medical King Toilet Seat Riser with Handles
2. Important Safety Information
- Always ensure all components are securely fastened before each use.
- Do not exceed the maximum weight capacity of 400 lbs (181 kg).
- Verify that the riser is stable and does not wobble on the floor before transferring weight onto it.
- Keep hands and fingers clear of adjustment points during height and width modifications.
- Regularly inspect the product for any signs of wear, damage, or loose parts. Discontinue use if any damage is observed.
- Use on a flat, level surface.
3. Package Contents
Please verify that all the following components are present in your package:
- Main Frame Assembly (with adjustable legs)
- Padded Toilet Seat
- Armrests (with foam grips)
- Toilet Paper Roll Holder
- Storage Pocket
- Instruction Manual
4. Setup & Assembly
Assembly typically takes approximately 2 minutes and requires no special tools. Follow these steps carefully:
- Unpack Components: Carefully remove all parts from the packaging and lay them out on a clean, flat surface.
- Assemble Main Frame: Connect the frame sections as indicated in the diagrams. Ensure all snap buttons engage fully. Note: Some plastic inserts used for shipping protection may need to be removed from the tube ends before assembly. If connectors are tight, apply gentle, firm pressure.
- Attach Armrests: Slide the armrests onto the designated frame posts until they click into place. Ensure the foam grips are facing upwards.
- Install Padded Seat: Place the padded toilet seat onto the frame, aligning the clips or attachment points. Press down firmly until the seat is securely attached. The seat is designed for easy removal for cleaning.
- Adjust Width (if necessary): The frame width can be adjusted to fit various toilet sizes. Locate the width adjustment pins on the frame. Press the pins and slide the frame sections inward or outward to achieve a width between 21 inches (minimum) and 25.5 inches (maximum). Release the pins to lock the desired width. Ensure both sides are adjusted equally for stability.

Image 2: Width Adjustment Mechanism
- Adjust Height: The riser's height is adjustable to suit individual user needs. Locate the spring-loaded pins on each leg. Press the pin and slide the leg extension up or down to the desired height. Ensure the pin fully re-engages in a hole. Adjust all four legs to the same height. The height can be set between 25 inches (minimum) and 30 inches (maximum).
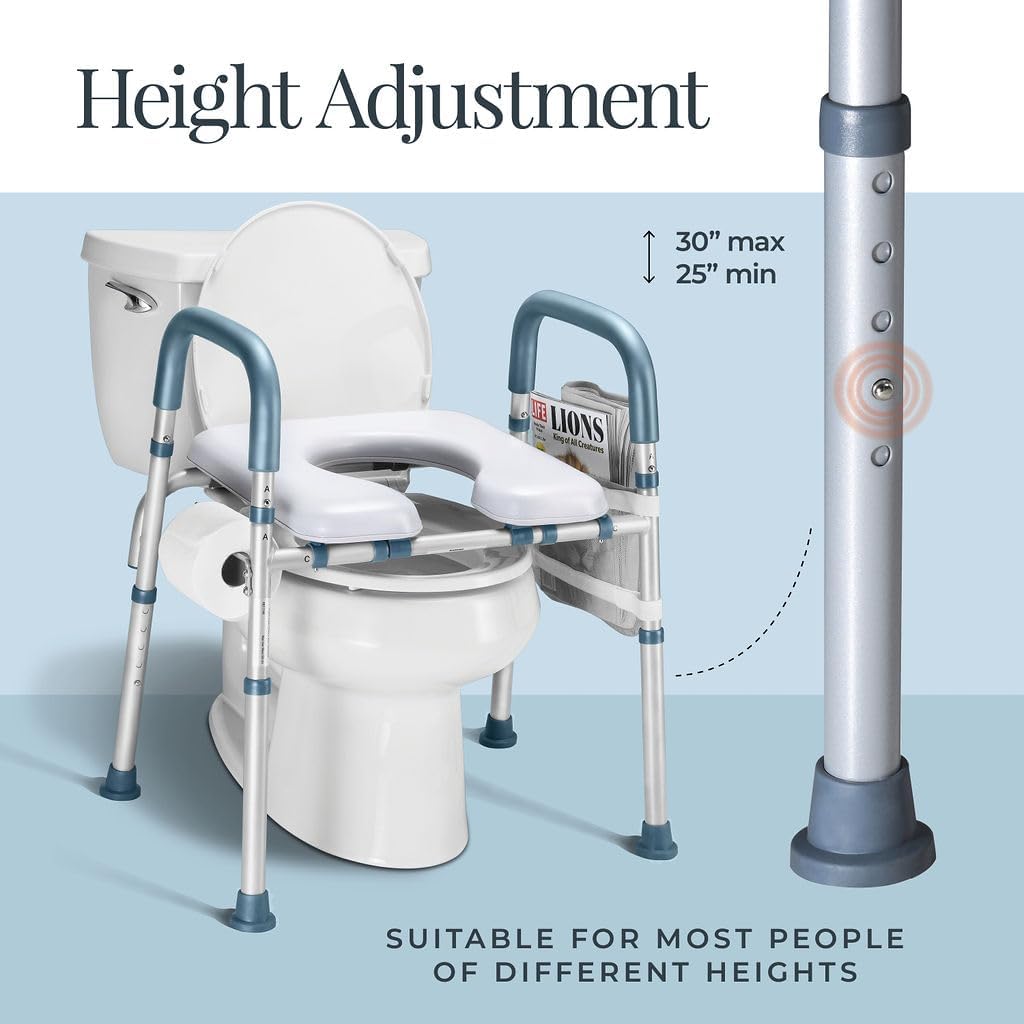
Image 3: Height Adjustment Mechanism
- Attach Accessories: The toilet paper roll holder can be attached to one side of the frame. The mesh storage pocket can be attached to the other side using its Velcro straps.
- Final Placement: Position the assembled riser over your toilet. Ensure all four non-slip rubber feet are firmly on the floor and the unit is stable.
5. Operating Instructions
Once properly assembled and positioned, the Medical King Toilet Seat Riser provides a secure and elevated seating solution.
- Using the Riser: Approach the toilet riser carefully. Use the padded armrests for stable support when sitting down or standing up. The U-shaped opening of the seat provides easy access.
- Toilet Paper Holder: The integrated toilet paper holder ensures easy access to toilet paper without straining.

Image 4: Convenient Features (Toilet Paper Holder and Storage Pocket)
- Storage Pocket: Use the mesh storage pocket to keep small personal items, magazines, or other necessities within easy reach.
6. Maintenance & Cleaning
Regular cleaning and maintenance will prolong the life of your toilet seat riser and ensure hygienic use.
- Cleaning the Seat: The padded seat is non-absorbent and features a quick-wipe surface. It can be easily removed for thorough cleaning. Use a mild soap and water solution with a soft cloth. Avoid abrasive cleaners or harsh chemicals that could damage the material.

Image 5: Effortless Cleaning and Hygiene
- Cleaning the Frame: Wipe down the aluminum frame and armrests with a damp cloth and mild detergent as needed. Dry thoroughly.
- Inspection: Periodically check all connections, pins, and rubber feet for tightness and wear. Replace any worn or damaged parts immediately.
7. Troubleshooting
If you encounter any issues with your Medical King Toilet Seat Riser, please refer to the following common solutions:
- Difficulty during Assembly: Ensure all plastic protective caps are removed from the ends of the tubes. If connectors are tight, apply firm, steady pressure. A small amount of lubricant (e.g., silicone spray) can assist if parts are exceptionally stiff.
- Riser is Wobbly: Verify that all adjustment pins are fully engaged in their respective holes. Ensure all four legs are set to the same height. Confirm that the non-slip rubber feet are clean and making full contact with a dry, level floor surface.
- Seat Not Secure: Ensure the padded seat is correctly aligned with the frame's attachment points and pressed down firmly until it clicks into place.
8. Specifications
| Feature | Specification |
|---|---|
| Brand | Medical king |
| Model Number | 7146 |
| Material | Aluminum |
| Color | Gray |
| Product Dimensions (L x W) | 16.5"L x 16.5"W (Seat) |
| Item Weight | 9.7 Pounds |
| Maximum Weight Capacity | 400 lbs |
| Adjustable Width Range | 21" (Min) to 25.5" (Max) |
| Adjustable Height Range | 25" (Min) to 30" (Max) |
| Included Components | Storage pocket, Toilet paper roll holder |
| UPC | 810147438365 |
9. Warranty Information
Medical King products are manufactured to high-quality standards. For specific warranty details, please refer to the documentation included with your purchase or contact Medical King customer support directly. Keep your proof of purchase for any warranty claims.
10. Customer Support
If you have any questions, require assistance with assembly, or need to report a problem, please contact Medical King customer support. Refer to the contact information provided on the product packaging or the official Medical King website for the most up-to-date support channels.


