1. Introduction and Overview
This manual provides detailed instructions for the installation, operation, maintenance, and troubleshooting of the Zebra 402491-001 Rev.C Blackline Sensor, also identified by part numbers G105910-004 and G105916-030. This component functions as a feed switch, crucial for the proper paper handling and detection in compatible Zebra TLP, TLP Plus, LP, and LP Plus Series Thermal Label Printers.
The feed switch sensor is an essential part of the printer's media detection system, ensuring accurate label feeding and preventing errors such as misfeeds or blank labels. Proper installation and maintenance are key to the reliable performance of your printer.
2. Product Components
The package typically includes the following:
- Zebra 402491-001 Rev.C Blackline Sensor (Feed Switch) with integrated wiring harness.
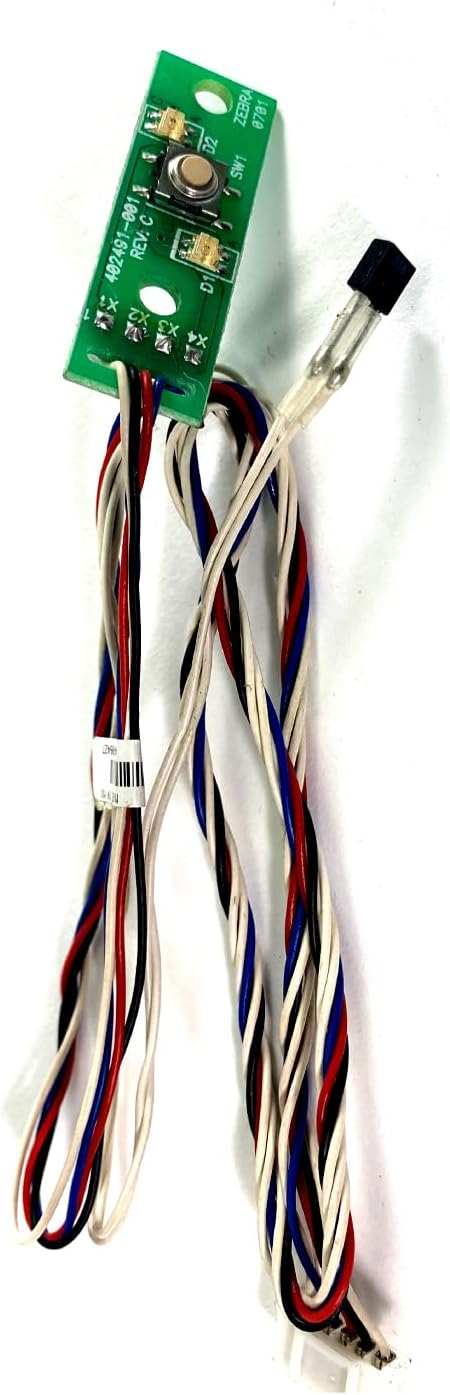
Figure 2.1: Top-down view of the sensor module, showing the green circuit board, two small buttons, and the attached wiring harness with red, black, blue, and white wires.

Figure 2.2: Angled view of the sensor, providing a clearer look at the wiring harness and the multi-pin connector at its end, which connects to the printer's main board.
3. Setup and Installation
Warning: Before beginning any installation, ensure the printer is powered off and unplugged from the electrical outlet to prevent electric shock or damage to the device.
- Preparation: Clear a well-lit, clean workspace. Gather necessary tools, which may include a small Phillips head screwdriver and possibly a flathead screwdriver.
- Access the Printer Interior: Carefully open the printer's casing to access the internal components. Refer to your specific printer model's service manual for precise instructions on how to safely open the enclosure.
- Locate the Existing Sensor: Identify the old feed switch sensor. It will typically be located near the media path, often where the labels feed into the printer. Note how it is mounted and where its wiring harness connects to the main board.
- Disconnect the Old Sensor: Gently disconnect the wiring harness of the old sensor from the printer's main board. Carefully unmount the old sensor from its position.
- Install the New Sensor: Mount the new Zebra 402491-001 sensor in the exact same location and orientation as the old one. Ensure it is securely fastened.
- Connect the Wiring Harness: Carefully connect the wiring harness of the new sensor to the corresponding port on the printer's main board. Ensure the connector is fully seated and oriented correctly.
- Reassemble the Printer: Once the new sensor is installed and connected, carefully reassemble the printer's casing, ensuring all screws are tightened and no wires are pinched.
- Test Functionality: Plug the printer back in and power it on. Perform a test print or run a media calibration to verify that the new feed switch sensor is functioning correctly and detecting media properly.
4. Operating Instructions
The Zebra 402491-001 feed switch sensor operates automatically as an integral part of your thermal label printer's media handling system. It does not require direct user interaction for its function.
- Media Detection: The sensor detects the presence and position of labels or continuous media as it feeds through the printer. This information is critical for the printer to accurately position prints and manage media consumption.
- Error Prevention: By accurately sensing media, the switch helps prevent common printing errors such as misfeeds, printing on gaps, or running out of labels unexpectedly.
- Calibration: Ensure your printer is properly calibrated for the type of media you are using. The sensor's performance is optimized when the printer's media settings match the physical media. Refer to your printer's user manual for media calibration procedures.
5. Maintenance
Proper maintenance of the sensor and its environment can extend its lifespan and ensure consistent performance.
- Cleaning: Periodically inspect the sensor area for dust, label adhesive residue, or paper debris. Use a soft, lint-free cloth lightly dampened with isopropyl alcohol to gently clean the sensor's surface. Ensure the printer is powered off and unplugged before cleaning.
- Handling: When handling the sensor, avoid touching the electronic components directly. Hold it by the edges of the circuit board or the plastic housing.
- Cable Integrity: Ensure the wiring harness is not kinked, cut, or damaged. A damaged cable can lead to intermittent sensor readings.
- Environmental Conditions: Operate the printer in a clean, dry environment to minimize dust accumulation and prevent moisture damage to electronic components.
6. Troubleshooting
If you experience issues with media feeding or detection after installing the new sensor, consider the following troubleshooting steps:
- No Media Detected / Paper Out Error:
- Verify that the media is loaded correctly and is compatible with your printer.
- Ensure the sensor's wiring harness is securely connected to the main board.
- Check for any obstructions or debris around the sensor area that might be blocking its path.
- Perform a media calibration on your printer.
- Misfeeds / Incorrect Label Spacing:
- Confirm that the sensor is properly mounted and aligned within the printer.
- Ensure the media type selected in your printer driver or settings matches the physical media (e.g., gap, black mark, continuous).
- Clean the sensor surface as described in the Maintenance section.
- Intermittent Errors:
- Inspect the wiring harness for any signs of damage (fraying, cuts).
- Ensure the connector is not loose.
If problems persist after attempting these steps, it may indicate an issue with another printer component or require professional service. Contact the seller or a qualified technician for further assistance.
7. Specifications
| Feature | Detail |
|---|---|
| Part Numbers | 402491-001 Rev.C, G105910-004, G105916-030 |
| Component Type | Feed Switch Sensor |
| Compatible Series | LP, LP Plus, TLP, TLP Plus |
| Compatible Models | LP2824 Plus, LP2844, LP2844-Z, LP2844 Plus, TLP2824 Plus, TLP2844-Z, TLP 3844-Z |
| Included Components | Sensor |
| Product Dimensions | 1 x 1 x 1 inches (approximate, for the sensor module) |
8. Warranty and Support
This product comes with a 30 Days Warranty from the date of purchase. This warranty covers defects in materials and workmanship under normal use.
For warranty claims, technical support, or any questions regarding the installation or operation of your Zebra 402491-001 Rev.C Blackline Sensor, please contact the seller, Tekswamp, directly through the platform where the purchase was made. Please have your order details and product information ready when contacting support.
For general information about Zebra printers or additional resources, you may visit the official Zebra website or consult your printer's specific user manual.


