1. Introduction
This manual provides essential information for the safe and effective operation, maintenance, and troubleshooting of your TECHTONGDA High Pressure Polyurethane Foam Sprayer, Model E3. Please read this manual thoroughly before operating the machine to ensure proper usage and to prevent damage or injury.
The TECHTONGDA High Pressure Spray Machine is designed for spraying two-component materials, such as polyurethane foaming materials. Its applications include embankment waterproofing, pipeline corrosion protection, auxiliary cofferdams, tank and pipe coating, cement layer protection, wastewater disposal, roofing, basement waterproofing, industrial maintenance, wear-resistant linings, and insulation for cold storage and walls.

Figure 1.1: TECHTONGDA High Pressure Polyurethane Foam Sprayer and included accessories.
2. Safety Instructions
Always prioritize safety when operating this equipment. Failure to follow safety instructions can result in serious injury or equipment damage.
- Read and understand all instructions in this manual before operation.
- Wear appropriate personal protective equipment (PPE), including eye protection, gloves, and respiratory protection, as required by the materials being sprayed.
- Ensure the work area is well-ventilated to prevent accumulation of hazardous fumes.
- Verify all electrical connections are secure and meet local codes. The machine requires a 110V/60Hz power source. It is recommended to connect the machine directly to a circuit breaker box.
- Maintain a clear and safe working distance from moving parts and high-pressure components.
- Do not operate the machine if any parts are damaged or malfunctioning.
- Keep children and unauthorized personnel away from the operating area.
- Always disconnect power before performing any maintenance or cleaning.
- Ensure the air source provides 0.8 MPa and ≥1.0m³/min.
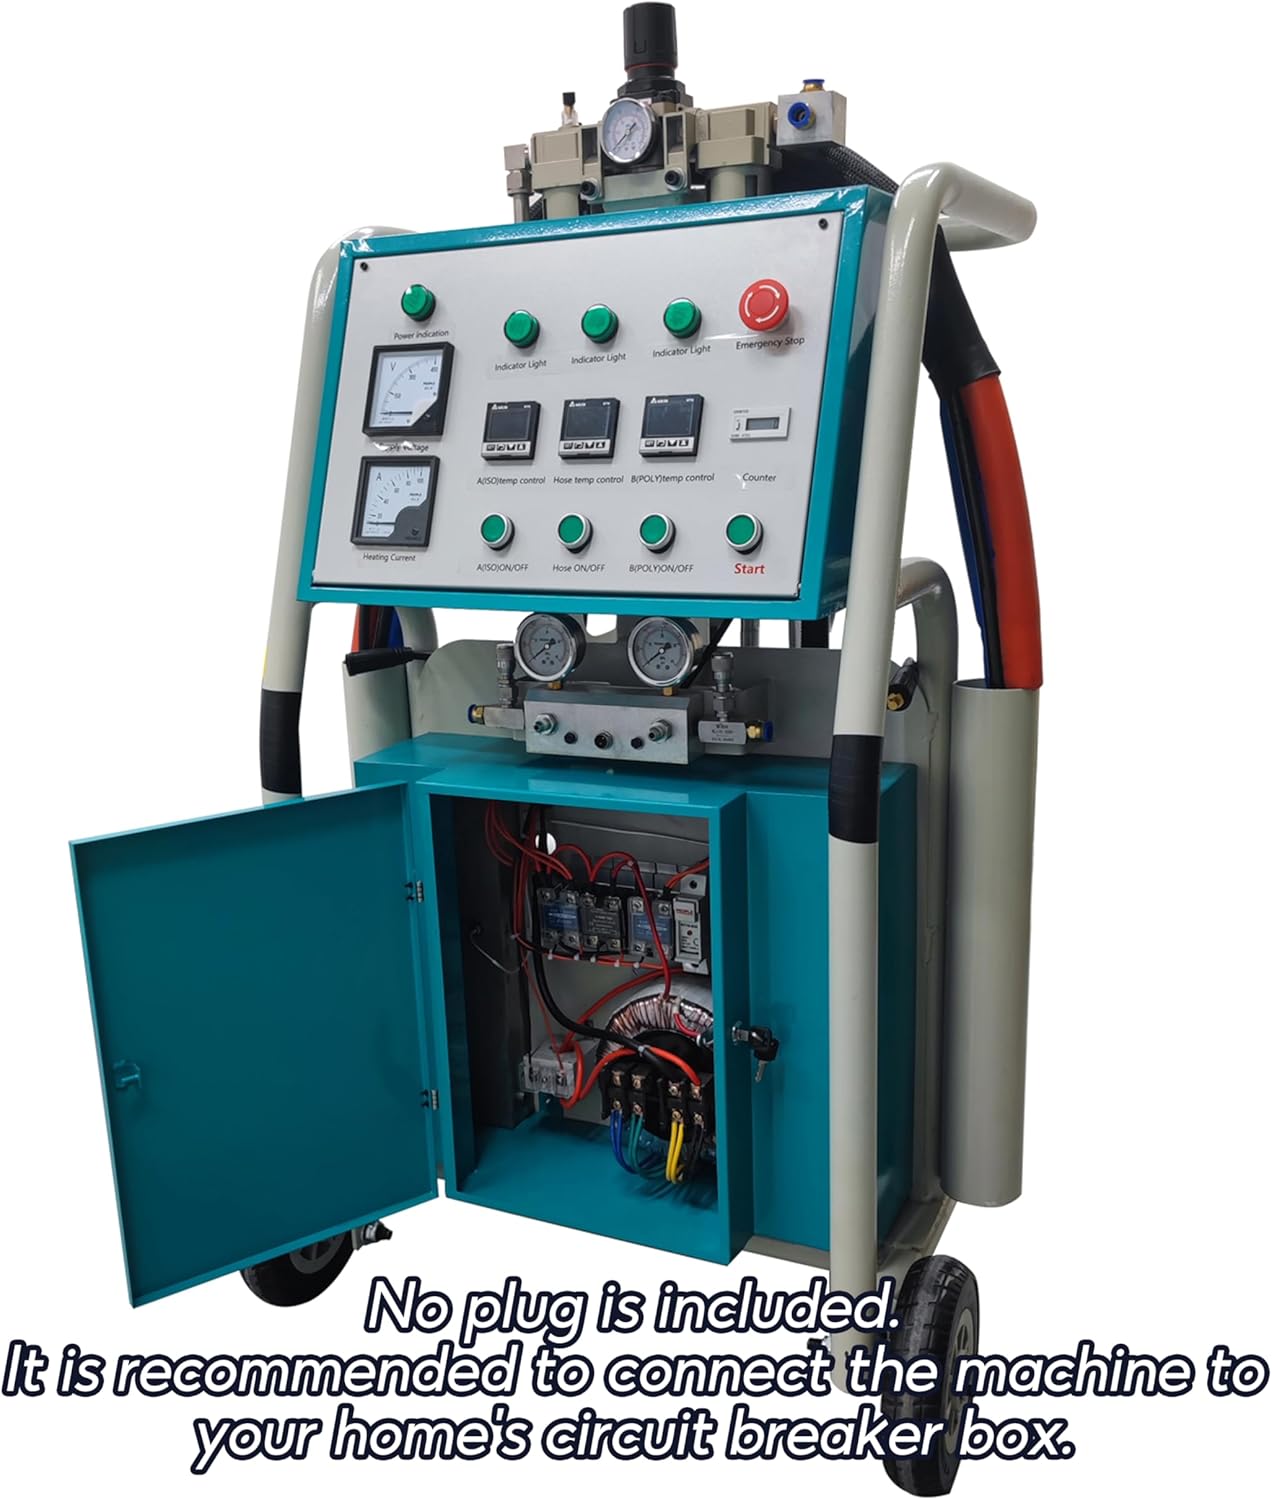
Figure 2.1: Electrical cabinet. Note: A plug is not included. Direct connection to a circuit breaker box is recommended for safety and optimal performance.
3. Components Overview
Familiarize yourself with the main components of the spray machine:
- Control Panel: Features indicators for power, heating, and material flow, along with temperature controls and start/stop buttons.
- High-Power Cylinder: Provides a powerful spraying effect and improved atomization.
- Heating System: A 7.5KW system designed to rapidly warm raw materials.
- Feedstock Device: An innovative 4-layer design to minimize clogging and ensure uniform material flow.
- Pneumatic Drive System: Utilizes an advanced pneumatic drive mode and supercharged cylinder for stable working pressure.
- Three-in-One Spray Gun: Designed for polyurethane spraying, pouring, and polyurea spraying, featuring a steel friction pair and advanced continuous air cleaning.
- Movable Wheels: For easy transport and positioning on job sites.

Figure 3.1: High-Power Cylinder, contributing to enhanced spraying and atomization.

Figure 3.2: Control panel displaying real-time voltage and current monitoring.
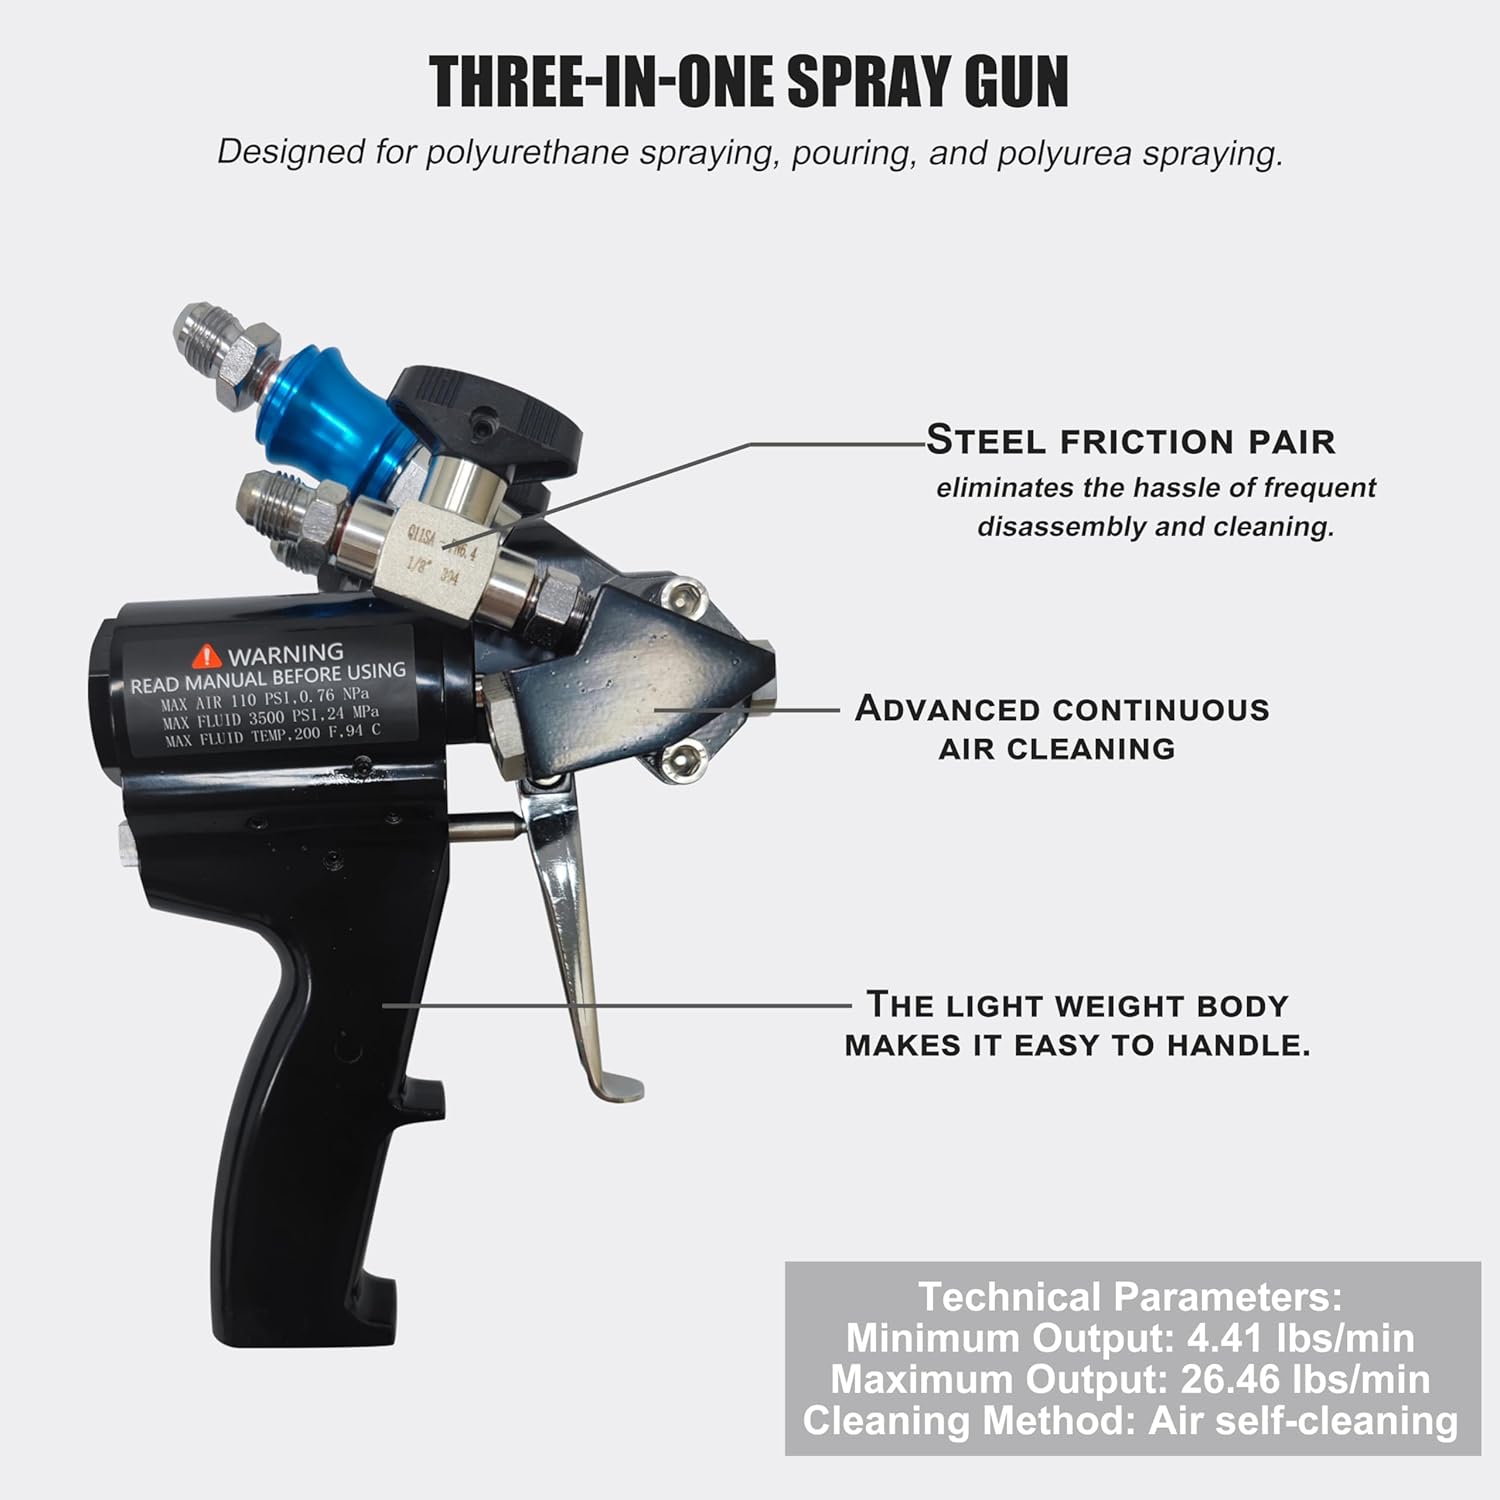
Figure 3.3: Three-in-One Spray Gun, designed for versatility in polyurethane and polyurea applications.
4. Setup
Follow these steps for initial setup of the spray machine:
- Unpacking: Carefully remove all components from the packaging. Inspect for any shipping damage.
- Positioning: Place the machine on a stable, level surface in a well-ventilated area. The movable wheels facilitate positioning.
- Electrical Connection: Connect the machine to a 110V/60Hz power source. As no plug is included, it is recommended to connect the machine directly to your facility's circuit breaker box by a qualified electrician. Ensure the power supply can handle the 7.5KW heating system.
- Air Source Connection: Connect a compressed air source to the machine. The air source must provide a minimum of 0.8 MPa pressure and a flow rate of at least 1.0 m³/min.
- Material Hoses: Connect the material hoses to the machine's outlets and to the spray gun. Ensure all connections are tight and secure to prevent leaks.
- Material Loading: Load the two-component polyurethane or polyurea materials into their respective containers, following the material manufacturer's instructions for mixing and preparation.
- Spray Gun Assembly: Assemble the three-in-one spray gun if not already assembled. Ensure the steel friction pair is correctly seated and the air cleaning mechanism is functional.
5. Operating Instructions
Before starting, ensure all safety precautions are observed and the machine is properly set up.
- Power On: Turn on the main power switch on the control panel. The power indicator light should illuminate.
- Set Temperatures: Use the temperature control settings on the control panel to set the desired heating temperatures for both components (A and B) and the hose, according to the material manufacturer's specifications. The 7.5KW heating system will begin warming the materials. Monitor the real-time voltage and current displays.
- Activate Heating: Press the "Heating ON/OFF" button to activate the heating system. Allow sufficient time for materials to reach the set temperature.
- Start Pneumatic System: Ensure the air compressor is on and providing adequate pressure. Activate the pneumatic drive system.
- Test Spray: Before applying to the work surface, perform a test spray in a designated area to verify proper material mixing and spray pattern. Adjust pressure and temperature as needed. The raw output range is 4.4-26.5 lbs/min (2-12 kg/min), with a maximum output pressure of 11 Mpa and an A:B material output ratio of 1:1.
- Application: Begin spraying the desired surface, maintaining a consistent distance and speed for even coverage. The lightweight body of the spray gun facilitates handling.
- Continuous Air Cleaning: The spray gun features advanced continuous air cleaning to prevent clogs.
- Shut Down: After use, turn off the spray gun, then the pneumatic system, and finally the heating system. Disconnect the main power.
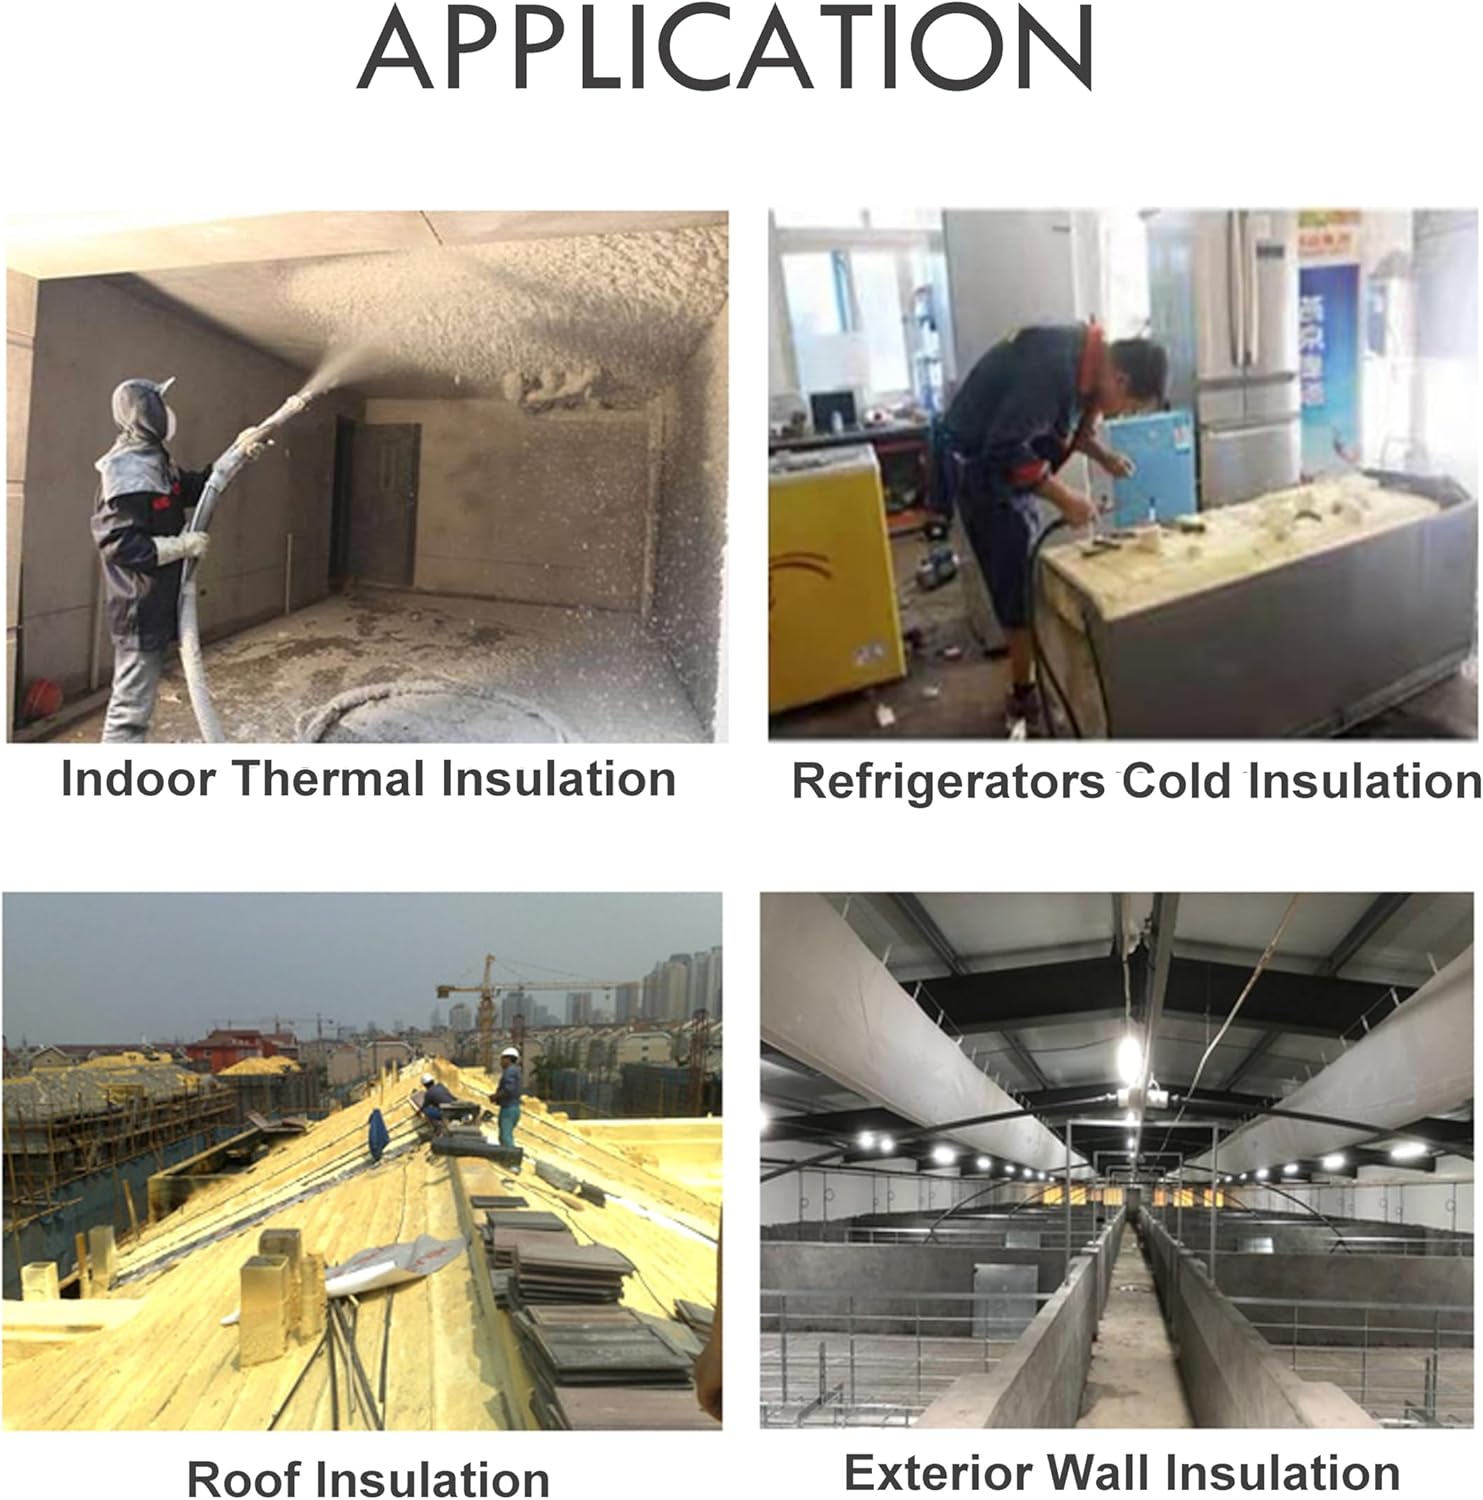
Figure 5.1: Various applications of the spray machine, demonstrating its versatility in insulation and coating tasks.
6. Maintenance
Regular maintenance is crucial for the longevity and optimal performance of your spray machine.
- Cleaning the Spray Gun: After each use, thoroughly clean the spray gun according to the material manufacturer's recommendations. The steel friction pair design minimizes disassembly for cleaning.
- Hose Cleaning: Flush the material hoses with appropriate cleaning agents to prevent material hardening and blockages.
- Filter Inspection: Regularly inspect and clean or replace material filters to ensure smooth material flow and prevent clogging. The 4-layer feedstock device is designed to minimize clogging.
- Pneumatic System Check: Periodically check the air lines and connections for leaks or damage. Ensure the air source is free of moisture and contaminants.
- General Inspection: Inspect all visible components for wear, damage, or loose connections. Tighten fasteners as needed.
- Storage: Store the machine in a clean, dry environment, protected from extreme temperatures.
7. Troubleshooting
This section addresses common issues you might encounter during operation.
| Problem | Possible Cause | Solution |
|---|---|---|
| No power to machine | Power cable disconnected, circuit breaker tripped, faulty power switch. | Check power connections. Reset circuit breaker. Contact qualified technician if switch is faulty. |
| Materials not heating | Heating system off, faulty heating element, incorrect temperature setting. | Ensure heating is activated. Verify temperature settings. Contact service if element is faulty. |
| Poor spray pattern or low output | Clogged spray gun nozzle, material filters blocked, insufficient air pressure, incorrect material ratio. | Clean spray gun and filters. Check air compressor and connections. Verify material loading and ratio (1:1). |
| Machine not building pressure | Air leak in pneumatic system, faulty pressure regulator, issue with supercharged cylinder. | Inspect air lines for leaks. Check pressure regulator. Contact service for cylinder issues. |
| Material crystallization | Improper material storage, incorrect temperature, prolonged inactivity. | Ensure materials are stored correctly. Verify heating system is maintaining temperature. Clean feedstock device and lines. |
8. Specifications
Technical specifications for the TECHTONGDA High Pressure Polyurethane Foam Sprayer, Model E3:
- Brand: TECHTONGDA
- Model Name: LAY033186 (Model E3)
- Power Source: 110V/60HZ (AC)
- Heating Power: 7.5KW
- Driven Mode: Pneumatic
- Required Air Source: 0.8 MPa, ≥1.0m³/min
- Raw Material Output: 4.4-26.5 lbs/min (2-12 kg/min)
- Maximum Output Pressure: 11 Mpa (approximately 1595.42 PSI)
- A:B Material Output Ratio: 1:1
- Dimensions (Approximate): Height: 44 inches, Width: 22.8 inches, Depth: 28.3 inches
- Item Weight: 454 pounds
- Color: Green
- UPC: 198462839617

Figure 8.1: Product dimensions for the spray machine.
9. Warranty and Support
For warranty information, technical support, or service inquiries, please contact TECHTONGDA customer service. Refer to your purchase documentation for specific warranty terms and contact details.
Protection plans may be available for extended coverage. For example, a 4-Year Protection Plan (ASIN: B07P5HBVKW) might be offered separately.