1. Introduction
This manual provides essential information for the installation, operation, and maintenance of your new High Brightness Brake Lights with Dynamic Information Turn Signals for Toyota Vios 2018-2023. Please read this manual thoroughly before installation and use to ensure proper function and safety.
2. Product Features
- Material: Constructed from durable ABS plastic and PMMA, offering high impact resistance, dustproof, and waterproof properties for a long service life.
- Enhanced Durability: Designed to withstand adverse weather conditions, preventing moisture and dust ingress, thereby improving performance and vehicle aesthetics.
- Multi-functional Lighting: Integrates brake light, turn signal, and driving light functions. Provides bright, high-quality illumination to increase vehicle visibility and enhance driving safety.
- Improved Visibility: Significantly enhances vehicle visibility at night or in low-light conditions, reducing the risk of rear-end collisions.
- Clear Driving Intentions: Effectively communicates driver intentions (e.g., slowing down, turning) to following vehicles through distinct light signals, improving overall road safety.
3. Compatibility
These tail lights are specifically designed for Toyota Vios models manufactured between 2018 and 2023. Ensure your vehicle falls within this model year range for proper fitment.

Image 3.1: Diagram illustrating brake light and reversing light functions, along with a note confirming compatibility for Toyota Vios 2018-2023. It also advises sending a picture of your car to customer service if unsure about fitment.

Image 3.2: Visual comparison showing the rear of a car with its original taillights ('Old') and the same car with the new, high-brightness taillights installed, highlighting the improved appearance and illumination.
4. Installation
Installation is designed to be straightforward, requiring no complicated tools. These lights are a direct replacement for your old or damaged vehicle taillights. However, professional installation is recommended if you are unfamiliar with automotive electrical systems or bodywork.
4.1 Pre-Installation Check
- Before beginning, ensure the vehicle's ignition is off and the battery is disconnected to prevent electrical shorts.
- Carefully inspect the new taillight units for any signs of damage from shipping.
- Verify that all necessary mounting points and connectors match your vehicle's existing setup.
4.2 Installation Steps (General Guidance)
- Locate and remove the fasteners securing the existing taillight assembly. These typically include screws, clips, or nuts accessible from inside the trunk or fender well.
- Carefully detach the old taillight assembly from the vehicle body. Disconnect any electrical connectors by pressing the release tabs.
- Connect the electrical harness of the new taillight assembly to the vehicle's wiring. Ensure a secure and tight connection.
- Position the new taillight assembly into the vehicle's opening, aligning the mounting points.
- Secure the new taillight assembly using the original fasteners. Do not overtighten.
- Reconnect the vehicle battery and test all light functions (brake lights, turn signals, driving lights, reversing lights) before fully reassembling any interior trim.

Image 4.1: A visual representation of a red Toyota Vios, displaying the 'BEFORE' state with its original taillights and the 'AFTER' state with the new, darker, and dynamically styled taillights installed.

Image 4.2: A close-up rear view of a white Toyota Vios, highlighting the newly installed dynamic taillights in operation, demonstrating their sleek design and bright illumination.

Image 4.3: A close-up rear view of a red Toyota Vios, highlighting the newly installed dynamic taillights in operation, demonstrating their sleek design and bright illumination.
5. Operation
Once installed, these taillights operate in conjunction with your vehicle's existing electrical system to provide enhanced visibility and communication to other drivers.
- Brake Lights: Illuminate brightly in red when the brake pedal is pressed, signaling deceleration or stopping.
- Turn Signals: Provide dynamic, sequential amber illumination in the direction of the turn, clearly indicating your intended lane change or turn.
- Driving Lights: Remain illuminated at a lower intensity when headlights are on, enhancing rear visibility during normal driving conditions.
- Reversing Lights: Activate when the vehicle is in reverse gear, providing white light for visibility when backing up.
Image 5.1: A diagram illustrating the distinct functions of the brake light (red) and reversing light (white), with corresponding icons and labels in various languages.
6. Maintenance
To ensure the longevity and optimal performance of your taillights, follow these simple maintenance guidelines:
- Cleaning: Clean the outer lens regularly with a soft cloth and mild automotive soap. Avoid abrasive cleaners or harsh chemicals that could damage the plastic.
- Inspection: Periodically check the taillight assemblies for any signs of condensation, cracks, or loose connections. Address any issues promptly.
- Bulb Replacement: These units typically use integrated LED components which are designed for long life and generally not user-replaceable. If an LED fails, the entire unit may need replacement.
7. Troubleshooting
If you encounter any issues with your taillights, consider the following troubleshooting steps:
- Lights Not Functioning: Check the electrical connections at the taillight assembly and ensure they are secure. Verify that the vehicle's fuses related to the taillights are intact.
- Intermittent Operation: This could indicate a loose connection. Re-check all wiring harnesses and ensure they are firmly seated.
- Condensation Inside Lens: Small amounts of condensation can occur due to temperature changes and usually dissipate. If excessive or persistent, check for cracks in the housing or improper sealing during installation.
- Fitment Concerns: If you are unsure about the product's fitment for your specific vehicle model, it is recommended to contact customer service with pictures of your car for confirmation before installation.
8. Specifications
| Brand Name | Generic |
| Manufacturer | Catalpa fine |
| Part Number | 4957928128803 |
| ASIN | B0DTYCCLGM |
| Material | ABS Plastic and PMMA |
| Vehicle Placement | Rear Left and Rear Right |
| Date First Available | January 24, 2025 |
9. Safety Information
Always prioritize safety during installation and operation. Failure to follow safety guidelines may result in injury or damage to the product or vehicle.
- Professional Installation: If you are not confident in your ability to install the product correctly, seek professional assistance.
- Electrical Safety: Disconnect the vehicle's battery before performing any electrical work.
- Secure Assembly: Ensure all components are firmly assembled and secured before using the vehicle. Loose parts can cause hazards.
- Road Safety: Always ensure your lights are functioning correctly before driving to maintain road safety and comply with local regulations.
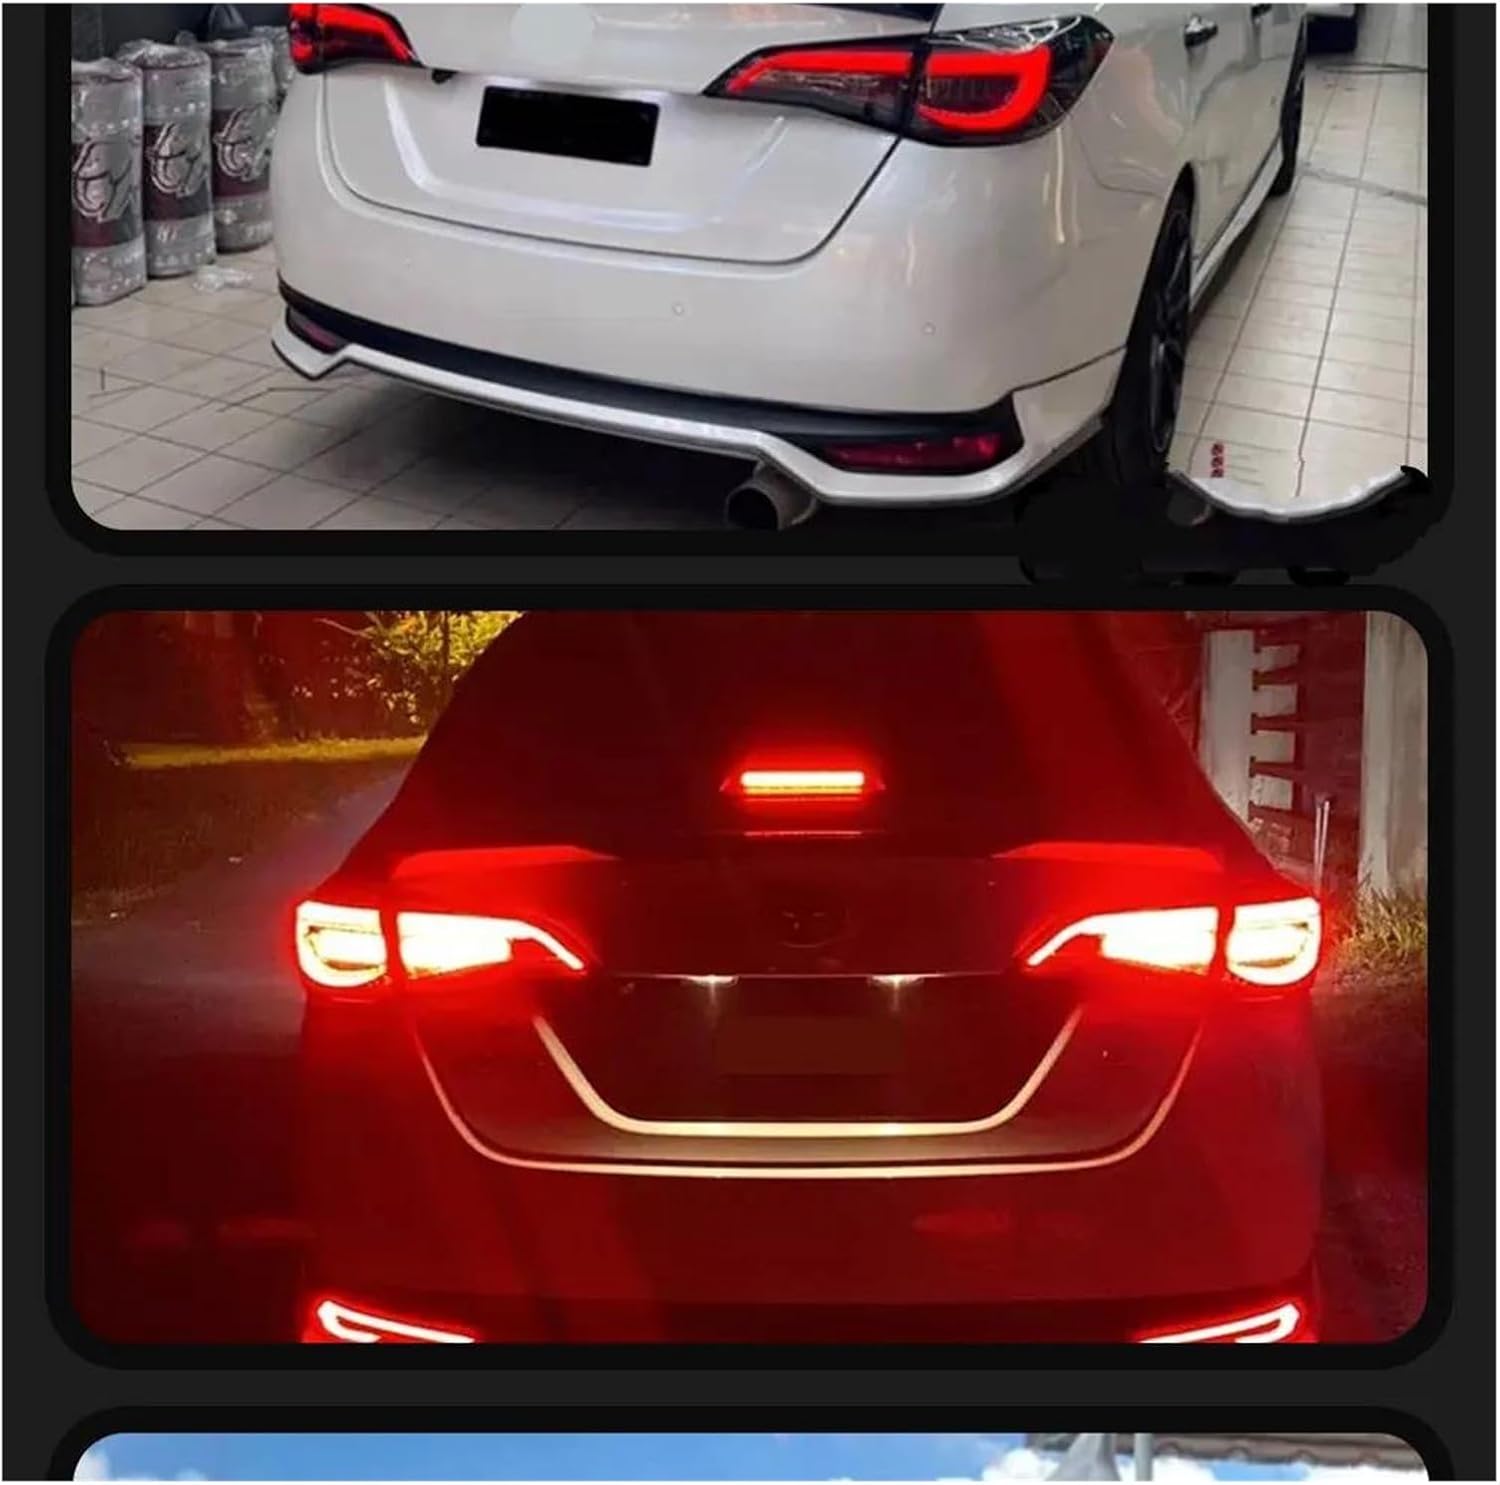
Image 9.1: A warning label translated into multiple languages, emphasizing the importance of assembling the product firmly before use to ensure safety and proper function.
10. Warranty and Support
For warranty information or technical support, please refer to the contact details provided with your purchase or reach out to the manufacturer, Catalpa fine, or the seller directly. Always provide your model number (4957928128803) and ASIN (B0DTYCCLGM) when contacting support.