NEEWER White NL48B
NEEWER BASICS Magnetic Selfie Light User Manual
Model: White NL48B
Brand: NEEWER
Introduction
This manual provides detailed instructions for the NEEWER BASICS Magnetic Selfie Light (Model: White NL48B). Please read this manual thoroughly before using the product to ensure proper operation and to maximize its lifespan. This compact and portable LED fill light is designed to enhance your photography, video calls, and content creation with adjustable lighting and convenient features.

Figure 1: NEEWER BASICS Magnetic Selfie Light and accessories.
Setup
Package Contents
Ensure all items are present in the package:
- 1 x NL48B Magnetic Selfie Light
- 1 x Magnetic Ring
- 1 x USB Type C Charging Cable

Figure 2: Package Contents and Overview.
Attaching the Selfie Light
The NL48B Magnetic Selfie Light is designed for easy attachment to your device.
- For MagSafe Compatible Devices (e.g., iPhone 12 series and later): Simply align the magnetic selfie light with the MagSafe area on the back of your phone. The strong magnetic force will securely attach the light.
- For Non-MagSafe Devices (e.g., Android phones, laptops):
- Peel off the adhesive backing from the included magnetic ring.
- Carefully center and apply the magnetic ring to the back of your device or phone case where you intend to attach the light.
- Press firmly to ensure a secure bond.
- Once the magnetic ring is attached, you can then magnetically attach the selfie light to the ring.

Figure 3: Magnetic Attachment Methods.
Charging the Device
Before first use, fully charge the selfie light. Use the provided USB Type C charging cable to connect the light to a power source (e.g., wall adapter, computer USB port, power bank). A full recharge takes approximately 150 minutes.

Figure 4: Charging the Selfie Light.
Operating Instructions
Power On/Off and Brightness Adjustment
The selfie light features intuitive physical buttons for control.
- Power On/Off: Long press the power button to turn the light on or off.
- Brightness Adjustment: Use the '+' and '-' buttons to cycle through 5 brightness levels (20%-100%).
Color Temperature Settings
The light offers 5 color temperature settings to match various environments and preferences.
- Changing CCT: Short press the color temperature switch button to cycle through the 5 color temperature levels: 3000K, 3500K, 4400K, 5600K, and 6500K.

Figure 5: Color Temperature and Brightness Levels.
Adjustable Angles and Mirror Functionality
The selfie light is designed for maximum flexibility and convenience.
- 360° Horizontal Rotation: The light head can rotate 360 degrees horizontally, allowing you to direct light from the front or rear camera without blocking the lens.
- 270° Vertical Tilt: The light can tilt vertically up to 270 degrees and extends upwards from 0 to 4.8cm, providing versatile lighting angles.
- Built-in HD Makeup Mirror: The base of the light features a built-in mirror, convenient for checking your appearance during rear camera shooting or for quick makeup touch-ups. Note: Remember to peel off the protective film from the mirror before use.

Figure 6: Adjustable Angles.

Figure 7: Built-in HD Makeup Mirror.
Additional Functions
- Phone Stand: The folded design allows the light to double as a convenient phone stand for desk use.
- Portability: Weighing only 96g and measuring 2.36"x2.76"x0.79" (6x7x2cm) when folded, it is highly portable for on-the-go use.
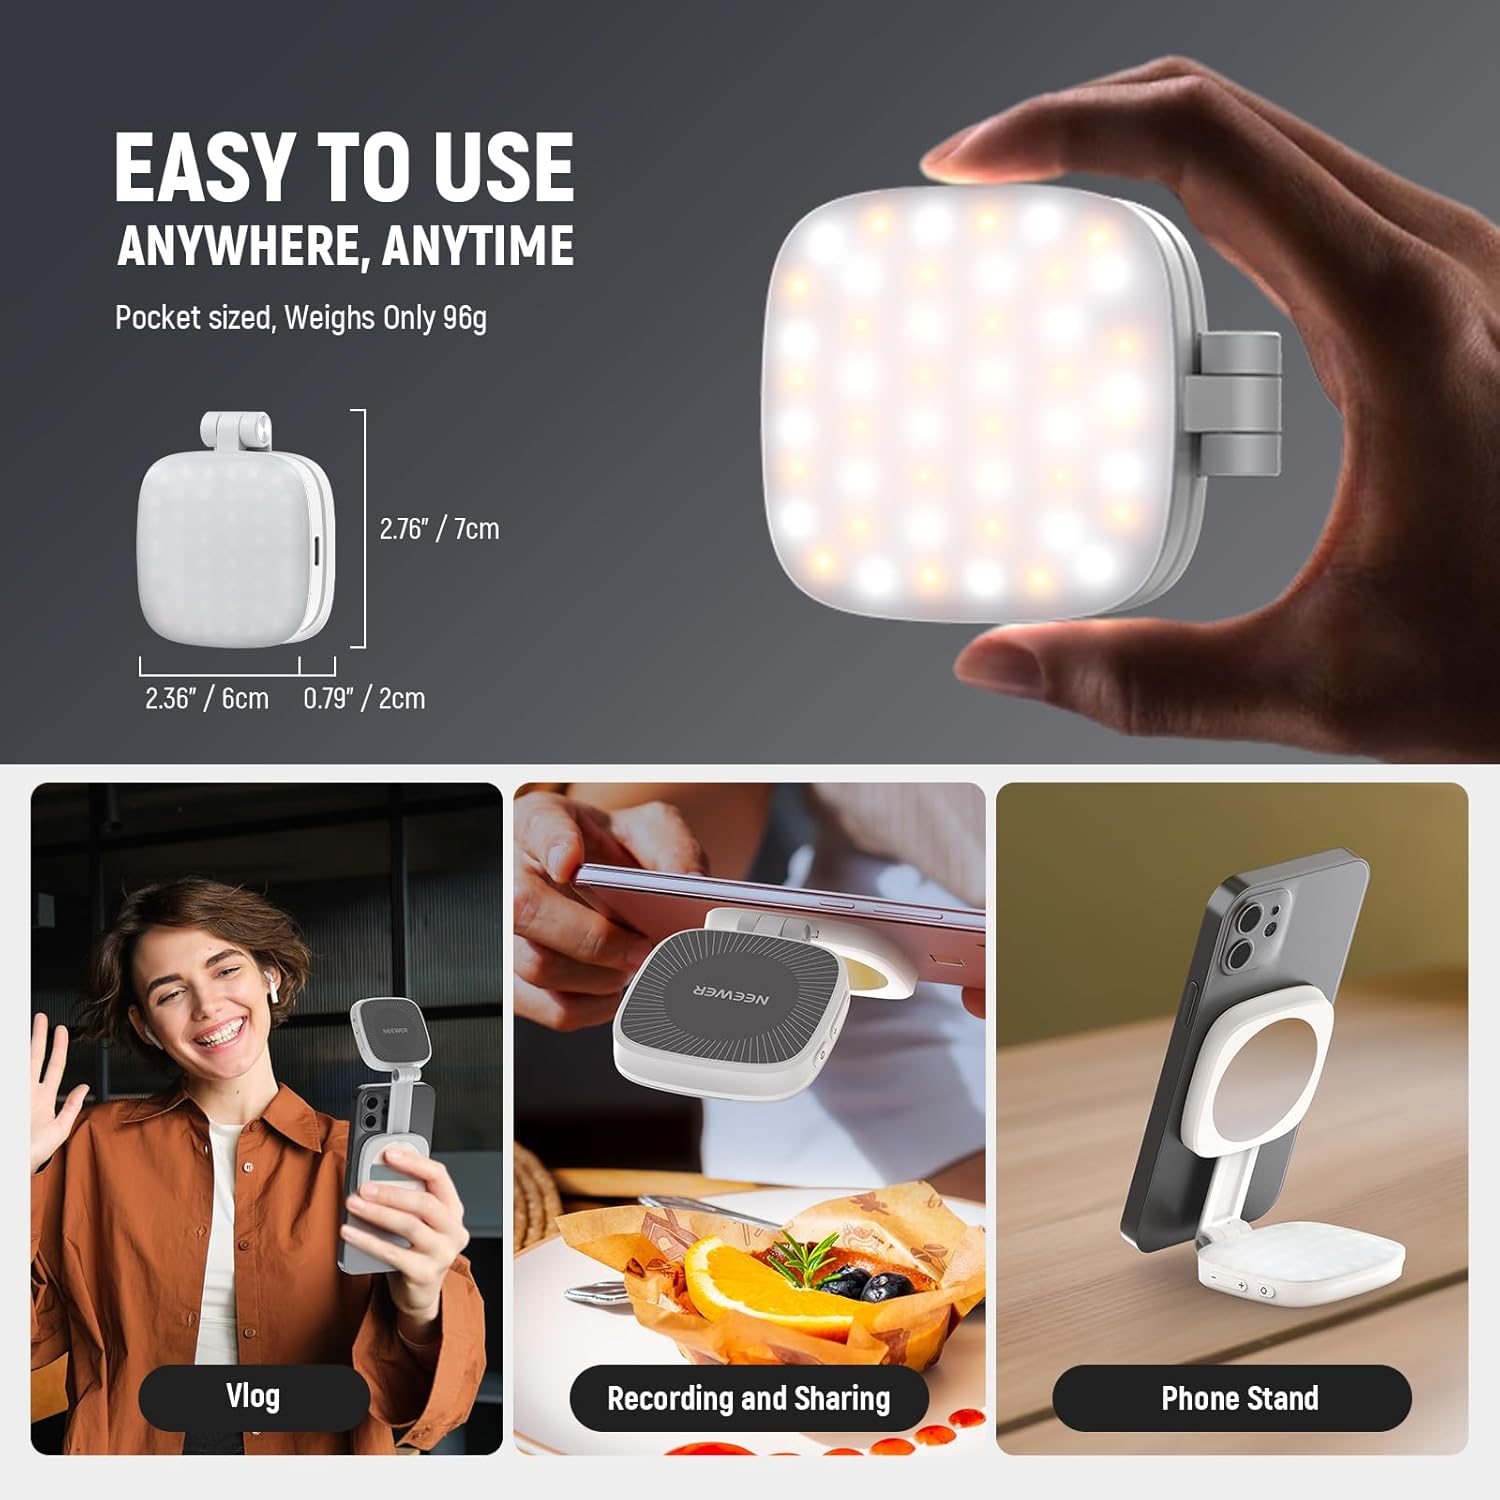
Figure 8: Versatile Usage and Portability.
Maintenance
- Cleaning: Use a soft, dry cloth to clean the surface of the light. Do not use abrasive cleaners or solvents.
- Storage: Store the device in a cool, dry place away from direct sunlight and extreme temperatures.
- Battery Care: To prolong battery life, avoid fully discharging the battery frequently. Recharge the device regularly, even if not in use for extended periods.
Troubleshooting
| Problem | Possible Cause | Solution |
|---|---|---|
| Light does not turn on. | Battery is depleted. | Charge the device using the provided USB-C cable. |
| Light does not charge. | Faulty cable or power source. | Try a different USB-C cable or power adapter. Ensure connections are secure. |
| Light is not bright enough. | Brightness level is set too low. | Press the '+' button to increase brightness. Ensure battery is fully charged. |
| Magnetic attachment is weak. | Device is not MagSafe compatible or magnetic ring is not properly applied. | For non-MagSafe devices, ensure the magnetic ring is securely and centrally attached. Clean the surface before applying the ring. |
Specifications
| Feature | Detail |
|---|---|
| Model | NL48B |
| Power | 2W |
| Color Temperature | 3000K/3500K/4400K/5600K/6500K (5 levels) |
| Brightness Range | 20%-100% (5 levels) |
| Maximum Illuminance | 700lx/0.3m (at 5600K) |
| CRI | 95 |
| Battery Capacity | 3.7V 850mAh |
| Endurance Time | 110 minutes (at 100% brightness) |
| Charging Time | 150 minutes |
| Bare Light Weight | 96g |
| Folded Dimensions | 6 x 7 x 2 cm (2.36"x2.76"x0.79") |
| 180° Opened Dimensions | Length 13-17.5cm, Width 6cm, Thickness 1cm |
| Control Method | Button |
| Manufacturer | NEEWER |
Warranty & Support
For warranty information and technical support, please refer to the official NEEWER website or contact their customer service directly. Keep your purchase receipt as proof of purchase for any warranty claims.
An electronic version of the user manual is available for download: Download User Manual (PDF)
Ask a question about this manual
Ask about setup, troubleshooting, compatibility, parts, safety, or missing instructions. Manuals+ will review the question and use this page’s manual context to help answer it.