PawHut D00-096V01
PawHut 36"-60" Adjustable Dog Car Barrier
Instruction Manual
Introduction
Thank you for choosing the PawHut Adjustable Dog Car Barrier. This barrier is designed to safely contain your pet in the cargo area of your vehicle, preventing distractions to the driver and ensuring a safer travel experience for everyone. Its robust construction and adjustable design make it suitable for a wide range of vehicles.
Key features include:
- Sturdy Construction: Made from strong wires to withstand pressure and protect your pet and vehicle occupants.
- Pet Safety: Keeps dogs securely in the cargo area, away from the driver and passengers.
- Vehicle Protection: Features a powder-coated smooth design to prevent scratches to your car's interior.
- Easy Installation: Designed for quick installation and removal without the need for tools.
- Universal Fit: Fully adjustable from 35.8" to 59.8" (91-152 cm) to fit most cars, SUVs, hatchbacks, and vans.
Safety Information
- Always ensure the barrier is securely installed before driving.
- Do not use the barrier as a primary restraint system for your pet in the event of a collision. It is designed to prevent access to the front of the vehicle.
- Regularly check all connections and adjustment points to ensure they remain tight and secure.
- Ensure your pet has adequate space and ventilation in the cargo area when the barrier is in place.
- Keep small children away from the barrier during installation and adjustment to prevent pinching or injury.
- This product is intended for automotive interior use only.
Package Contents
Please verify that all components are present before beginning assembly:
- Main Barrier Panels (typically 3 sections: 1 center, 2 adjustable side panels)
- Adjustable Vertical Support Rods (2)
- Mounting Hooks/Clamps (2 sets, for headrest posts)
- Adjustment Knobs/Screws
- Protective Rubber Caps/Pads (for contact points)

Image: Overview of the adjustable barrier showing the main panels, vertical supports, and mounting hardware.
Setup and Assembly
Follow these steps to assemble and install your PawHut Dog Car Barrier:
- Prepare the Barrier: Unfold the main barrier panels. The barrier consists of a central fixed section and two side panels that slide outwards for width adjustment.
- Attach Vertical Support Rods: Insert the two vertical support rods into the designated slots on the main barrier frame. Ensure they are securely seated.

Image: Detail of how the vertical support rods connect to the main barrier frame.
- Attach Mounting Hooks/Clamps: Secure the mounting hooks or clamps to the top of the vertical support rods. These hooks are designed to attach to your vehicle's headrest posts or other suitable anchor points.
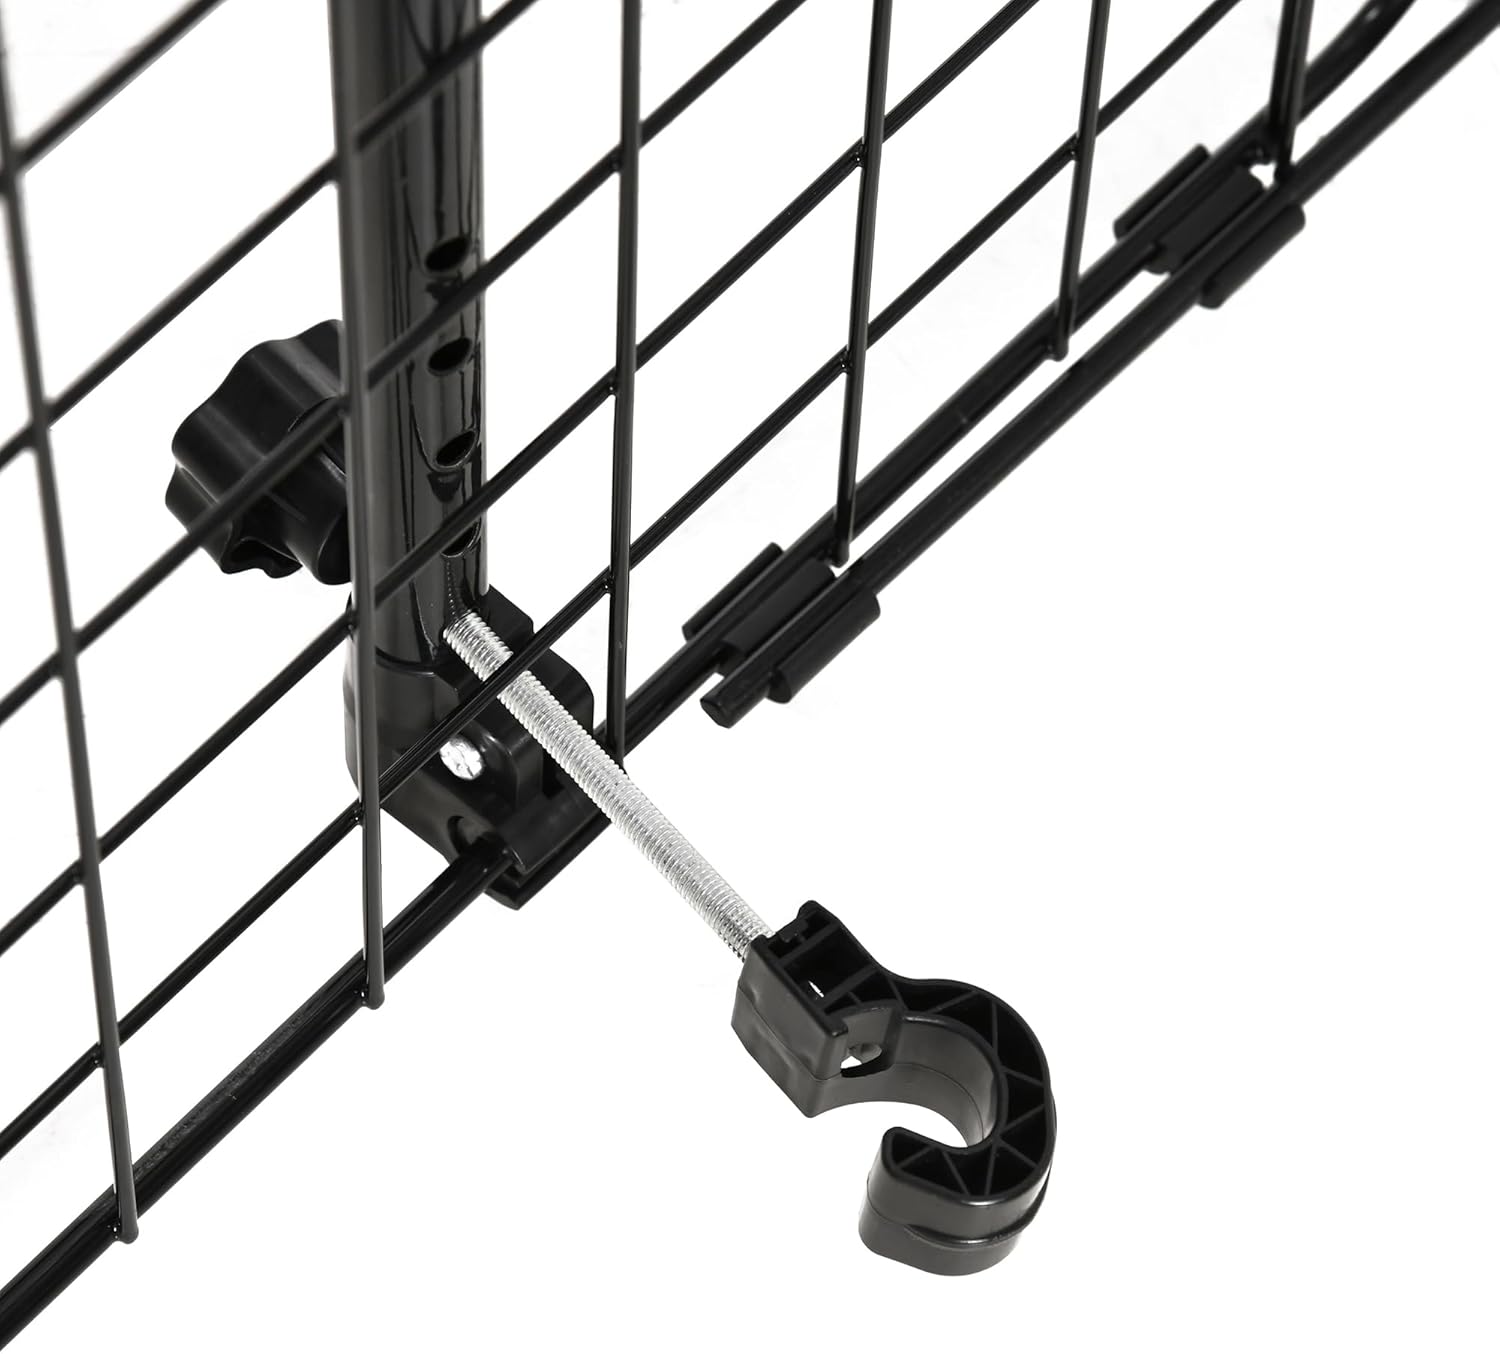
Image: Close-up view of the adjustable hook mechanism used for securing the barrier.
- Position in Vehicle: Place the assembled barrier in the cargo area of your vehicle, typically behind the rear seats.
- Adjust Width: Extend the side panels of the barrier outwards until they reach the desired width, fitting snugly against the interior walls of your vehicle. The barrier is adjustable from 35.8" (91 cm) to 59.8" (152 cm).

Image: Visual representation of the barrier's adjustable width and other features.
- Secure Vertical Rods: Adjust the height of the vertical support rods so they brace firmly against the ceiling or the back of the rear seats/headrests. Tighten the adjustment knobs on the vertical rods to secure them in place. Ensure the barrier is stable and does not wobble.
- Final Check: Double-check all connections and adjustment points to ensure they are tight and the barrier is firmly installed.
Operation and Usage
Once installed, the PawHut Dog Car Barrier creates a safe partition between your pet in the cargo area and the passenger compartment. This allows your pet to travel comfortably and securely without interfering with the driver.

Image: A golden retriever safely contained in the cargo area by the installed barrier.

Image: A labrador in the cargo area of a different vehicle, demonstrating the barrier's effectiveness.
To remove the barrier, simply reverse the installation steps: loosen the vertical support rods, detach the mounting hooks, and then collapse the side panels for compact storage.
Maintenance
- Cleaning: Wipe the barrier clean with a damp cloth and mild detergent as needed. Avoid abrasive cleaners that could damage the powder coating.
- Inspection: Periodically inspect the barrier for any signs of wear, damage, or loose components. Ensure all welds and connections are intact.
- Storage: When not in use, store the barrier in a dry place to prevent rust or corrosion. Its collapsible design allows for convenient storage.
Troubleshooting
| Problem | Possible Cause | Solution |
|---|---|---|
| Barrier feels unstable or wobbly. | Vertical rods not tight enough; width not fully extended; hooks not properly secured. | Ensure vertical rods are firmly braced and adjustment knobs are tightened. Extend side panels fully to create a snug fit. Re-attach hooks securely to headrest posts. |
| Difficulty installing vertical support bars. | May require firm pressure to snap into place. | Apply firm, even pressure to snap the vertical bars into their designated slots. Ensure correct orientation. |
| Barrier does not fit my vehicle. | Vehicle dimensions outside of barrier's adjustable range. | Verify your vehicle's cargo area dimensions against the barrier's adjustable range (35.8"-59.8" / 91-152 cm width). |
Specifications
| Attribute | Detail |
|---|---|
| Model Number | D00-096V01 |
| Brand | PawHut |
| Adjustable Width | 35.8" - 59.8" (91 cm - 152 cm) |
| Product Dimensions | 152 x 20 x 30 cm (fully extended, approximate) |
| Weight | 2 kg |
| Material | Steel with powder coating |
| Manufacturer | Aosom Canada |

Image: Detailed dimensions of the barrier, including adjustable width and height.
Warranty and Support
For any questions regarding the PawHut Adjustable Dog Car Barrier, or for support with assembly, operation, or troubleshooting, please contact the manufacturer, Aosom Canada. Contact information may be found on their official website or through your point of purchase.
Please retain your proof of purchase for any warranty claims.
Ask a question about this manual
Ask about setup, troubleshooting, compatibility, parts, safety, or missing instructions. Manuals+ will review the question and use this page’s manual context to help answer it.