Seenelling QAR-Seenelling-2554
Porch Swing Rope Kit Instruction Manual
Model: QAR-Seenelling-2554
1. Introduction
Thank you for choosing the Seenelling 4 Pack Porch Swing Rope Kit. This kit provides a robust and adjustable solution for hanging your porch swing or swing bed. Each kit includes four adjustable polypropylene ropes and four claw nails with rings, designed for durability and ease of installation. With a maximum load-bearing capacity of 800 lbs, this kit ensures a secure and enjoyable swinging experience.

Figure 1: Seenelling Porch Swing Rope Kit components and typical application.
2. Safety Information
- Weight Capacity: Do not exceed the maximum load-bearing capacity of 800 lbs (approximately 400 kg). Overloading can lead to product failure and serious injury.
- Secure Installation: Ensure all ropes are securely fastened and knots are properly tied before use. Regularly inspect all connection points for wear or loosening.
- Material Durability: The ropes are made from strong PE material designed to withstand outdoor elements. However, inspect ropes periodically for signs of fraying, cuts, or degradation. Replace immediately if damage is observed.
- Clearance: Ensure adequate clearance around the swing area to prevent collisions with obstacles or other individuals.
- Adult Supervision: Children should always be supervised by an adult when using the swing.
3. Setup and Installation
The Seenelling Porch Swing Rope Kit is designed for straightforward installation. Follow these steps to set up your swing securely:
- Prepare Components: Unpack the four adjustable ropes and four claw nails with rings. Ensure all components are present and undamaged.
- Attach Nails to Swing Bed: Identify the attachment points on your porch swing or swing bed. Securely fasten the claw nails with rings into these points. Ensure they are firmly anchored and can support the intended weight.
- Thread the Rope: Take one end of an adjustable rope and thread it through the ring of a securely attached claw nail on the swing bed.
- Tie a Secure Knot: Once threaded, tie a strong, secure knot to fix the rope to the swing bed. Ensure the knot is tight and will not slip under load. Repeat for all four attachment points.
- Hang the Swing: Attach the free end of each rope to your overhead support structure. Ensure the overhead support is strong enough to bear the full weight of the swing and its occupants.
- Adjust Length: Adjust the length of each rope as needed to achieve the desired swing height and level. The adjustable design allows for customization.
- Final Check: Before first use, double-check all knots and attachment points for security and stability. Gently test the swing's stability before full use.

Figure 2: Step-by-step installation guide for the swing ropes.
4. Operating Instructions
The primary operation of the swing rope kit involves adjusting the rope length to suit your preference and the specific setup.
- Adjusting Rope Length: The ropes feature an adjustable mechanism that allows you to easily shorten or lengthen the swing. This versatility enables you to customize the swing height for different users or environments.
- Usage: Once installed and adjusted, the swing is ready for use. Always ensure the swing is balanced and stable before allowing anyone to sit or swing.

Figure 3: Features of the rope kit, including adjustable length.
5. Maintenance
Proper maintenance will extend the lifespan of your Seenelling Porch Swing Rope Kit.
- Regular Inspection: Periodically inspect the ropes, knots, and attachment points for any signs of wear, fraying, cuts, or damage. Pay close attention to areas exposed to friction or direct sunlight.
- Cleaning: The PE material is resistant to weather. If cleaning is necessary, wipe the ropes with a damp cloth and mild soap. Rinse thoroughly and allow to air dry completely before re-use. Avoid harsh chemicals.
- Storage: If the swing will not be used for an extended period, especially during harsh weather conditions, consider detaching the ropes and storing them indoors in a dry, cool place to prevent premature wear and color fading.
6. Troubleshooting
If you encounter issues with your porch swing rope kit, consider the following:
- Swing Feels Unstable:
- Check that all four ropes are adjusted to the same length, ensuring the swing is level.
- Verify that all knots are securely tied and have not loosened.
- Confirm that the claw nails (eye bolts) are firmly anchored to the swing bed and the overhead support is stable.
- Rope Appears Faded:
- Prolonged exposure to direct sunlight and harsh weather can cause color fading over time. This is a natural process for outdoor materials.
- To minimize fading, consider covering the swing when not in use or storing the ropes indoors during off-season.
- Difficulty Adjusting Rope Length:
- Ensure the rope is not under tension when attempting to adjust.
- Check for any debris or knots that might be obstructing the adjustment mechanism.
7. Specifications
| Brand | Seenelling |
| Model Number | QAR-Seenelling-2554 |
| Material | Polyethylene (PE) |
| Color | Brown |
| Rope Length | Approximately 3.55 meters (118 inches / 10 ft) |
| Rope Diameter | Approximately 1.8 cm (0.71 inches) |
| Maximum Load Capacity | 800 lbs (400 kg) |
| Product Dimensions (Packaged) | 13.78"D x 7.87"W x 5.91"H |
| Item Weight | 6.87 pounds |
| Country of Origin | China |
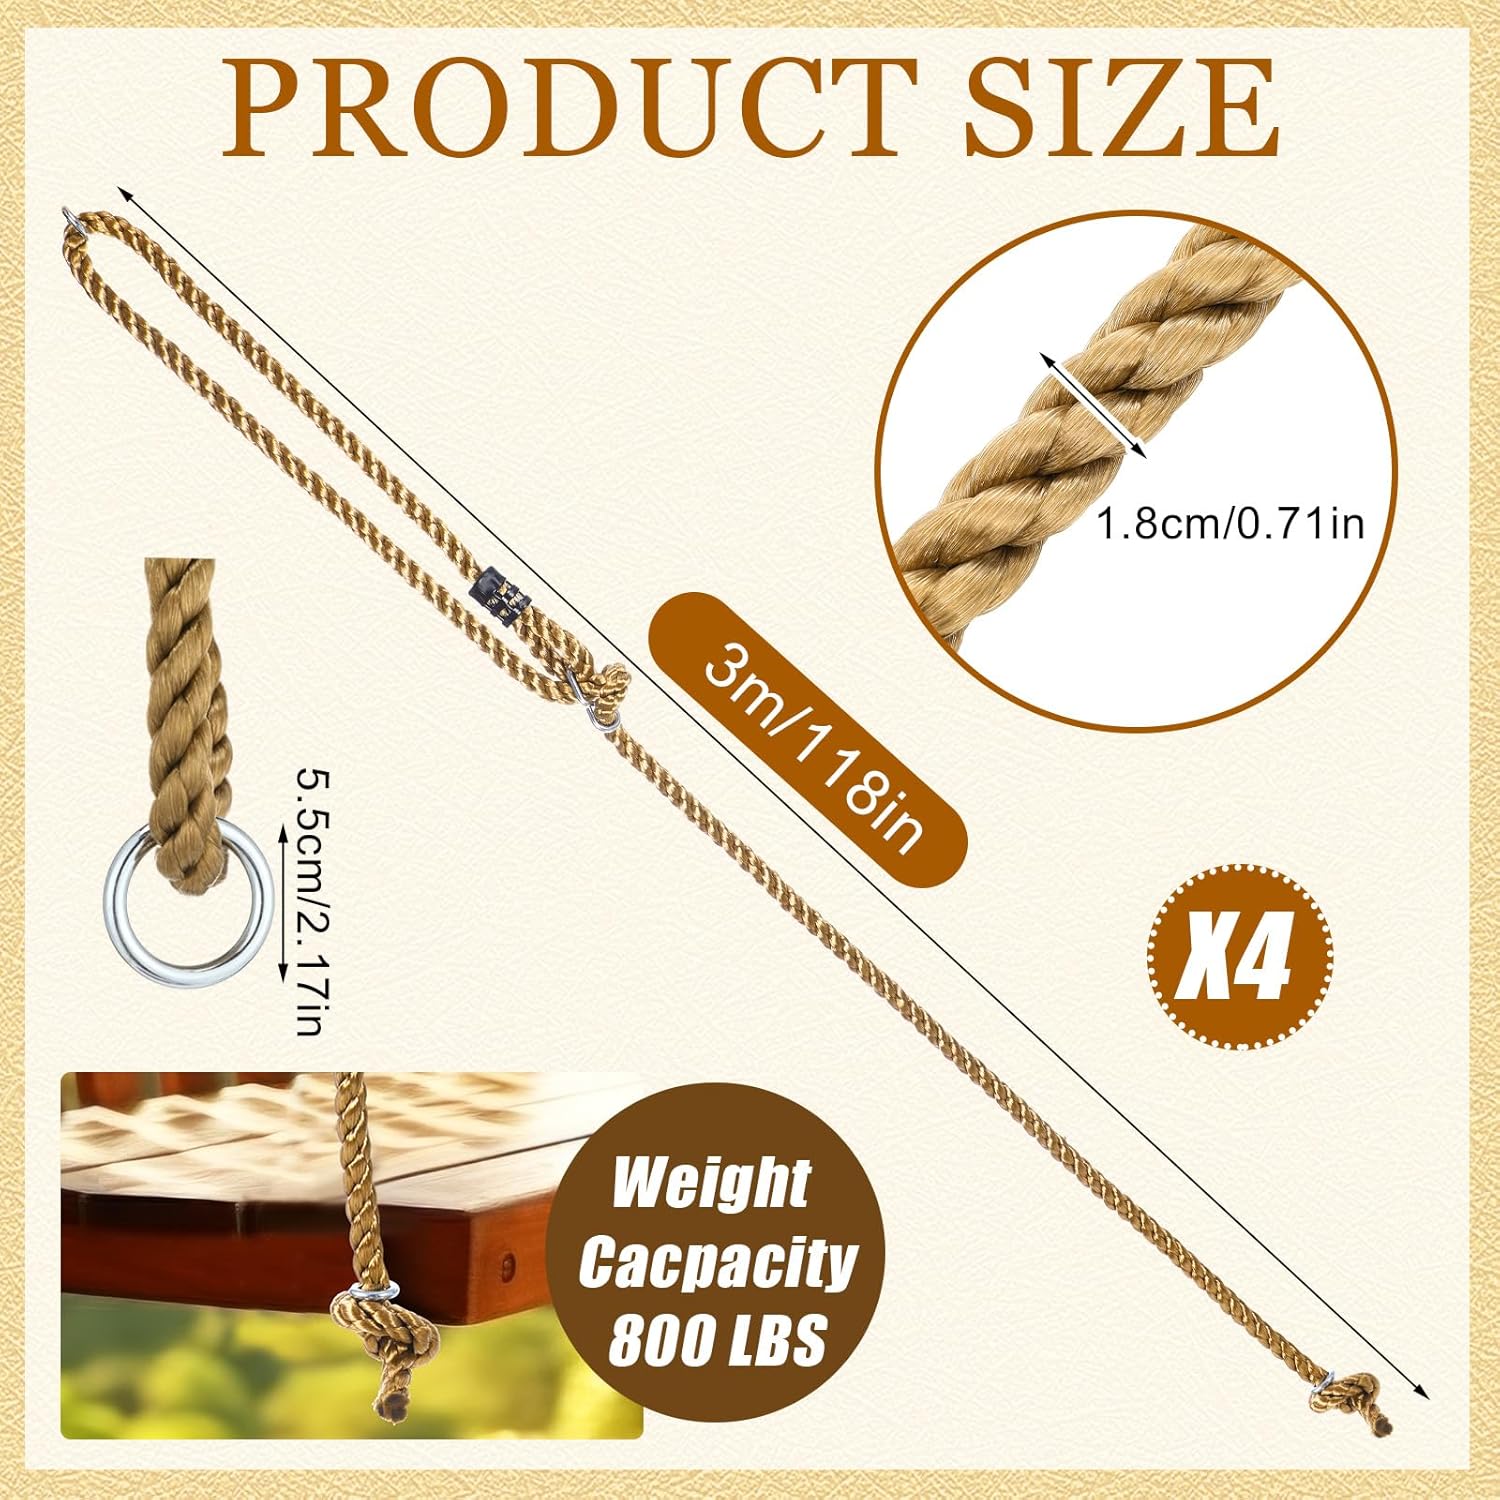
Figure 4: Detailed product dimensions and specifications.
8. Warranty and Support
Specific warranty information for the Seenelling Porch Swing Rope Kit is not provided in this manual. For details regarding warranty coverage, returns, or technical support, please refer to the product listing on the retailer's website or contact the manufacturer directly through the contact information provided at the point of purchase.
Ask a question about this manual
Ask about setup, troubleshooting, compatibility, parts, safety, or missing instructions. Manuals+ will review the question and use this page’s manual context to help answer it.