1. Introduction and Overview
Thank you for choosing the Elite Kitchen Supply SK-219 Commercial Ice Maker Machine. This high-capacity ice machine is designed for commercial establishments, capable of producing up to 219 pounds of clear ice per day with an 80-pound storage capacity. Its robust stainless steel construction ensures durability and reliable performance. This manual provides essential information for the safe installation, operation, maintenance, and troubleshooting of your ice maker.

Figure 1: Elite Kitchen Supply SK-219 Commercial Ice Maker Machine. This image shows the front and side view of the stainless steel ice maker with its black top lid and digital control panel.
2. Safety Information
Please read all safety instructions carefully before operating the ice maker to prevent injury or damage. Keep this manual for future reference.
- Electrical Safety: Ensure the unit is connected to a grounded power outlet with the correct voltage (115V/60Hz) and current (5.8A) as specified on the product label. Do not use extension cords.
- Water Connection: Connect the unit to a potable water supply with appropriate pressure (Min. 19 PSIG, Max. 80 PSIG). Ensure all water connections are secure to prevent leaks.
- Refrigerant: This unit uses R290 refrigerant (4.23oz). Servicing should only be performed by qualified personnel. Do not puncture refrigerant tubing.
- Ventilation: Maintain adequate clearance around the unit for proper ventilation to prevent overheating.
- Placement: Place the unit on a stable, level surface capable of supporting its weight (145 lbs).
- Cleaning: Always unplug the unit before cleaning or performing maintenance.

Figure 2: Product specification label for the SK-219 ice maker. This label details electrical ratings, refrigerant type (R290), and pressure specifications, along with safety certifications (ETL, Intertek).
3. What's in the Box
Upon unpacking, verify that all components are present:
- Commercial Ice Maker Unit
- Ice Storage Bin (integrated)
- Water Inlet Hose
- Drain Hose
- Ice Scoop
- User Manual (this document)

Figure 3: Included accessories. This image displays a white ice scoop, a coiled white water inlet hose, and a grey corrugated drain hose, which are typically included with the ice maker.
4. Setup
Proper setup is crucial for optimal performance and longevity of your ice maker.
4.1 Placement
- Choose a location with adequate space for ventilation (at least 6 inches from walls on all sides).
- Ensure the floor is level and strong enough to support the unit's weight.
- Avoid direct sunlight or heat sources.
- Adjust the leveling feet (Figure 4) to ensure the unit is perfectly stable and level.

Figure 4: Adjustable leveling feet. This image shows the black adjustable feet at the base of the ice maker, used to ensure stability and proper leveling on uneven surfaces.
4.2 Water Connection
- Connect the provided water inlet hose to the water inlet valve on the back of the ice maker and to a cold potable water supply.
- Ensure all connections are tight to prevent leaks. It is recommended to install a water filter for better ice quality and machine longevity.
4.3 Drain Connection
- Connect the drain hose to the drain outlet on the back of the ice maker.
- Route the drain hose to a floor drain or a drain pipe that is lower than the ice maker's drain outlet to allow for gravity drainage. Ensure the drain hose has a continuous downward slope.

Figure 5: Rear connections of the ice maker. This image displays the power cord, water inlet hose, and drain hose connected to the back of the unit, illustrating proper routing and secure connections.
4.4 Electrical Connection
- Plug the power cord into a dedicated, grounded 115V/60Hz electrical outlet.
- Do not use adapters or extension cords.
4.5 Initial Cleaning
- Before first use, clean the interior of the ice bin and the ice-making components with a mild detergent and warm water. Rinse thoroughly.
- Run a cleaning cycle as described in the Maintenance section.
5. Operating Instructions
Familiarize yourself with the control panel for efficient operation.

Figure 6: Digital control panel. This image shows the control panel with an LED display, buttons for ON/OFF, CLEAN, and thickness adjustment (+/-), along with indicator lights for various operational stages and error codes.
5.1 Control Panel Overview
- LED Display: Shows current status, error codes, or ice thickness setting.
- Indicator Lights:
- INIT: Initialization
- PREP: Preparation
- MAKE: Ice Making Cycle
- HARV: Harvest Cycle
- INLET: Water Inlet
- FAULT: Error Indication
- ON/OFF Button: Powers the unit on or off.
- CLEAN Button: Initiates the automatic cleaning cycle.
- +/- Buttons: Adjust ice thickness. Press '+' for thicker ice, '-' for thinner ice.
5.2 Starting the Ice Maker
- Ensure the unit is properly connected to water and power.
- Press the ON/OFF button. The unit will begin its initialization sequence.
- The MAKE indicator light will illuminate when the ice-making cycle begins.
5.3 Adjusting Ice Thickness
- During the ice-making cycle, press the + button to increase ice thickness or the - button to decrease it.
- The display will show the current thickness setting. Allow a few cycles for the change to take effect.

Figure 7: Ice making grid (evaporator). This image shows the internal grid where ice cubes are formed before being harvested into the storage bin.
6. Maintenance
Regular maintenance ensures optimal performance and extends the lifespan of your ice maker.
6.1 Daily/Weekly Cleaning
- Wipe down the exterior with a soft, damp cloth.
- Clean the ice scoop and the interior of the ice storage bin (Figure 8) with a mild, food-safe cleaner.

Figure 8: Interior of the ice storage bin. This image shows the blue, food-grade liner of the ice storage bin, which should be regularly cleaned.
6.2 Automatic Cleaning Cycle
- Press the CLEAN button on the control panel to initiate an automatic cleaning cycle.
- Follow the instructions on the display, which may prompt you to add a descaling solution.
- This cycle helps remove mineral buildup from the ice-making components. Perform this monthly or as needed based on water hardness.
6.3 Condenser Cleaning
- Periodically clean the condenser coils (located at the rear/side, Figure 9) to ensure efficient heat dissipation.
- Use a soft brush or vacuum cleaner to remove dust and debris.
- Perform this every 3-6 months, or more frequently in dusty environments.

Figure 9: Rear view showing the condenser area. This image highlights the vented panel at the back of the ice maker, behind which the condenser coils are located, requiring periodic cleaning.
7. Troubleshooting
Refer to the following table for common issues and their solutions. For persistent problems, contact customer support.
7.1 Error Codes (from Control Panel)
- E03: Harvest Over Time: Indicates the ice harvest cycle took too long. Check water flow, temperature, or refrigerant levels.
- E04: High Temp. Fault: Compressor or condenser issue, or high ambient temperature. Ensure proper ventilation.
- E07: Cond. Temp. Sensor Open Fault: Condenser temperature sensor is open or faulty.
- E08: Cond. Temp. Sensor Short Fault: Condenser temperature sensor is shorted or faulty.
7.2 General Troubleshooting
| Problem | Possible Cause | Solution |
|---|---|---|
| No ice production | No water supply, power off, clogged filter, high ambient temperature. | Check water connection, power supply, clean water filter, ensure proper ventilation. |
| Ice cubes are too thin/thick | Ice thickness setting incorrect, water flow issue. | Adjust ice thickness using +/- buttons. Check water pressure. |
| Water leakage | Loose water connections, clogged drain hose. | Tighten connections, clear drain hose. |
| Unusual noise | Unit not level, fan obstruction, compressor issue. | Level the unit, check for obstructions, contact service if noise persists. |
8. Specifications
Detailed technical specifications for the SK-219 Commercial Ice Maker Machine.
| Feature | Specification |
|---|---|
| Model Name | SK-219 |
| Production Capacity | Up to 219 lbs / 24 hours |
| Storage Capacity | 80 lbs |
| Product Dimensions (D x W x H) | 27"D x 26"W x 38"H (68.6cm D x 66cm W x 96.5cm H) |
| Weight | 145 Pounds (65.8 kg) |
| Rated Voltage | 115V / 60Hz |
| Rated Current | 5.8 A |
| Wattage | 790 watts |
| Refrigerant | R290 (4.23 oz) |
| Min. Water Pressure | 19 PSIG |
| Max. Water Pressure | 80 PSIG |
| Construction Material | Stainless Steel Exterior, Food-Grade Liner |
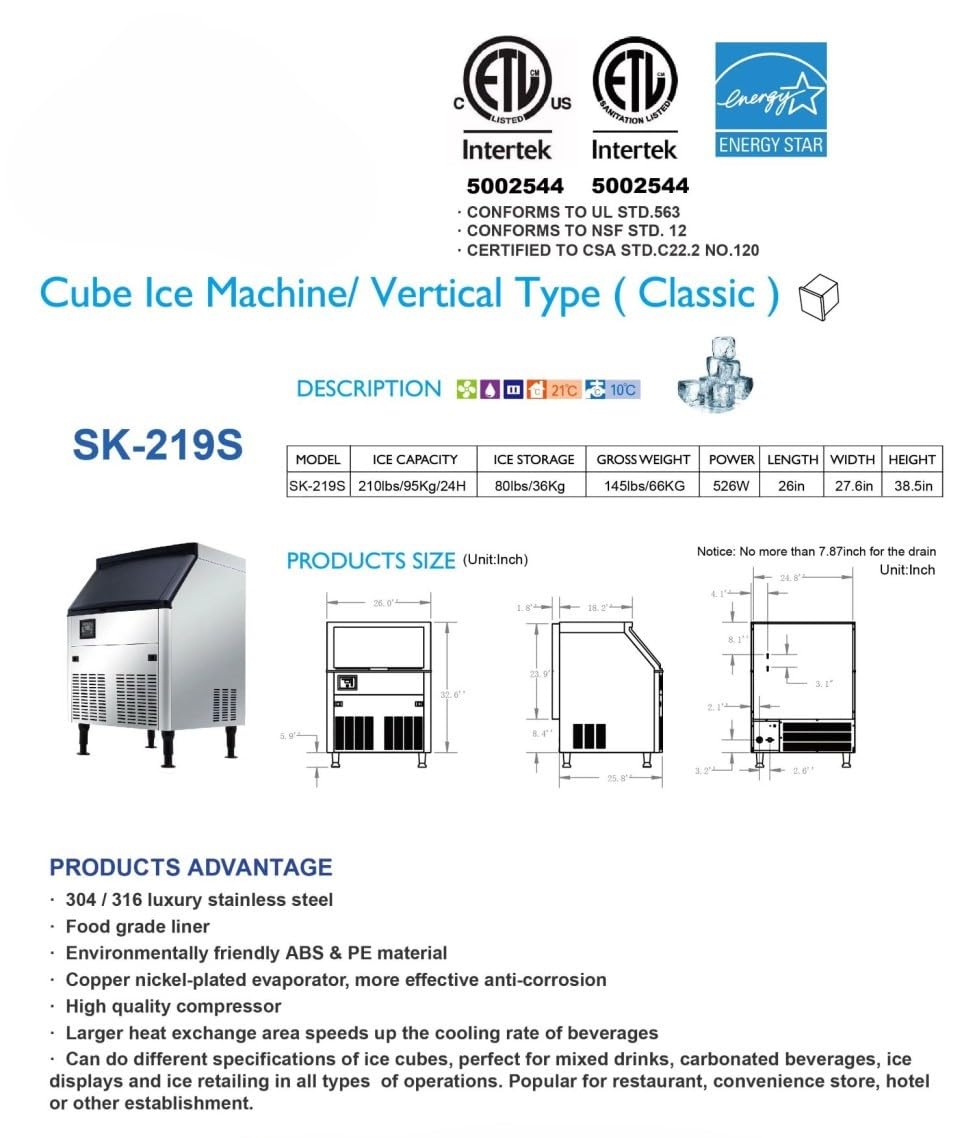
Figure 10: Product dimensions and specifications diagram. This diagram provides detailed measurements and key specifications for the SK-219 ice maker, including ice capacity, storage, weight, power, length, width, and height.
9. Warranty and Support
Elite Kitchen Supply stands behind the quality of its products.
9.1 Warranty Information
This product comes with a comprehensive warranty:
- 3-year warranty on all parts.
- 6-year warranty on the compressor.
- 1-year warranty on labor.
Note: The warranty does not cover equipment used in food trucks, trailers, boats, residential addresses, islands, or built-in decorations.
9.2 Customer Support
For technical assistance, warranty claims, or general inquiries, please contact Elite Kitchen Supply customer support. Refer to the product packaging or the official Elite Kitchen Supply website for the most current contact information.
You can also visit the Elite Kitchen Supply Store on Amazon for more information and support resources.