1. Introduction
Thank you for choosing the Vabches Shoe Storage Cabinet. This manual provides detailed instructions for the assembly, operation, and maintenance of your new shoe cabinet. This product is designed to offer an organized and stylish solution for shoe storage in entryways, hallways, or living rooms. Please read this manual thoroughly before assembly and use to ensure proper installation and safe operation. This package includes two individual shoe storage cabinets.

Image 1.1: Overview of the Vabches Shoe Storage Cabinet (2-Pack). The image shows two rustic oak rattan cabinets side-by-side, one with its two flip-down drawers open, revealing stored shoes. The top surface of both cabinets features open storage for decorative items or small essentials.
2. Important Safety Information
To prevent potential hazards and ensure the stability of your shoe cabinet, please adhere to the following safety guidelines:
- Anti-Tipping Kit: Always install the included anti-tipping kit to securely fix the cabinet to the wall. This is crucial to prevent the cabinet from tipping over, especially in households with children or pets.
- Weight Distribution: Distribute the weight evenly across the shelves and drawers. Avoid placing excessively heavy items on the top shelf or in the flip drawers.
- Stable Surface: Place the cabinet on a flat, level, and stable surface to prevent wobbling or instability.
- Assembly: Ensure all screws and fasteners are tightened securely during assembly. Periodically check and re-tighten as needed.

Image 2.1: Anti-Tipping Kit Installation. This diagram shows the correct method for attaching the anti-tipping hardware to the back of the cabinet and securing it to the wall, emphasizing the importance of preventing tip-over incidents.
3. Package Contents
Each Vabches Shoe Storage Cabinet (one unit of the 2-pack) includes the following components. Please verify all parts are present before beginning assembly. If any parts are missing or damaged, please contact customer support.
- Cabinet Panels (Top, Bottom, Sides, Back)
- Flip Drawers (2 sets)
- Adjustable/Removable Shelves for Flip Drawers
- Cabinet Legs (4)
- Metal Handles (2)
- Assembly Hardware (Screws, Dowels, Cam Locks, etc.)
- Anti-Tipping Kit
- Assembly Instructions Manual
4. Setup and Assembly
Assembly is required for this product. Please follow the steps carefully. It is recommended to have two people for assembly. Ensure you have a clear, spacious area to work in.
- Unpack and Identify: Carefully unpack all components and lay them out. Refer to the parts list in the instruction manual to identify each piece. Each part is labeled for easy identification.
- Assemble the Main Frame: Attach the side panels to the bottom panel using the provided hardware. Ensure all connections are secure.
- Install Back Panel: Slide or fasten the back panel into place.
- Attach Cabinet Legs: Securely attach the four cabinet legs to the bottom of the cabinet.
- Assemble Flip Drawers: Construct the two flip drawers according to the specific instructions for their mechanism.
- Insert Adjustable Shelves: Place the adjustable shelves inside the flip drawers. These can be positioned at different heights or removed entirely based on shoe size.
- Attach Flip Drawers to Frame: Mount the assembled flip drawers into the main cabinet frame.
- Install Handles: Attach the metal handles to the front of the flip drawers.
- Install Anti-Tipping Kit: Securely attach the anti-tipping kit to the top rear of the cabinet and then to a wall stud or appropriate wall anchor.
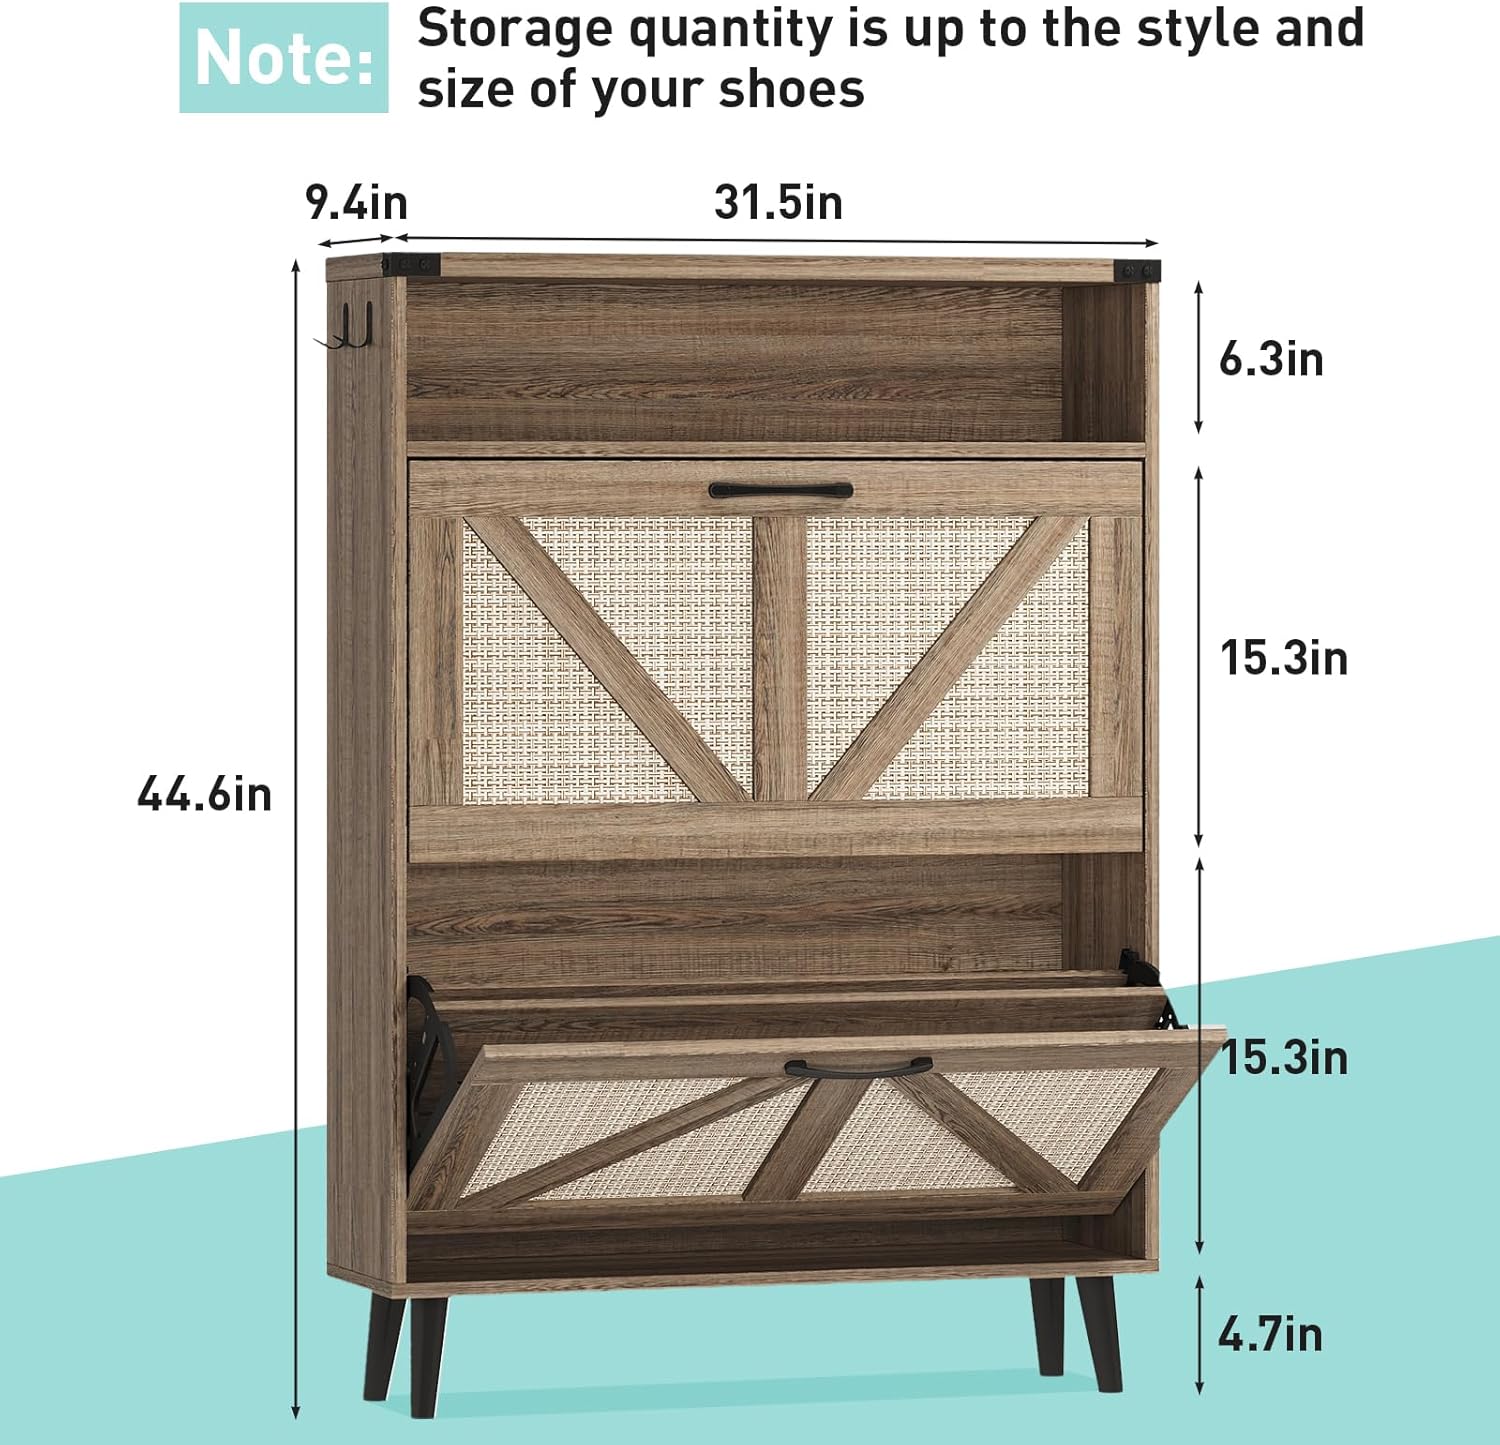
Image 4.1: Product Dimensions. This image provides a detailed view of the cabinet's measurements, including its height (44.6 inches), width (31.5 inches), and depth (9.4 inches), along with internal shelf and leg heights.

Image 4.2: Key Features. This composite image showcases the cabinet's design elements: durable metal handles, rustic decorative accents, the overall farmhouse aesthetic, and the stable, tapered legs that provide support.
5. Operating Instructions
Your Vabches Shoe Storage Cabinet is designed for convenient and efficient shoe organization.
- Using the Flip Drawers: Gently pull the metal handle to open each flip drawer. The drawer will tilt forward, allowing access to the internal shelves. Push the drawer back until it clicks into place to close it securely.
- Adjusting/Removing Shelves: Each flip drawer contains an adjustable shelf. To accommodate different shoe types (e.g., boots, high heels), you can adjust the shelf to one of two positions or remove it entirely. Carefully lift and reposition the shelf within the designated slots.
- Open Storage: The top surface of the cabinet provides an open storage area. This space is suitable for placing small items such as keys, wallets, decorative plants, or other entryway essentials.

Image 5.1: Adjustable Shelf Mechanism. This diagram illustrates how the internal shelf within each flip drawer can be adjusted to two different positions or removed completely to accommodate various shoe sizes and types, such as leather shoes, high heels, sneakers, slippers, and running shoes.

Image 5.2: Shelf Removal Demonstration. This image visually compares the storage capacity before and after removing the internal shelf, demonstrating how larger footwear like boots can be stored once the shelf is taken out.

Image 5.3: Spacious Open Storage Area. This close-up view highlights the functional top surface of the cabinet, which can be used to store and display various items, enhancing its utility beyond just shoe storage.
6. Care and Maintenance
Proper care will help maintain the appearance and longevity of your Vabches Shoe Storage Cabinet.
- Cleaning: Wipe the cabinet surfaces with a soft, damp cloth. Avoid using harsh chemicals, abrasive cleaners, or polishes that may damage the finish.
- Spills: Immediately wipe up any spills to prevent moisture damage to the engineered wood.
- Sunlight Exposure: Avoid prolonged exposure to direct sunlight, which can cause fading or discoloration of the finish.
- Hardware Check: Periodically check all screws and fasteners to ensure they remain tight. Re-tighten if necessary.
7. Troubleshooting Guide
If you encounter any issues with your shoe cabinet, refer to the following common problems and solutions:
- Cabinet is Wobbly:
- Ensure the cabinet is placed on a level surface.
- Check that all assembly screws are securely tightened.
- Verify the anti-tipping kit is properly installed and secured to the wall.
- Flip Drawer Not Closing Properly:
- Check for any obstructions (e.g., shoes, debris) preventing the drawer from closing fully.
- Ensure the drawer mechanism is correctly aligned and not damaged.
- Verify that the internal shelf is correctly seated and not interfering with the closing mechanism.
- Limited Shoe Capacity:
- Utilize the adjustable/removable shelves to optimize space for different shoe types. Remove shelves for taller items like boots.
- Consider the style and size of your shoes; larger or bulkier shoes will occupy more space.
8. Product Specifications
| Brand | Vabches |
| Model Number | B0DTT81F9Y |
| Color | Rustic Oak Rattan |
| Product Dimensions (D x W x H) | 6.69"D x 31.5"W x 44.6"H |
| Material | Engineered Wood |
| Finish Type | Polished |
| Mounting Type | Floor Mount (Freestanding with Anti-Tipping Kit) |
| Number of Shelves | 2 (adjustable/removable within flip drawers) |
| Special Features | Adjustable Shelf, Anti-Tipping, Lightweight, Open Storage, Removable Shelf |
| Assembly Required | Yes |
9. Warranty and Customer Support
Vabches is committed to providing high-quality products. For any questions, concerns, or assistance with your shoe storage cabinet, please contact Vabches customer support. Please have your model number (B0DTT81F9Y) and purchase information ready when contacting support.
Specific warranty details may vary. Please refer to your purchase documentation or contact Vabches customer service for information regarding warranty coverage.


