Introduction
This manual provides detailed instructions for the installation, operation, and maintenance of the Mitsubishi PAC-SDW01RC-1 Simple Ductless Wired Remote Controller. Please read this manual thoroughly before installation and use to ensure proper functionality and safety.
Product Overview
The Mitsubishi PAC-SDW01RC-1 is a wired remote controller designed for precise climate control of Mitsubishi Electric ducted and ductless HVAC systems. It features a color screen, intuitive dial control, and programmable settings for optimal comfort and energy efficiency.

Image Description: Front view of the Mitsubishi PAC-SDW01RC-1 wired remote controller, displaying a digital interface with temperature and time, along with a rotary dial for adjustments.
Key Features:
- Compatibility with all Mitsubishi Electric ducted and ductless systems.
- Intuitive dial control for temperature and system settings.
- 7-day programming capability.
- Dual setpoint auto changeover for heating and cooling.
- Auto-Dry Mode for humidity control.
- Customizable 4-digit PIN for security.
- Error code display with written descriptions.
- Includes CN105 adapter for easy connection.
Safety Information
WARNING: Installation and wiring must be performed by a qualified HVAC technician or licensed electrician in accordance with all local and national electrical codes.
- Disconnect power to the HVAC system before installation or maintenance.
- Do not expose the controller to water or excessive moisture.
- Ensure proper grounding to prevent electrical shock.
- Do not attempt to repair or modify the unit yourself. Contact qualified service personnel.
Setup and Installation
Package Contents:
- Wired Remote Controller
- Wall Plate
- CN105 Adapter
Tools Required:
- Screwdriver (Phillips and Flathead)
- Wire Strippers
- Drill (if mounting to a new location)
- Level
Wiring Diagram and Connection:
The controller connects to the indoor unit via the CN105 adapter using standard 18/4 AWG solid core wire. The maximum recommended wire length is 50 feet.

Image Description: A detailed diagram illustrating the wiring connections for the PAC-SDW01RC-1 controller. It shows the CN105 adapter connecting to the indoor unit control board, the field-supplied 18-4 AWG wire connecting to the wall plate, and the wall plate connecting to the controller. The diagram also highlights the maximum 50-foot wire length.
- Power Disconnection: Before beginning installation, ensure that power to the indoor and outdoor HVAC units is completely disconnected at the circuit breaker.
- Mounting the Wall Plate:
- Select a suitable location on an interior wall, away from direct sunlight, drafts, or heat sources, and at an average height (approximately 5 feet from the floor).
- Route the 18/4 AWG wire from the indoor unit to the chosen wall plate location.
- Secure the wall plate to the wall using appropriate screws. Ensure it is level.
- Wiring the Wall Plate:
- Strip approximately 1/4 inch of insulation from each of the four wires (A, B, C, D).
- Connect the wires to the corresponding terminals (A, B, C, D) on the wall plate. Ensure connections are secure.
- Connecting the CN105 Adapter:
- Connect the other end of the 18/4 AWG wire to the CN105 adapter, matching terminals A, B, C, D.
- Plug the CN105 adapter's 3-foot cable into the CN105 port on the indoor unit's control board. Refer to your indoor unit's manual for the exact location of the CN105 port.
- Attaching the Controller: Align the controller with the mounted wall plate and gently push until it clicks into place.
- Power Restoration: Restore power to the HVAC system at the circuit breaker. The controller display should illuminate.
Operating Instructions
Controller Overview:

Image Description: A visual guide to the controller's display and controls. It labels the indoor temperature/humidity display, temperature set point, mode selection (Heat, Cool, Dry, Fan, Auto, Off), fan speed adjustment, and the rotary dial for temperature adjustment.
- Indoor Temperature/Humidity (RH%): Displays current indoor conditions.
- Temperature Set Point: Shows the desired indoor temperature.
- Mode: Touch to select system mode (Heat, Cool, Dry, Fan, Auto, Off).
- Fan: Touch to select fan mode (Auto, Adjustable speeds 1-5).
- Adjust Temperature: Rotate the dial clockwise or counter-clockwise to set the desired temperature for the current mode.
Adjusting the Temperature:
To adjust the desired temperature up or down, rotate the dial clockwise or counter-clockwise on the controller home screen. Temperature changes can be temporary or permanent based on your schedule override settings.

Image Description: The controller display in cooling mode. The large number '78' indicates the current room temperature, and the smaller '72' in the blue wave represents the set cooling temperature. Icons for 'Cool' and 'Low' fan speed are visible at the top.
Selecting Operating Modes:
Tap the "Mode" icon on the display to cycle through available operating modes:
- Cool Mode: For cooling the space. Set your desired cooling temperature.
- Heat Mode: For heating the space. Set your desired heating temperature.
- Auto Mode: The system automatically switches between heating and cooling to maintain a set temperature range.
- Dry Mode: Reduces indoor humidity levels.
- Fan Mode: Operates the fan only, without heating or cooling.
- Off Mode: Turns off the HVAC system.

Image Description: Controller display showing "Auto Mode Cooling". The current temperature is 82, with a cooling set point of 77 and a heating set point of 68. The display shows a blue wave indicating cooling operation.
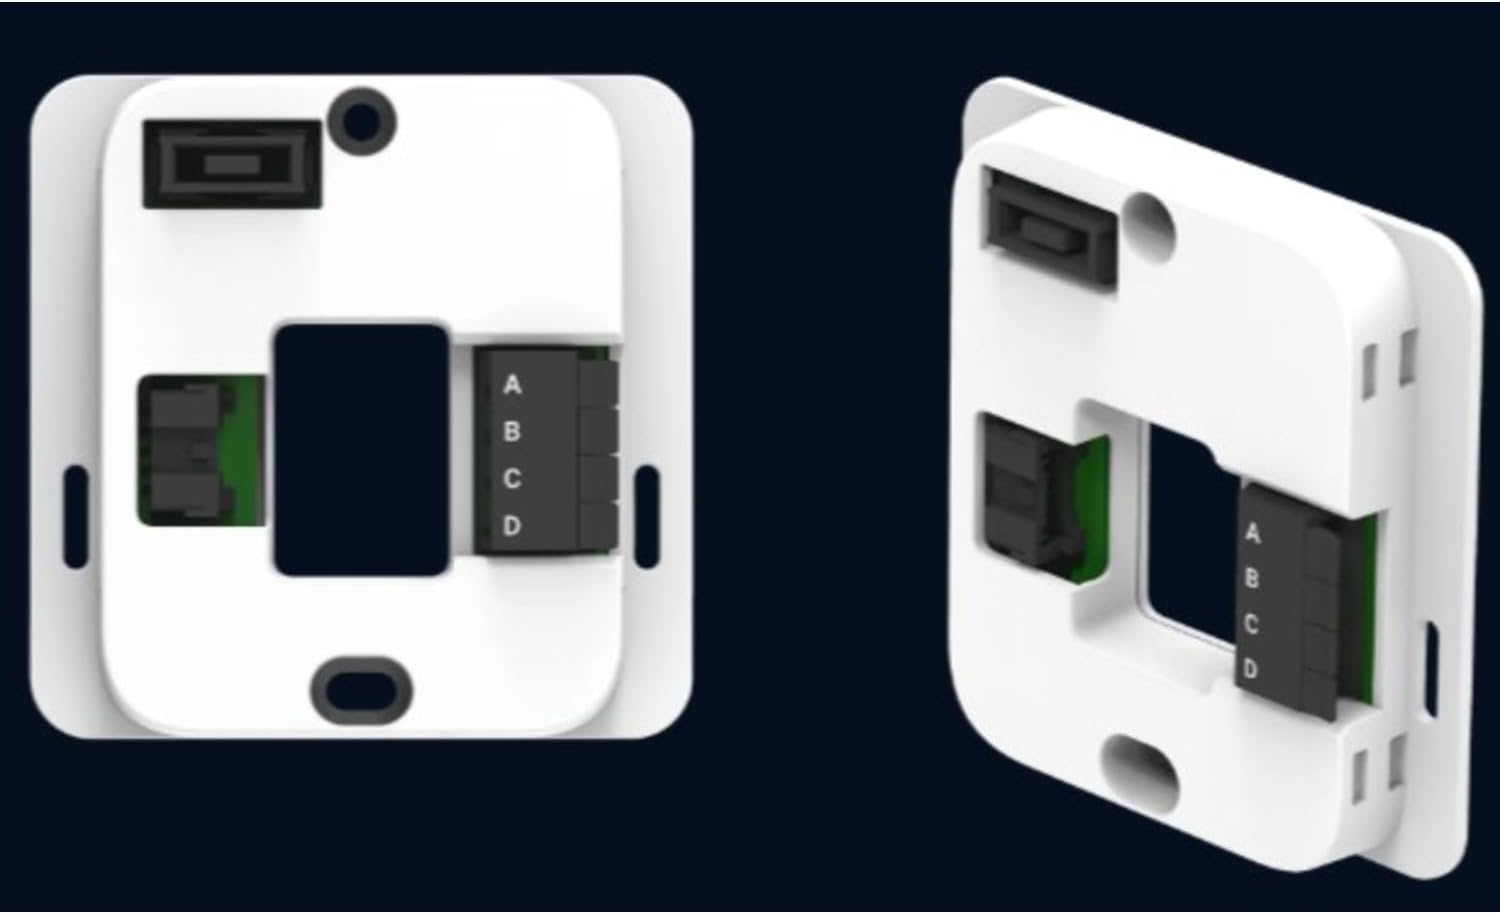
Image Description: Controller display showing "Heat Mode". The current temperature is 68, with a heating set point of 76. The display shows an orange wave indicating heating operation.
7-Day Programming:
The controller supports 7-day programming to create custom schedules for heating and cooling. Access the programming menu through the settings. Refer to the on-screen prompts for detailed schedule setup.
Auto-Dry Mode:
The Auto-Dry Mode function helps maintain optimal indoor air moisture levels. When activated, the system will automatically adjust operation to reduce humidity.

Image Description: The controller display showing the current time, temperature (72), and humidity level (64%) in Auto Dry mode. The display is dark, indicating a neutral or standby state for humidity control.
Security PIN:
A customizable 4-digit PIN can be set to restrict access to settings adjustments. This feature is useful in multi-family or commercial applications.
Maintenance
The Mitsubishi PAC-SDW01RC-1 controller requires minimal maintenance. Follow these guidelines to ensure continued optimal performance:
- Cleaning: Gently wipe the display and exterior with a soft, dry cloth. Do not use abrasive cleaners, solvents, or spray cleaners directly onto the unit.
- Inspection: Periodically check the wiring connections at the wall plate and CN105 adapter to ensure they are secure. (Ensure power is disconnected before inspection.)
- Software Updates: Check the manufacturer's website for any available firmware updates for your controller model.
Troubleshooting
This section provides solutions to common issues. For problems not listed here, contact qualified service personnel.
| Problem | Possible Cause | Solution |
|---|---|---|
| Controller display is blank. | No power to the unit; loose wiring connection. | Check circuit breaker for HVAC system. Verify all wiring connections are secure. |
| System not responding to commands. | Incorrect mode selected; communication error with indoor unit. | Ensure correct operating mode is selected. Check CN105 adapter connection. Power cycle the HVAC system. |
| Temperature readings appear inaccurate. | Controller location affected by external factors (e.g., direct sunlight, drafts). | Relocate the controller if possible, or shield it from direct influences. Allow time for sensor to stabilize. |
| Error code displayed. | System malfunction; communication issue. | Note the error code and its description. Refer to your Mitsubishi Electric indoor unit manual for specific error code meanings. Contact service if the issue persists. |
Specifications
| Feature | Detail |
|---|---|
| Model Name | Simple Ductless Wired Controller |
| Model Number | PAC-SDW01RC-1 |
| Brand | Ecostar Energy (Manufacturer: Mitsubishi) |
| Product Dimensions (Controller) | 3.38"D x 1"W x 3.38"H (86 x 86 x 23 mm) |
| CN105 Adapter Dimensions | 3" x 1-8/10" x 5/8" (74 mm x 46 mm x 16 mm) |
| Controller Type | Push Button / Rotary Dial |
| Connectivity Technology | Wired |
| Power Source | Corded Electric (powered by indoor unit) |
| Display Type | LCD Color Screen |
| Operating Ambient Temperature | 14 to 120 °F (-10 to 50 °C) |
| Operating Relative Humidity | 5% to 90% (non-condensing) |
| Compatible Wire | 18/4 AWG solid core wire (field-supplied) |
| Max Wire Length | 50 feet |
| Special Features | Auto Changeover, Clock Display, Fan Control, Programmable (7-day), Temperature Display, Auto-Dry Mode, Security PIN. |
Image Description: A comprehensive diagram detailing the physical dimensions of the controller, wall plate, and CN105 adapter, along with operating conditions and wiring specifications. It visually reinforces the connection points and wire type.
Warranty and Support
The product listing states "No Return/Refund Manufacturer Warranty." For specific warranty details or technical support, please contact the manufacturer, Mitsubishi Electric, or the seller, Ecostar Energy, directly. It is recommended to retain your purchase receipt for any warranty claims.
For further assistance, please refer to the official Mitsubishi Electric HVAC documentation or visit their support website.