Hobbypark HD4533MG
HobbyPark HD4533MG Waterproof 45kg High Torque Brushless Digital Servo User Manual
Model: HD4533MG
1. Introduction
Thank you for choosing the HobbyPark HD4533MG Waterproof 45kg High Torque Brushless Digital Servo. This high-performance servo is designed for demanding RC applications, including crawlers, cars, trucks, and buggies. Featuring a brushless motor, metal gears, and waterproof construction, it delivers precise control and durability in various environments. Please read this manual thoroughly before installation and operation to ensure optimal performance and longevity of your servo.
2. Safety Information
- This product contains small parts and is not suitable for children under 6 years of age due to choking hazard.
- Always ensure correct polarity when connecting the servo to avoid damage.
- Do not attempt to disassemble or modify the servo, as this may void the warranty and cause malfunction.
- Operate the servo within its specified voltage range (DC 4.8V-8.4V) to prevent overheating or damage.
- Keep the servo away from extreme temperatures and corrosive substances.
3. Key Features
- Brushless Motor: Provides high efficiency, speed, and extended lifespan.
- High Torque (45kg/cm): Delivers powerful performance for demanding applications.
- Waterproof Design (IP67): Ensures reliable operation in wet and dusty conditions.
- Durable Metal Gears: Stainless steel and metal gears for strength and longevity.
- Dual Ball Bearings (2BB): For smoother operation and reduced friction.
- Wide Control Angle: 180° operating travel for versatile control.
- Fast Response Time: 0.08sec/60° at 7.4V for precise and quick movements.
- High Voltage (HV) Compatible: Supports operating voltages up to 8.4V.
4. What's in the Box
Upon opening the package, please verify that all components are present and undamaged:
- 1x HobbyPark HD4533MG Servo
- 1x Metal Servo Horn (25T)
- Assorted Servo Accessories (plastic servo arms, mounting screws, rubber grommets, brass eyelets)

Image 1: HobbyPark HD4533MG Servo with metal servo horn and various plastic servo arms, mounting screws, and rubber grommets.
5. Specifications

Image 2: Detailed specifications table for the HobbyPark HD4533MG servo, including voltage, torque, speed, current, and physical dimensions.
| Parameter | Value |
|---|---|
| Model | HD4533MG |
| Operating Voltage | DC 4.8V - 8.4V |
| Stall Torque (5.0V) | 34 kg.cm (469 oz.in) |
| Speed (5.0V) | 0.11 sec/60° |
| Stall Torque (6.0V) | 40 kg.cm (552 oz.in) |
| Speed (6.0V) | 0.09 sec/60° |
| Stall Torque (7.4V) | 45 kg.cm (621 oz.in) |
| Speed (7.4V) | 0.08 sec/60° |
| Stall Torque (8.4V) | 50 kg.cm (690 oz.in) |
| Speed (8.4V) | 0.07 sec/60° |
| Operating Travel | 90-180° (Programmable) |
| Gear Type | Stainless Steel Gear |
| Bearing Type | 2BB (Dual Ball Bearings) |
| Dimensions (L x W x H) | 40 x 20 x 36.5 mm (1.57 x 0.79 x 1.44 inches) |
| Weight | 75g (2.65 oz) |
| Waterproof Rating | IP67 |
| Spline | Φ5.9 25T |
| Working Frequency | 1520μs/333Hz |
| Dead Band | 3μs |
6. Setup and Installation
6.1 Component Identification

Image 3: Exploded view illustrating the internal and external components of the HD4533MG servo, including metal shell, gears, bearings, and waterproof gasket.
Familiarize yourself with the servo's construction. The HD4533MG features a 6061 shell with sand-blasted anodized finish, 416 stainless steel heat-treated gears, CNC aluminum middle shell, waterproof gasket, and high-strength screws for durability and heat dissipation.
6.2 Wiring Connection
Image 4: Diagram showing the three-wire servo connection: brown for negative pole, red for positive pole, and orange for signal.
- Connect the servo's brown wire to the Negative (-) terminal of your receiver/power source.
- Connect the servo's red wire to the Positive (+) terminal of your receiver/power source.
- Connect the servo's orange (or yellow) wire to the Signal (S) pin of your receiver.
- Ensure your power source provides a stable voltage within the 4.8V-8.4V range. Using a BEC (Battery Eliminator Circuit) is recommended for optimal performance, especially with higher voltage setups.
6.3 Mounting the Servo
- Identify the appropriate mounting location in your RC vehicle chassis.
- Secure the servo using the provided mounting screws and rubber grommets. The rubber grommets help absorb vibrations and protect the servo.
- Attach the desired servo horn (metal or plastic) to the servo spline. Ensure the horn is centered before tightening the screw.
- Connect the linkage rods from the servo horn to the steering mechanism or other control surfaces. Adjust linkages for proper alignment and free movement.
7. Operating Instructions
7.1 Initial Power-Up and Centering
- With the servo connected to your receiver and power source, turn on your transmitter first, then the receiver/vehicle power.
- The servo will automatically move to its neutral (centered) position.
- If the servo horn is not perfectly centered, remove it, ensure your transmitter trim is at neutral, and reattach the horn so it is visually centered. Fine-tune with transmitter sub-trim if necessary.
7.2 Control Angle and Responsiveness
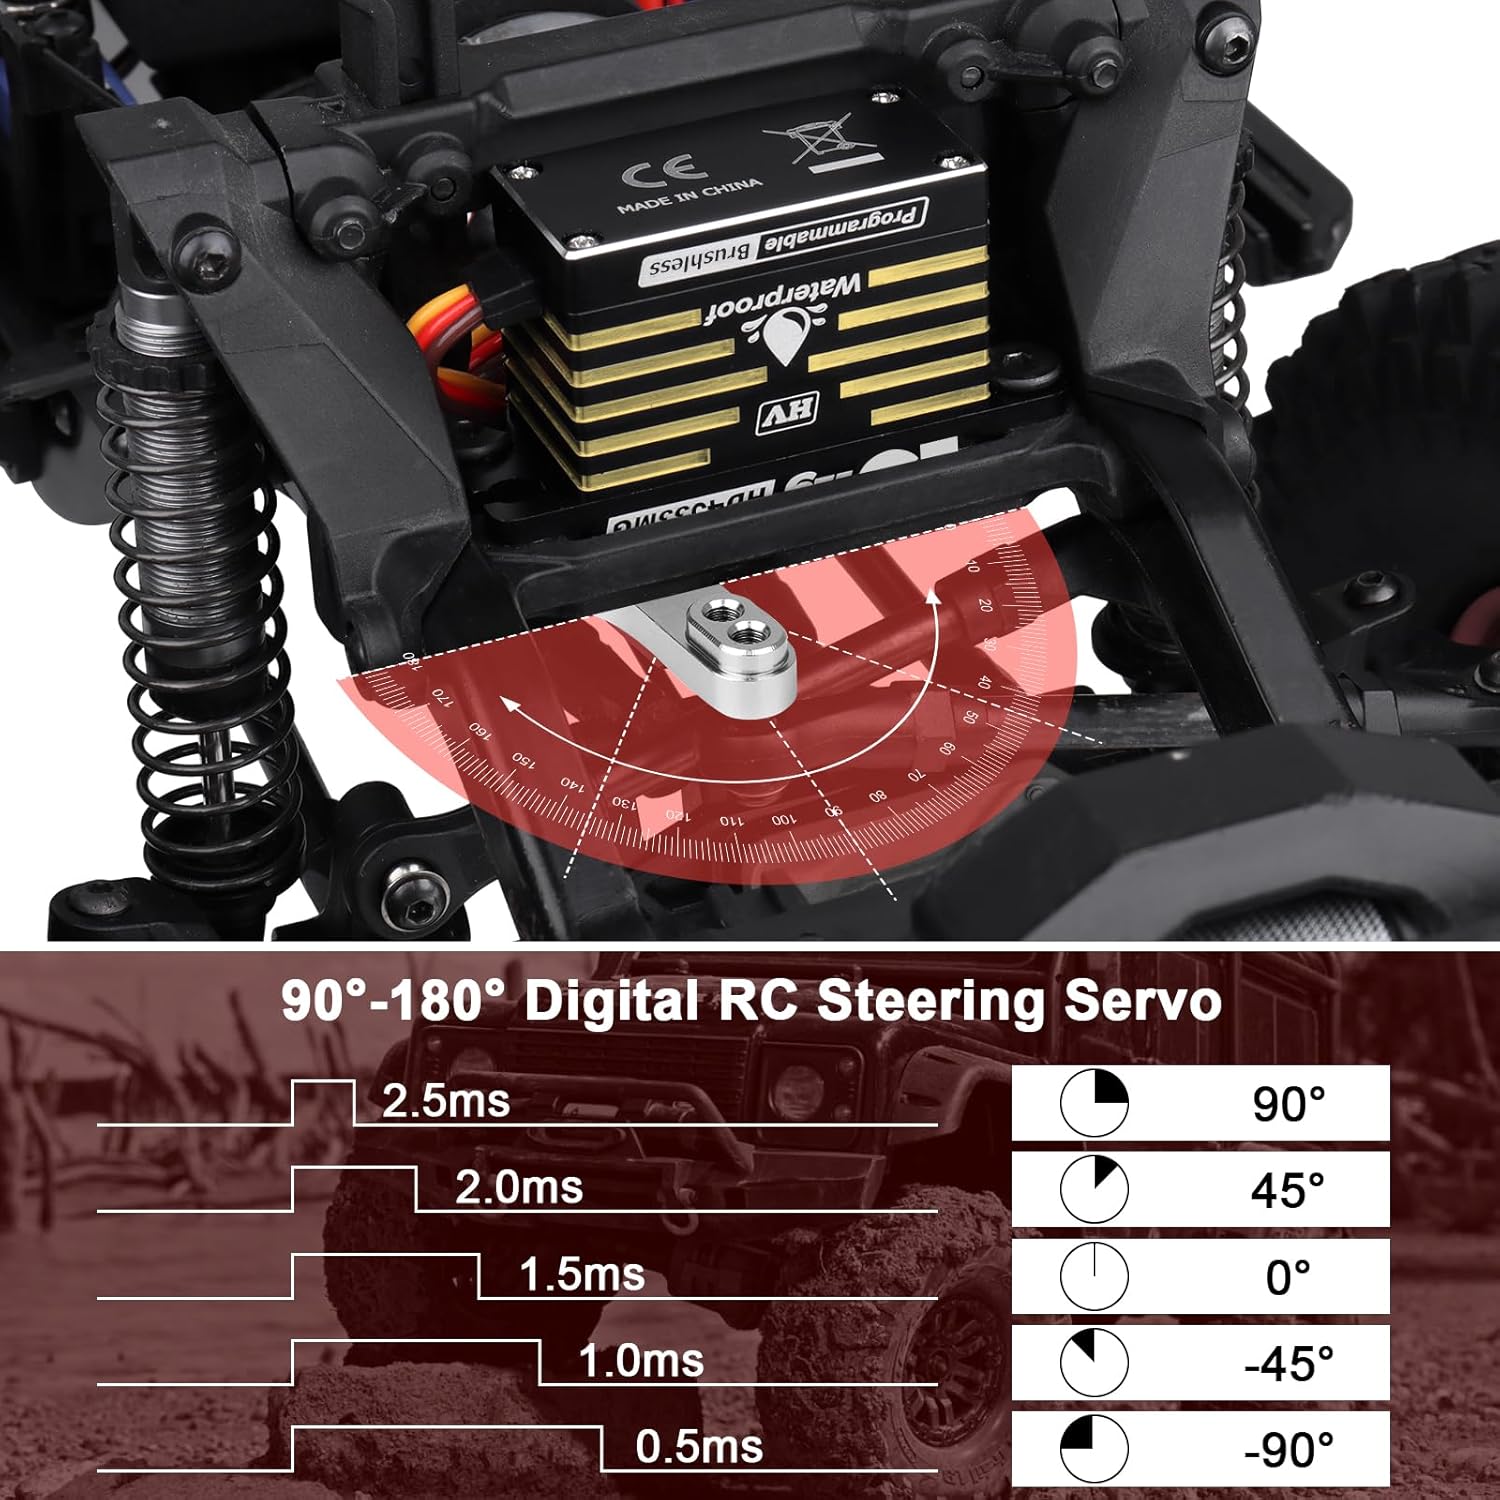
Image 5: Diagram illustrating the relationship between pulse width (0.5ms to 2.5ms) and servo control angle (from -90° to +90°, totaling 180°).
The HD4533MG servo offers a 180° control angle, providing ample range for steering and other functions. Its digital nature and fast response time (as low as 0.07 sec/60° at 8.4V) ensure precise and immediate control inputs are translated into servo movement.
- Pulse Width: Standard pulse width for neutral is 1.5ms. A pulse width of 0.5ms typically corresponds to -90° (full left), and 2.5ms to +90° (full right).
- Programmability: This servo is programmable. Advanced users can adjust parameters like travel, speed, and dead band using a compatible servo programmer (sold separately). Refer to the programmer's manual for detailed instructions.
7.3 Waterproof Operation

Image 6: The HD4533MG servo is shown in a simulated wet environment (IP67 waterproof) and a dusty environment (dust prevention), highlighting its suitability for harsh outdoor conditions.
The HD4533MG servo is designed with IP67 waterproofing, making it suitable for use in wet, muddy, or dusty conditions. While it is waterproof, prolonged submersion is not recommended. After operating in wet conditions, it is advisable to clean the servo and allow it to air dry.
8. Maintenance
- Cleaning: Regularly clean the exterior of the servo to remove dirt, dust, and debris. Use a soft, dry cloth. For stubborn dirt, a slightly damp cloth can be used, ensuring no moisture enters the servo casing through unsealed openings (though this servo is sealed, it's good practice).
- Gear Inspection: Periodically inspect the servo gears for any signs of wear, damage, or foreign objects. While the stainless steel gears are durable, extreme impacts can cause damage.
- Lubrication: The internal gears are pre-lubricated. Avoid applying additional lubricants unless specifically recommended by the manufacturer for internal components, as this can attract dirt.
- Wiring Check: Ensure all wiring connections are secure and free from fraying or damage.
- Storage: Store the servo in a cool, dry place away from direct sunlight and extreme temperatures when not in use.
9. Troubleshooting
| Problem | Possible Cause | Solution |
|---|---|---|
| Servo not responding | No power, incorrect wiring, faulty receiver/transmitter, damaged servo. | Check power supply and battery charge. Verify wiring connections (positive, negative, signal). Test with a different receiver/transmitter or servo tester. If still unresponsive, the servo may be damaged. |
| Servo jitters or twitches | Interference, weak signal, power fluctuations, worn gears, excessive load. | Ensure proper antenna placement. Check battery voltage and connections. Reduce mechanical load on the servo. Inspect gears for wear. |
| Servo lacks power/torque | Low voltage, excessive load, internal damage. | Verify power supply voltage is within the specified range (4.8V-8.4V). Reduce mechanical resistance. If the issue persists, the servo may be faulty. |
| Servo makes grinding noise | Damaged or worn gears, foreign object lodged in gears. | Disassemble carefully (if experienced) to inspect gears. Remove any debris. Replace damaged gears if necessary (contact support for parts). |
| Servo overheats | Excessive load, continuous operation under heavy strain, incorrect voltage. | Reduce the load on the servo. Allow for cool-down periods. Ensure operating voltage is correct. Check for binding in the mechanical linkage. |
10. Warranty and Support
HobbyPark products are manufactured to high-quality standards. For warranty information, please refer to the terms and conditions provided at the point of purchase or visit the official HobbyPark website. Typically, a limited warranty covers manufacturing defects for a specified period from the date of purchase.
For technical support, troubleshooting assistance, or inquiries regarding spare parts, please contact HobbyPark customer service through their official website or the retailer from whom you purchased the product. Please have your product model number (HD4533MG) and proof of purchase ready when contacting support.
HobbyPark Official Store: Visit the HobbyPark Store on Amazon
Ask a question about this manual
Ask about setup, troubleshooting, compatibility, parts, safety, or missing instructions. Manuals+ will review the question and use this page’s manual context to help answer it.