
1. Introduction
This manual provides essential information for the safe and efficient operation of your ADMARK AD-60 Class-D Pro Audio Amplifier. Please read this manual thoroughly before using the amplifier and retain it for future reference.
The ADMARK AD-60 is a powerful, professional-grade 2-channel Class-D amplifier designed for demanding audio environments. It features advanced Gallium Nitride technology for improved efficiency and reduced heat production, along with comprehensive protection features.
2. Safety Instructions
WARNING: To prevent fire or electric shock, do not expose this appliance to rain or moisture. Do not remove the cover. No user-serviceable parts inside. Refer servicing to qualified personnel.
- Ensure proper grounding for all equipment.
- Do not block ventilation openings.
- Avoid placing the amplifier near heat sources or in direct sunlight.
- Do not operate the amplifier with a damaged power cord.
- Disconnect power before making any connections or performing maintenance.
- Use only specified power voltage (60V to 380V).
3. Product Overview
3.1 Key Features
- Advanced Technology: Incorporates Gallium Nitride technology for reduced heat production and improved efficiency.
- Operation Modes: Can operate in stereo, parallel, and bridge modes.
- Protection Features: Includes built-in protection against short circuits, overloads, and overheating.
- Durable Construction: Compact steel frame, shockproof and compressive resistant.
- Power Output: Up to 2 × 6000W at 8 Ohm, 2 × 11000W at 4 Ohm, and 2 × 11000W at 2 Ohm.
- Voltage Compatibility: Can work under voltage 60V to 380V.
- Connectors: Uses original Neutrik connectors for reliable connections.
3.2 Front Panel
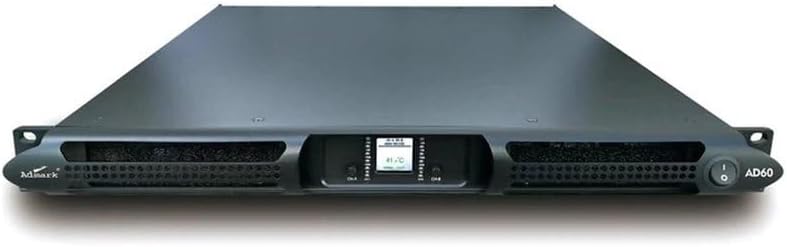
Figure 1: Front view of the ADMARK AD-60 amplifier. Shows the power button on the right, ventilation grilles, and a central display panel.
The front panel includes the power switch, ventilation grilles, and a central display for operational status.
3.3 Rear Panel and Connections
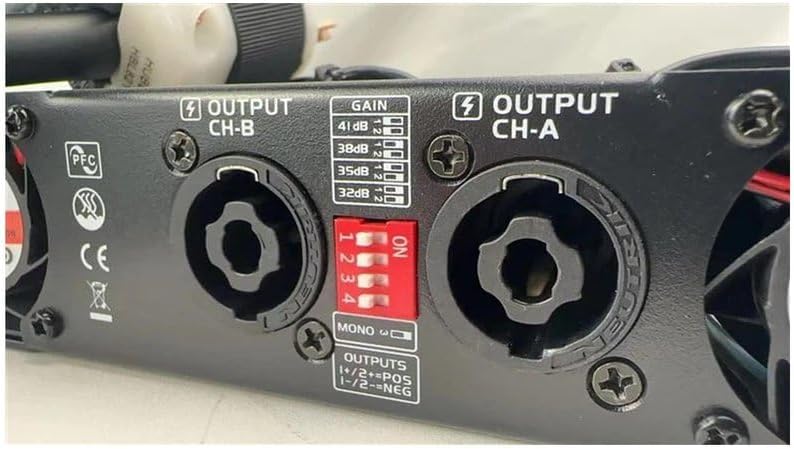
Figure 2: Close-up of the rear panel connections. This image highlights the output channels (CH-A, CH-B), gain settings DIP switches, and mono/stereo configuration options.
The rear panel features input and output connectors, along with controls for gain and operation mode selection. Output channels A and B are clearly labeled, with Neutrik Speakon connectors for speaker outputs. A set of DIP switches allows adjustment of gain settings (41dB, 38dB, 35dB, 32dB) and selection between mono, parallel, and bridge modes.
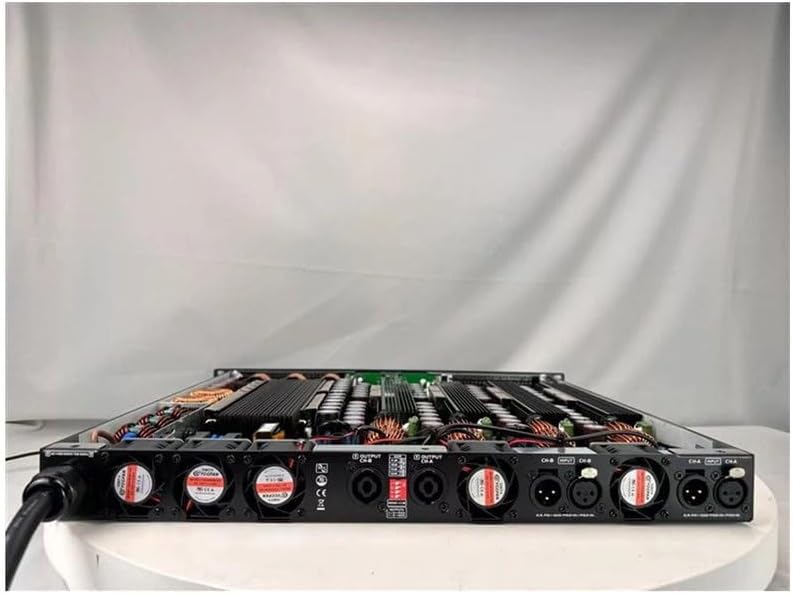
Figure 3: Full rear view of the ADMARK AD-60 amplifier. This image shows the complete layout of the rear panel, including power input, cooling fans, and all audio input/output connections.
The full rear view provides an overview of all connections, including the power input, multiple cooling fans, and the balanced audio input connectors (XLR, not visible in detail but implied by professional audio standards).
3.4 Internal Components

Figure 4: Internal view of the ADMARK AD-60 amplifier. This image displays the high-quality capacitors and heat sinks, indicative of the amplifier's robust power delivery and thermal management.
The internal design features high-quality components, including large capacitors and efficient heat sinks, contributing to the amplifier's stable performance and longevity.
4. Setup
4.1 Rack Mounting
The AD-60 amplifier is designed for standard 19-inch rack mounting. Ensure adequate ventilation space around the unit when installing in a rack.
4.2 Power Connection
- Ensure the amplifier's power switch is in the OFF position.
- Connect the provided power cable to the amplifier's power input on the rear panel.
- Connect the other end of the power cable to a suitable AC power outlet (60V to 380V).
4.3 Audio Input Connections
Connect your audio source (mixer, pre-amplifier) to the input connectors on the rear panel. Use balanced XLR cables for optimal signal integrity.
4.4 Speaker Output Connections
Use original Neutrik NL4FX Speakon connectors and speaker cables with a thickness of over 4mm for reliable and high-power connections.
- Connect your speakers to the OUTPUT CH-A and OUTPUT CH-B Speakon connectors on the rear panel.
- Ensure correct polarity: 1+/2+ for positive, 1-/2- for negative, as indicated on the amplifier.
4.5 Operation Mode and Gain Settings
Refer to Figure 2 for the location of the DIP switches for mode and gain settings.
- Operation Modes:
- Stereo Mode: Each channel operates independently.
- Parallel Mode: Input signal is sent to both channels, but each channel drives its own speaker.
- Bridge Mode: Combines the power of both channels into a single, higher-power output for a single speaker. Consult the manual for specific DIP switch configurations for each mode.
- Gain Settings: Adjust the input sensitivity using the DIP switches. Available settings are 41dB, 38dB, 35dB, and 32dB. Select the appropriate gain based on your audio source's output level to achieve optimal signal-to-noise ratio without clipping.
5. Operating Instructions
5.1 Powering On/Off
- Power On: After all connections are made, press the power button on the front panel. The amplifier features an intelligent soft boot sequence.
- Power Off: Press the power button again. It is recommended to power off the amplifier before disconnecting any cables.
5.2 Basic Operation
Once powered on, the amplifier will process the audio signal from your source and deliver it to the connected speakers. Monitor the front panel display for status indicators. Adjust the volume from your audio source (mixer) as needed.
5.3 Protection Features
The AD-60 amplifier is equipped with sophisticated protection circuits to ensure reliable operation and protect connected equipment:
- Short-Circuit Protection: Automatically disengages output in case of a short circuit.
- Overload Protection: Prevents damage from excessive output levels.
- Overheat Protection: Monitors internal temperature and reduces output or shuts down if temperatures exceed safe limits.
If a protection circuit is activated, the amplifier may temporarily shut down or reduce output. Identify and resolve the issue (e.g., remove short, reduce load, ensure ventilation) before resuming normal operation.
6. Maintenance
6.1 Cleaning
Regularly clean the exterior of the amplifier with a soft, dry cloth. Do not use liquid cleaners or solvents. Ensure ventilation grilles are free from dust and debris to maintain proper airflow.
6.2 General Care
- Avoid exposing the amplifier to extreme temperatures, humidity, or direct sunlight.
- Do not place heavy objects on top of the amplifier.
- Ensure all connections are secure and free from corrosion.
7. Troubleshooting
| Problem | Possible Cause | Solution |
|---|---|---|
| No power | Power cable disconnected, power outlet failure, internal fuse blown. | Check power cable connection. Test power outlet. Contact qualified service personnel if fuse is suspected. |
| No sound output | Incorrect input/output connections, gain set too low, source device issue, speaker fault, protection circuit active. | Verify all audio connections. Check gain settings. Ensure source device is playing. Test speakers. Check for protection circuit activation. |
| Distorted sound | Input signal too high (clipping), incorrect gain setting, faulty cables, speaker impedance mismatch. | Reduce input signal level. Adjust gain settings. Check/replace cables. Ensure speaker impedance matches amplifier's capabilities. |
| Amplifier overheats | Blocked ventilation, excessive load, prolonged high-power operation. | Ensure clear airflow around the amplifier. Reduce load or operating volume. Allow amplifier to cool down. |
8. Specifications
| Feature | Detail |
|---|---|
| Model | AD-60 |
| Type | Class-D Pro Audio Amplifier |
| Channels | 2 |
| Technology | Gallium Nitride (GaN) |
| Power Output (8 Ohm) | 2 × 6000W |
| Power Output (4 Ohm) | 2 × 11000W |
| Power Output (2 Ohm) | 2 × 11000W |
| Operation Modes | Stereo, Parallel, Bridge |
| Protection | Short-circuit, Overload, Overheat |
| Input Voltage Range | 60V to 380V |
| Dimensions (W x H x D) | 482 mm x 44 mm x 470 mm (18.98 x 1.73 x 18.5 inches) |
| Weight | 12 kg (26.5 lbs) |
| Connectors | Original Neutrik (Speakon for output) |
9. Warranty Information
ADMARK products are manufactured to the highest quality standards. This product is covered by a limited warranty against defects in materials and workmanship for a period specified at the point of purchase. Please retain your proof of purchase for warranty claims.
The warranty does not cover damage caused by improper installation, misuse, unauthorized modifications, or natural disasters. For detailed warranty terms and conditions, please refer to the warranty card included with your product or contact ADMARK customer support.
10. Support
For technical assistance, troubleshooting, or service inquiries, please contact ADMARK customer support through the following channels:
- Website: www.admark.com (placeholder)
- Email: support@admark.com (placeholder)
- Phone: +1-XXX-XXX-XXXX (placeholder)
When contacting support, please have your product model (AD-60) and serial number ready.