Front 4K 2160P Model A
ZhuCamX Plug and Play Car Video Recorder User Manual
Model: Front 4K 2160P Model A | Brand: Generic
Product Overview
The ZhuCamX Plug and Play Car Video Recorder is designed for seamless integration into compatible vehicles, offering high-definition video recording capabilities. This dash cam provides a discreet, OEM-like appearance without external wires or mounts cluttering the windshield.
Key features include:
- 4K 2160P Video Recording: Captures clear, detailed footage.
- Night Vision: Enhanced visibility in low-light conditions with WDR technology.
- Integrated Wi-Fi: Connects to the Viidure APP for easy viewing and downloading of footage.
- Loop Recording: Automatically overwrites old footage to ensure continuous recording.
- G-Sensor: Detects sudden collisions and locks important footage to prevent overwriting.
- Plug and Play Installation: Designed for a straightforward setup without complex wiring.

Image: The ZhuCamX dash cam unit shown alongside an example of its discreet installation near the rearview mirror.
Package Contents
Please verify that all items are present in your package:
- ZhuCamX Dash Cam Unit (Model A)
- Plastic Pry Bar
- Plug and Play Cable
- User Manual (this document)

Image: Contents of the package, including the dash cam unit, plastic pry bar, and plug and play cable with wiring diagram.
Installation Guide
This dash cam is designed for a custom fit and plug-and-play installation, minimizing the need for complex wiring. Ensure your vehicle model is compatible before proceeding.
1. Vehicle Compatibility Check
Before installation, confirm the dash cam's compatibility with your specific vehicle model and year. The design is tailored for Great Wall Pao, GWM Poer, Ruman, Sucan, Cannon, Ute P Series, and P-Series models from 2019 to present. Compare your car's rearview mirror area with the provided images to ensure a proper fit.

Image: Various angles showing the vehicle's rearview mirror area before the dash cam installation. This helps confirm compatibility with "Model A".
2. Power Connection (Plug and Play)
The dash cam utilizes a plug-and-play cable for power, typically connecting to existing power sources such as rain sensors or reading light panels. Some models may draw power from anti-glare mirrors, ETC reserved ports, skylights, or other dedicated plugs.

Image: Close-up of the plug-and-play cable connecting to a vehicle's existing wiring harness, demonstrating the ease of power integration.
For models requiring a fuse box connection, refer to the diagram below. The fuse required is 10A. You may replace an existing fuse or connect directly to the appropriate wires:
- Black wire (GND): Connect to any metal part of the car chassis for ground.
- Red wire (ACC): Connect to a 12V source that receives power when the ignition is on (e.g., cigarette lighter, radio).
- Yellow Wire (B+): Connect to a 12V source that provides constant power, even when the car is off (e.g., for small lights, dome light).

Image: Diagram illustrating how to connect the dash cam's power wires to the vehicle's fuse box, with explanations for each wire type (GND, ACC, B+).
Note: If the yellow wire loses power when the car is off, the DVR may lose its settings, including date/time.
3. Mounting the Dash Cam
The dash cam is designed for rearview mirror mounting, integrating seamlessly with the vehicle's interior. Use the provided plastic pry bar to carefully open panels if necessary for cable routing and secure fitting.
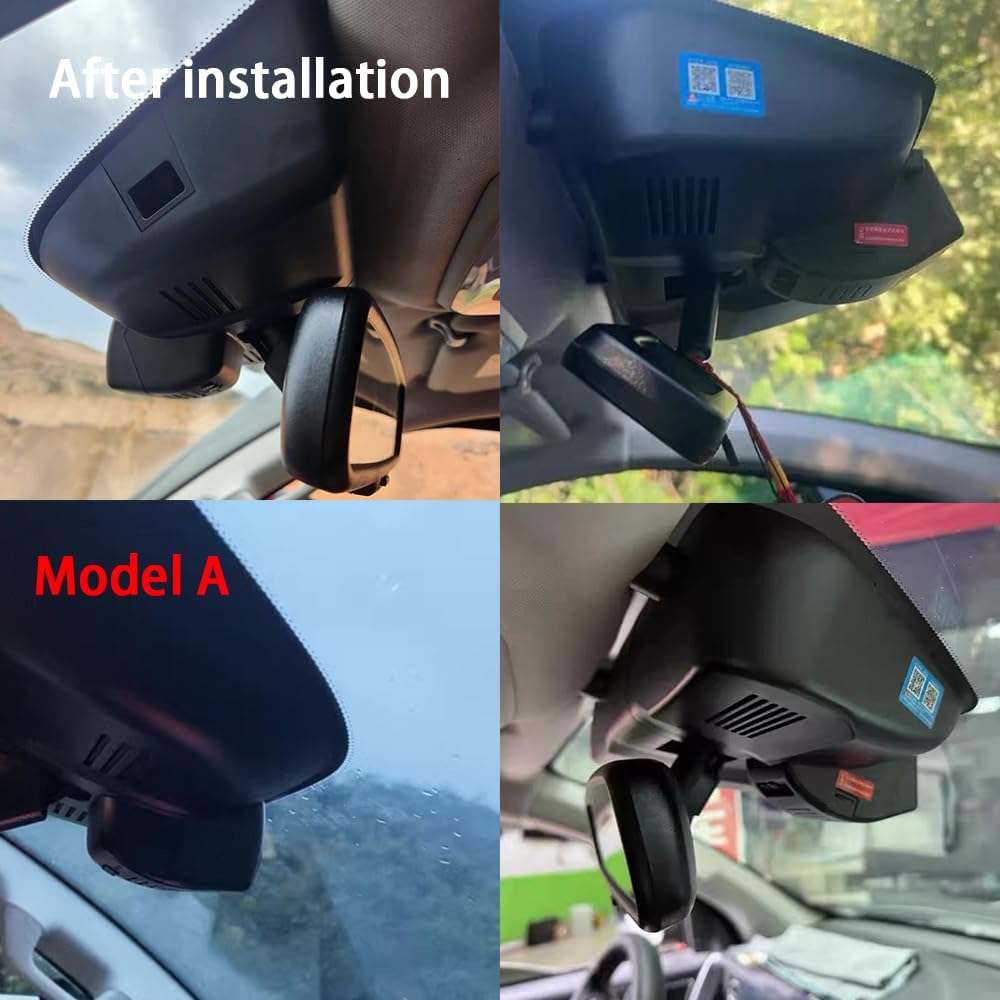
Image: Various angles showing the vehicle's rearview mirror area after the dash cam installation, demonstrating its integrated and discreet appearance.
Operating Instructions
1. Initial Setup and Wi-Fi Connection
Once installed and powered, the dash cam will automatically begin recording. To access settings, view live footage, or download recordings, connect to the built-in Wi-Fi via the Viidure APP.
- Download the "Viidure" application from your smartphone's app store.
- Turn on your car engine to power the dash cam.
- On your smartphone, go to Wi-Fi settings and connect to the dash cam's Wi-Fi network. The network name and password can typically be found on the device or in the quick start guide.
- Open the Viidure APP. You can now view live footage, playback recorded videos, and adjust settings such as resolution, loop recording duration, and G-sensor sensitivity.
Note: If you experience issues with live preview, try turning off cellular data and Bluetooth on your smartphone while connected to the dash cam's Wi-Fi.
2. Recording Modes and Features
- Continuous Loop Recording: The dash cam continuously records video in short segments (e.g., 1, 3, or 5 minutes). When the memory card is full, the oldest footage is automatically overwritten to make space for new recordings. Supports up to 256GB memory cards.
- Emergency Accident Locks (G-Sensor): The built-in G-sensor detects sudden impacts or collisions. When an event is detected, the current video segment is automatically locked and saved to a protected folder, preventing it from being overwritten by loop recording.
- High Dynamic Range (HDR): The dash cam utilizes HDR technology to improve image quality in varying light conditions, ensuring clearer recordings during the day, at night, and in challenging weather like rain.

Image: Examples of video quality demonstrating 4K Ultra Clear HDR recording capabilities in various lighting conditions, including night vision, daytime, and rainy weather.

Image: Detailed view of the dash cam's lens system, highlighting features such as F1.6 large aperture, Sony Ultra Clear Lens, 6 sets of 2160P full HD glass lenses, 1800W pixels, high photosensitivity, and H265 intelligent encoding for smoother video.
Maintenance
To ensure optimal performance and longevity of your ZhuCamX dash cam, consider the following maintenance tips:
- Memory Card Management: Regularly format your memory card (at least once a month) through the Viidure APP or by inserting it into a computer. This helps prevent data corruption and ensures smooth loop recording.
- Lens Cleaning: Gently clean the dash cam lens with a soft, lint-free cloth to remove dust or smudges that could affect video clarity. Avoid abrasive materials or harsh chemicals.
- Firmware Updates: Check the ZhuCamX official website or the Viidure APP periodically for firmware updates. Keeping the firmware updated can improve performance, add new features, and resolve potential issues.
- Temperature Control: Avoid exposing the dash cam to extreme temperatures for prolonged periods. While designed for automotive use, excessive heat or cold can impact its lifespan.
Troubleshooting
If you encounter issues with your ZhuCamX dash cam, refer to the following common problems and solutions:
| Problem | Possible Cause / Solution |
|---|---|
| Dash cam does not power on. |
|
| Wi-Fi connection issues / No live preview in APP. |
|
| Dash cam loses date/time settings. |
|
| Footage is not saving or loop recording is not working. |
|
| Poor video quality. |
|
Specifications
| Feature | Detail |
|---|---|
| Model Name | Dash Cam (Front 4K 2160P Model A) |
| Brand | Generic (ZhuCamX Manufacturer) |
| Video Capture Resolution | 2160p (4K) Front, 1080P Rear (if applicable to variant) |
| Connectivity Technology | Wi-Fi |
| Special Features | Loop Recording, Built-In WiFi, G-Sensor, App Control, Built-In Microphone |
| Mounting Type | Rearview Mirror Mount |
| Vehicle Service Type | Car |
| Product Dimensions | 8 x 8 x 8 inches (approximate) |
| Included Components | Crowbar, User Manual |
| First Available Date | January 22, 2025 |
Warranty and Support
ZhuCamX is committed to providing innovative and reliable products for safe driving. All integrated dash cams undergo strict quality inspection.
- Warranty: This product comes with a 12-month (one year) warranty from the date of purchase.
- Technical Support: For any usage or installation problems, please contact ZhuCamX customer service. Prompt response technical support is available to ensure an optimal user experience.
Please retain your proof of purchase for warranty claims.
Ask a question about this manual
Ask about setup, troubleshooting, compatibility, parts, safety, or missing instructions. Manuals+ will review the question and use this page’s manual context to help answer it.