Fitense AKFIBI0101
Fitense Bike Camera System User Manual
Model: AKFIBI0101
Introduction
This manual provides detailed instructions for the installation, operation, and maintenance of your Fitense Bike Camera System. Please read this manual thoroughly before using the product to ensure proper function and safety. This system is designed to enhance cycling safety by providing a clear rear view of your surroundings.
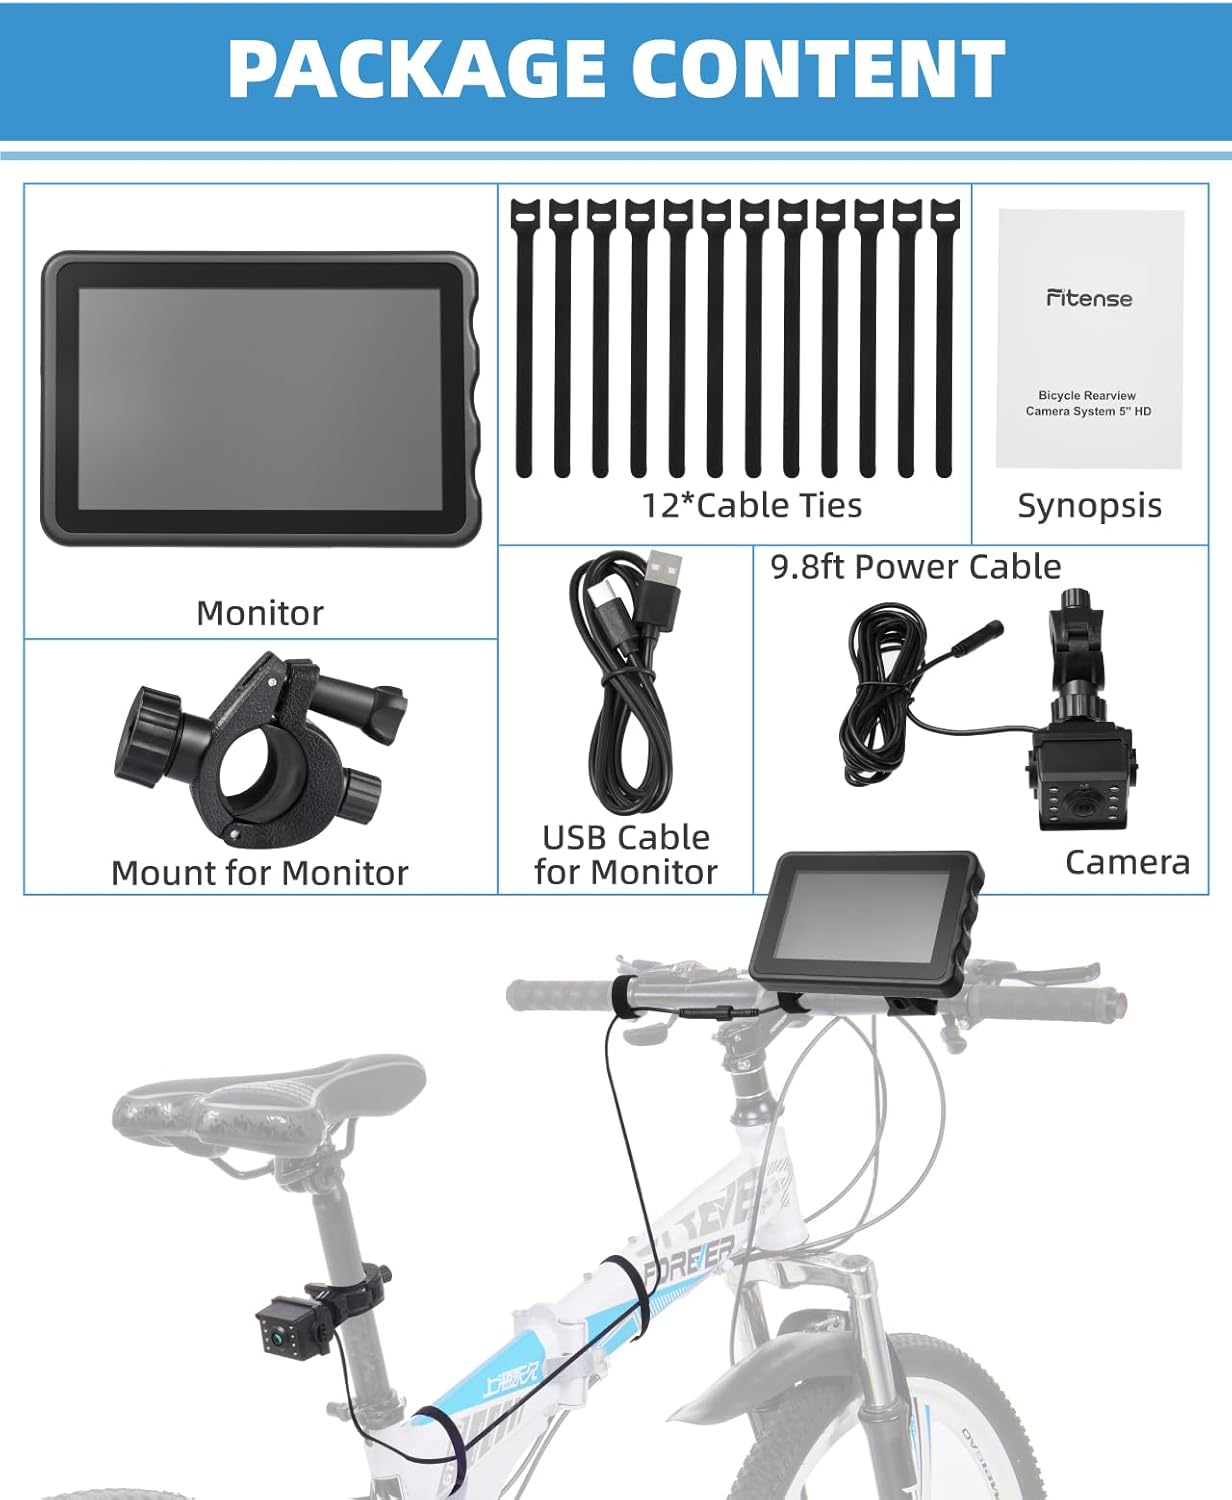
Package Contents
Verify that all items listed below are included in your package:
- 1 x Electronic Display (Monitor)
- 1 x Camera (with integrated cable)
- 1 x Charging Cable (USB)
- 1 x Fixing Base (for monitor mount)
- 12 x Straps (cable ties)
Product Overview
The Fitense Bike Camera System provides a comprehensive rear-view solution for cyclists, featuring a high-definition display and robust design.
Key Features:
- 5-inch HD 1080P Display: Offers clear and stable images for an expanded field of view.
- 10000mAh Rechargeable Battery: Provides 10-12 hours of continuous use on a 5-6 hour charge.
- Dual-Mode Night Vision: Features both color and black-and-white infrared night vision for varied lighting conditions.
- Adjustable Wide-Angle View: Camera view can be set to 130°, 110°, or 100° without distortion.
- IP67 Waterproof Rating: Designed to withstand diverse weather conditions.
- 360° Rotatable Bracket: Allows for flexible installation and precise angle adjustment.
- Integrated Power Cord Design: Reduces issues with external power connections during rides.


Setup and Installation
The Fitense Bike Camera System is designed for tool-free and hassle-free installation.
Installation Steps:
- Mount the Camera: Attach the camera to the rear of your bicycle, typically on the seat post or rear rack. Ensure it has a clear view of the road behind you. The bracket allows for 360° rotation to achieve the optimal angle.
- Mount the Display: Secure the 5-inch display to your bicycle's handlebars using the provided fixing base and straps. The bracket is designed to keep the screen secure even on bumpy roads. It fits handlebars with a diameter of 20-30mm.
- Connect the Cable: Plug the camera's integrated cable into the display unit. Ensure the connection is firm to prevent disconnections during your ride. The system features an integrated power cord design to minimize external power cord issues.
- Adjust Position: Once mounted, adjust the camera and display angles for your preferred viewing position. Ensure the monitor's ball mount is securely tightened to maintain its position.


Operating Instructions
Power On/Off:
- To Turn On: Short-press the power button located on the display unit.
- To Turn Off: Long-press the power button on the display unit.
Display Brightness Adjustment:
The display features a photosensitive component that automatically adjusts brightness based on ambient lighting conditions, reaching up to 1500 units. Manual adjustment is also available.
- Automatic Adjustment: The display will adjust brightness automatically.
- Manual Adjustment: Refer to the display unit's buttons for manual brightness control options.
- Restore Auto-Sensing: If manual settings are applied, the auto-sensing function can be restored by resetting or restarting the device.
Adjusting Wide-Angle View:
The camera's wide-angle view is adjustable to 130°, 110°, and 100° without distortion. Consult the display unit's menu or physical controls for this adjustment.

Night Vision Modes:
The system offers two night vision modes for optimal visibility in low-light conditions.
- Color Night Vision: In well-lit areas or twilight, the system provides comfortable color images.
- Black-and-White Infrared Mode: In pitch-dark conditions, the upgraded infrared mode automatically switches to black-and-white for clearer views.

Maintenance
Battery Charging:
The 10000mAh rechargeable battery charges in approximately 5-6 hours and provides 10-12 hours of use. Use the provided USB charging cable.

Water Resistance:
The camera system is rated IP67 waterproof, meaning it is protected from dust and can withstand immersion in water up to 1 meter for 30 minutes. This allows for use in various weather conditions.
Cleaning:
To clean the display and camera lens, use a soft, damp cloth. Avoid abrasive cleaners or solvents that could damage the surfaces.
Troubleshooting
- Display Not Turning On: Ensure the battery is charged. Short-press the power button to turn on; long-press to turn off.
- No Image on Display: Check that the camera cable is securely connected to the display unit.
- Display Image Unstable/Shaking: Verify that the monitor's ball mount is securely tightened to its base. The thickened shockproof stand is designed to keep the screen steady.
- Difficulty Seeing Display in Bright Sunlight: While the display has auto-adjusting brightness up to 1500 units, extreme direct sunlight can still affect visibility. Adjust your riding position or consider a sun visor if available.
- Image Appears Too Small/Distant: The camera offers adjustable wide-angle views (130°, 110°, 100°). Experiment with these settings to find the most suitable field of view for your preference. Note that objects in a wide-angle view may appear smaller than they are.
- No Recording Function: This product does not support recording functions and does not have a memory card slot. It is designed for real-time rear-view display only.
Specifications
| Product Dimensions | 6.89 x 6.1 x 3.54 inches |
| Item Weight | 1.54 pounds |
| Model Number | AKFIBI0101 |
| Connectivity Technologies | Auxiliary |
| Special Features | 360 Degree Rotation |
| Display Technology | LCD |
| Other Display Features | Wireless (referring to display connection to power, not camera) |
| Color | Black |
| Manufacturer | Fitense |
| Screen Size | 5 Inches |
| Compatible Devices | Bicycle |
| Installation Type | Surface Mount |
| Voltage | 5 Volts |
| Optical Sensor Technology | CCD CMOS |
| Lens Type | Wide Angle |
| Real Angle of View | 130 Degrees (Adjustable) |
| Optical Sensor Size | 1/3 inch |
Warranty and Support
For warranty information or technical support, please refer to the product packaging or contact Fitense customer service directly. Contact details are typically available on the manufacturer's official website or through your point of purchase.
Please retain your proof of purchase for any warranty claims.
Ask a question about this manual
Ask about setup, troubleshooting, compatibility, parts, safety, or missing instructions. Manuals+ will review the question and use this page’s manual context to help answer it.