1. Introduction
This manual provides essential information for the safe and efficient operation of your YARDCARE Robotic Lawn Mower, model E400 Grey AB. Please read this manual thoroughly before installation and use, and retain it for future reference. This robotic lawn mower is designed to automate lawn maintenance for areas up to 4300 sq.ft, featuring app control, self-charging capabilities, weather detection, and obstacle avoidance.

Image 1.1: The YARDCARE Robotic Lawn Mower E400 Grey AB, a self-charging, app-controlled device for automated lawn care.
2. Safety Instructions
Always adhere to the following safety guidelines to prevent injury and damage to the product.
- Read the entire manual: Understand all instructions before operating the mower.
- Children and pets: Keep children and pets away from the mowing area when the mower is in operation.
- Sharp blades: The mower contains sharp blades. Exercise extreme caution when handling or performing maintenance. Always turn off the mower and disconnect power before inspecting or cleaning blades.
- Obstacles: Clear the lawn of any objects such as stones, toys, or wires before operation to prevent damage to the mower and potential hazards.
- Boundary wire: Ensure the boundary wire is correctly installed and maintained to keep the mower within designated areas.
- Weather conditions: The mower is equipped with a rain sensor. Avoid manual operation during heavy rain or extreme weather.
- Charging: Use only the provided charging station and power adapter. Ensure the charging station is placed in a dry, protected area.
- Maintenance: Only perform maintenance tasks described in this manual. For complex repairs, contact qualified service personnel.
- Emergency Stop: Familiarize yourself with the emergency stop button on the mower.
3. Package Contents
Verify that all items listed below are present in your package. If any items are missing or damaged, contact customer support.

Image 3.1: All components included in the YARDCARE Robotic Lawn Mower E400 Grey AB package.
- Mower x 1 pc
- Charging station x 1 pc
- Power adapter x 1 pc
- Measurement gauge x 1 pc
- Instructions x 1 pc (This manual)
- Boundary Wire Peg x 100 pcs
- Connection clip x 2 pcs
- Charging station fixing screws x 6 pcs
- Blades x 3 pcs
- M4 x 12 screws x 3 pcs
- Hex key x 1 pc
- Battery x 1 pc
- Boundary wire 100 meters
- 6 meters extension cord
4. Setup
4.1 Charging Station Placement
Select a suitable location for the charging station. It should be on a flat surface, preferably in a shaded area, and near an outdoor power outlet. Ensure there is enough clear space around the station for the mower to dock easily.

Image 4.1: The robotic mower automatically returning to its charging station.
4.2 Boundary Wire Installation
The boundary wire defines the mowing area. Lay the wire around the perimeter of your lawn, ensuring it is securely fastened with the provided pegs. Maintain a minimum distance from obstacles and edges as specified in the detailed instructions (refer to the included paper manual for precise measurements).

Image 4.2: An aerial view illustrating the proper layout of the boundary wire to define the mowing area.
4.3 Initial Charging
Before first use, ensure the mower is fully charged. Place the mower onto the charging station. The indicator light on the charging station will confirm charging status. A full charge typically takes several hours.
4.4 App Installation and Pairing
Download the YARDCARE app from your device's app store. Follow the in-app instructions to pair your robotic lawn mower via Bluetooth. This will enable remote control and scheduling features.

Image 4.3: A smartphone screen showing the YARDCARE app interface for controlling the robotic lawn mower.
5. Operation
5.1 Starting and Stopping
- To Start: Press the 'Start' button on the mower or use the 'Start' function in the mobile app.
- To Pause: Press the 'Pause' button on the mower or in the app.
- To Stop (Emergency): Press the large red 'STOP' button on top of the mower. This will immediately halt all operations.
5.2 App Control and Scheduling
The YARDCARE app allows you to:
- Initiate or pause mowing cycles.
- Set a regular mowing schedule.
- Adjust cutting height (if supported by app, otherwise use manual knob).
- Monitor the mower's status and location.
- Send the mower back to its charging station.
5.3 Cutting Height Adjustment
The cutting height can be adjusted from 0.8 inches (20mm) to 2.4 inches (60mm) using the height adjustment knob located on the mower. Rotate the knob to your desired setting. Ensure the mower is powered off before adjusting the cutting height.
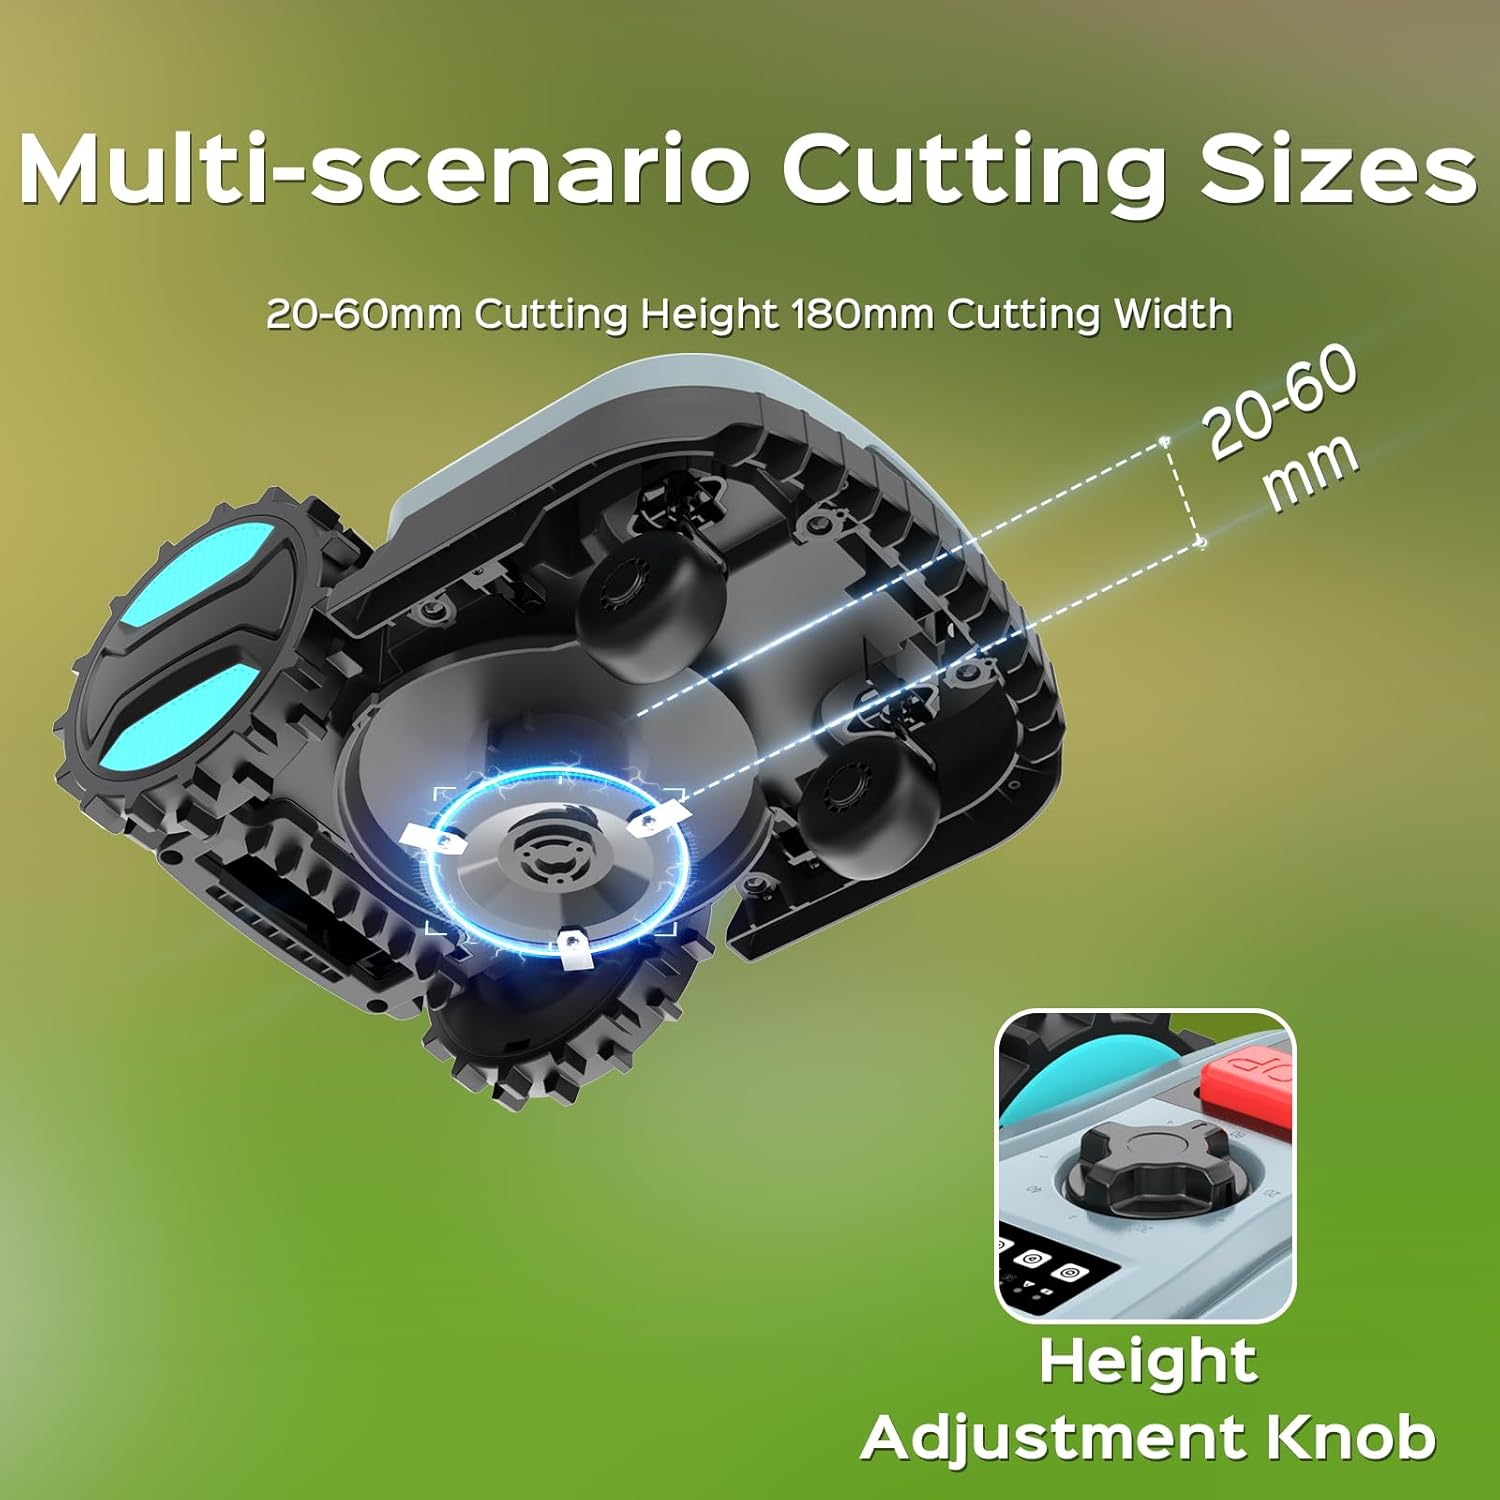
Image 5.1: Detail of the cutting height adjustment knob and the three-blade cutting system.
5.4 Automatic Features
- Self-Charging: The mower automatically returns to its charging station when the battery level is low (below 20%) to recharge.
- Weather Detection: Equipped with a rain sensor, the mower will automatically return to its charging station if rain is detected, protecting it from adverse weather conditions.
- Obstacle Detection: A contact-based bumper sensor allows the mower to detect solid objects. Upon contact, it will redirect its path to avoid the obstacle.
- Tilt Sensor: For safety, if the mower is lifted or tilted significantly, the blades will automatically stop turning.

Image 5.2: The mower's obstacle detection system and the safety function of the tilt sensor.

Image 5.3: The mower's automatic return to the charging station when battery is low or rain is detected.
5.5 Gradient Capability
The mower is designed to handle lawns with gradients up to 25 degrees (approximately 47% incline).

Image 5.4: The robotic mower demonstrating its ability to operate on sloped terrain.
6. Maintenance
Regular maintenance ensures optimal performance and extends the lifespan of your robotic lawn mower.
- Cleaning: Regularly clean the mower's chassis, wheels, and cutting deck. Use a soft brush or cloth. Avoid using high-pressure water jets directly on the mower.
- Blade Inspection and Replacement: Inspect the blades regularly for wear and damage. Worn blades can affect cutting quality. Replace all three blades simultaneously using the provided hex key and M4 x 12 screws. Always wear protective gloves and ensure the mower is powered off and the battery is disconnected before handling blades.
- Charging Contacts: Keep the charging contacts on both the mower and the charging station clean and free of debris.
- Storage: During off-season or extended periods of non-use, clean the mower thoroughly, fully charge the battery, and store it in a dry, frost-free location.
7. Troubleshooting
This section addresses common issues you might encounter. For problems not listed here, refer to the full instruction manual or contact customer support.
| Problem | Possible Cause | Solution |
|---|---|---|
| Mower not starting or stopping unexpectedly. | Low battery, boundary wire issue, emergency stop engaged, obstacle detected. | Check battery level. Inspect boundary wire for breaks. Ensure emergency stop button is disengaged. Clear mowing area of obstacles. |
| Mower not returning to charging station. | Charging station blocked, boundary wire issue near station, station not powered. | Ensure clear path to charging station. Verify charging station is powered and boundary wire is intact. |
| Uneven cutting or poor mowing performance. | Dull or damaged blades, incorrect cutting height, tall grass. | Replace blades. Adjust cutting height. Mow more frequently or raise cutting height for very tall grass. |
| App connectivity issues (Bluetooth). | Mower out of range, Bluetooth off, app glitch. | Ensure you are within Bluetooth range. Verify Bluetooth is enabled on your device. Restart the app or re-pair the device if necessary. |
| Mower gets "trapped" or alarms after leaving charger. | Obstruction near charging station, boundary wire too close to an object. | Ensure sufficient clear space around the charging station. Adjust boundary wire placement if it's too close to an object. |
8. Specifications
| Feature | Detail |
|---|---|
| Brand | YARDCARE |
| Model Number | E400 Grey AB |
| Power Source | Battery Powered |
| Material | Plastic |
| Item Weight | 29.3 Pounds (13.3 kg) |
| Product Dimensions (L x W x H) | 20.47"D x 14.96"W x 8.93"H (52cm x 38cm x 22.7cm) |
| Cutting Width | 7.87 Inches (20 cm) |
| Adjustable Cutting Height | 0.8" - 2.4" (2.03 cm - 6.1 cm) |
| Operation Mode | Automatic |
| Maximum Lawn Area | Up to 4300 sq.ft |
| Maximum Gradient | 25 degrees (approx. 47%) |
| Battery Type | Nonstandard Battery (included) |
| Weather Resistance | IPX5 rated |
9. Warranty and Support
For warranty information and customer support, please refer to the warranty card included in your package or visit the official YARDCARE website. Keep your proof of purchase for warranty claims.
For technical assistance or service inquiries, contact YARDCARE customer service directly. Contact details are typically found in the included documentation or on the brand's official support channels.


