1. Introduction
This manual provides essential information for the safe operation, assembly, maintenance, and troubleshooting of your PULITUO 20V Electric Cordless Leaf Blower. Please read this manual thoroughly before using the product and retain it for future reference.
2. Safety Instructions
Always observe basic safety precautions to reduce the risk of fire, electric shock, and personal injury when operating this product.
- Read All Instructions: Familiarize yourself with the controls and proper use of the appliance.
- Wear Eye Protection: Always wear safety glasses or goggles when operating the leaf blower.
- Keep Area Clear: Ensure bystanders, children, and pets are at a safe distance from the operating area.
- Avoid Loose Clothing: Do not wear loose clothing or jewelry that could get caught in moving parts.
- Battery Safety: Use only the specified battery and charger. Do not expose the battery to water or extreme temperatures.
- Inspect Before Use: Check for damaged parts, loose connections, or any condition that may affect operation.
- Outdoor Use Only: This appliance is designed for outdoor use. Do not operate in wet conditions.
- Secure Grip: Maintain a firm grip on the handle during operation.
3. Package Contents
Verify that all items are present upon unpacking:
- PULITUO Cordless Leaf Blower Unit
- 20V Lithium-Ion Battery
- Battery Charger
- Extension Nozzle
- Turbo Nozzle
- User Manual (this document)

Image 3.1: Contents of the PULITUO Leaf Blower package, including the blower unit, battery, charger, and nozzles.
4. Product Overview
Understand the main components of your leaf blower for proper assembly and operation.

Image 4.1: Key features of the leaf blower, highlighting the motor, two-section tube, battery, and ergonomic handle.
- Blower Body: Contains the motor, fan, and control switches.
- Nozzle: Directs the airflow. The two-section design allows for short or long configurations.
- Battery Pack: Provides power to the blower.
- Battery Charger: Used to recharge the battery.
- Speed Control Buttons: Adjust the airflow speed.
5. Setup
Follow these steps to assemble your leaf blower:
- Attach the Nozzle: Align the desired nozzle (extension or turbo) with the blower's air outlet and twist until it locks securely into place. The two-section design allows for a shorter mode for general use or a longer mode for precise cleaning in hard-to-reach areas.
- Insert the Battery: Slide the fully charged battery pack into the battery slot on the blower until it clicks into position. Ensure it is firmly seated.

Image 5.1: Visual guide for assembling the leaf blower, including nozzle attachment and battery insertion.
6. Charging the Battery
Ensure your battery is fully charged before use for optimal performance.
- Connect Charger: Plug the charger into a standard electrical outlet.
- Insert Battery: Slide the battery pack into the charger.
- Monitor Indicator: The charger will display a red light during charging. Once fully charged, the indicator light will turn green.
- Charging Time: A full charge typically takes approximately 1 hour. The battery provides 10-20 minutes of runtime depending on the speed setting.
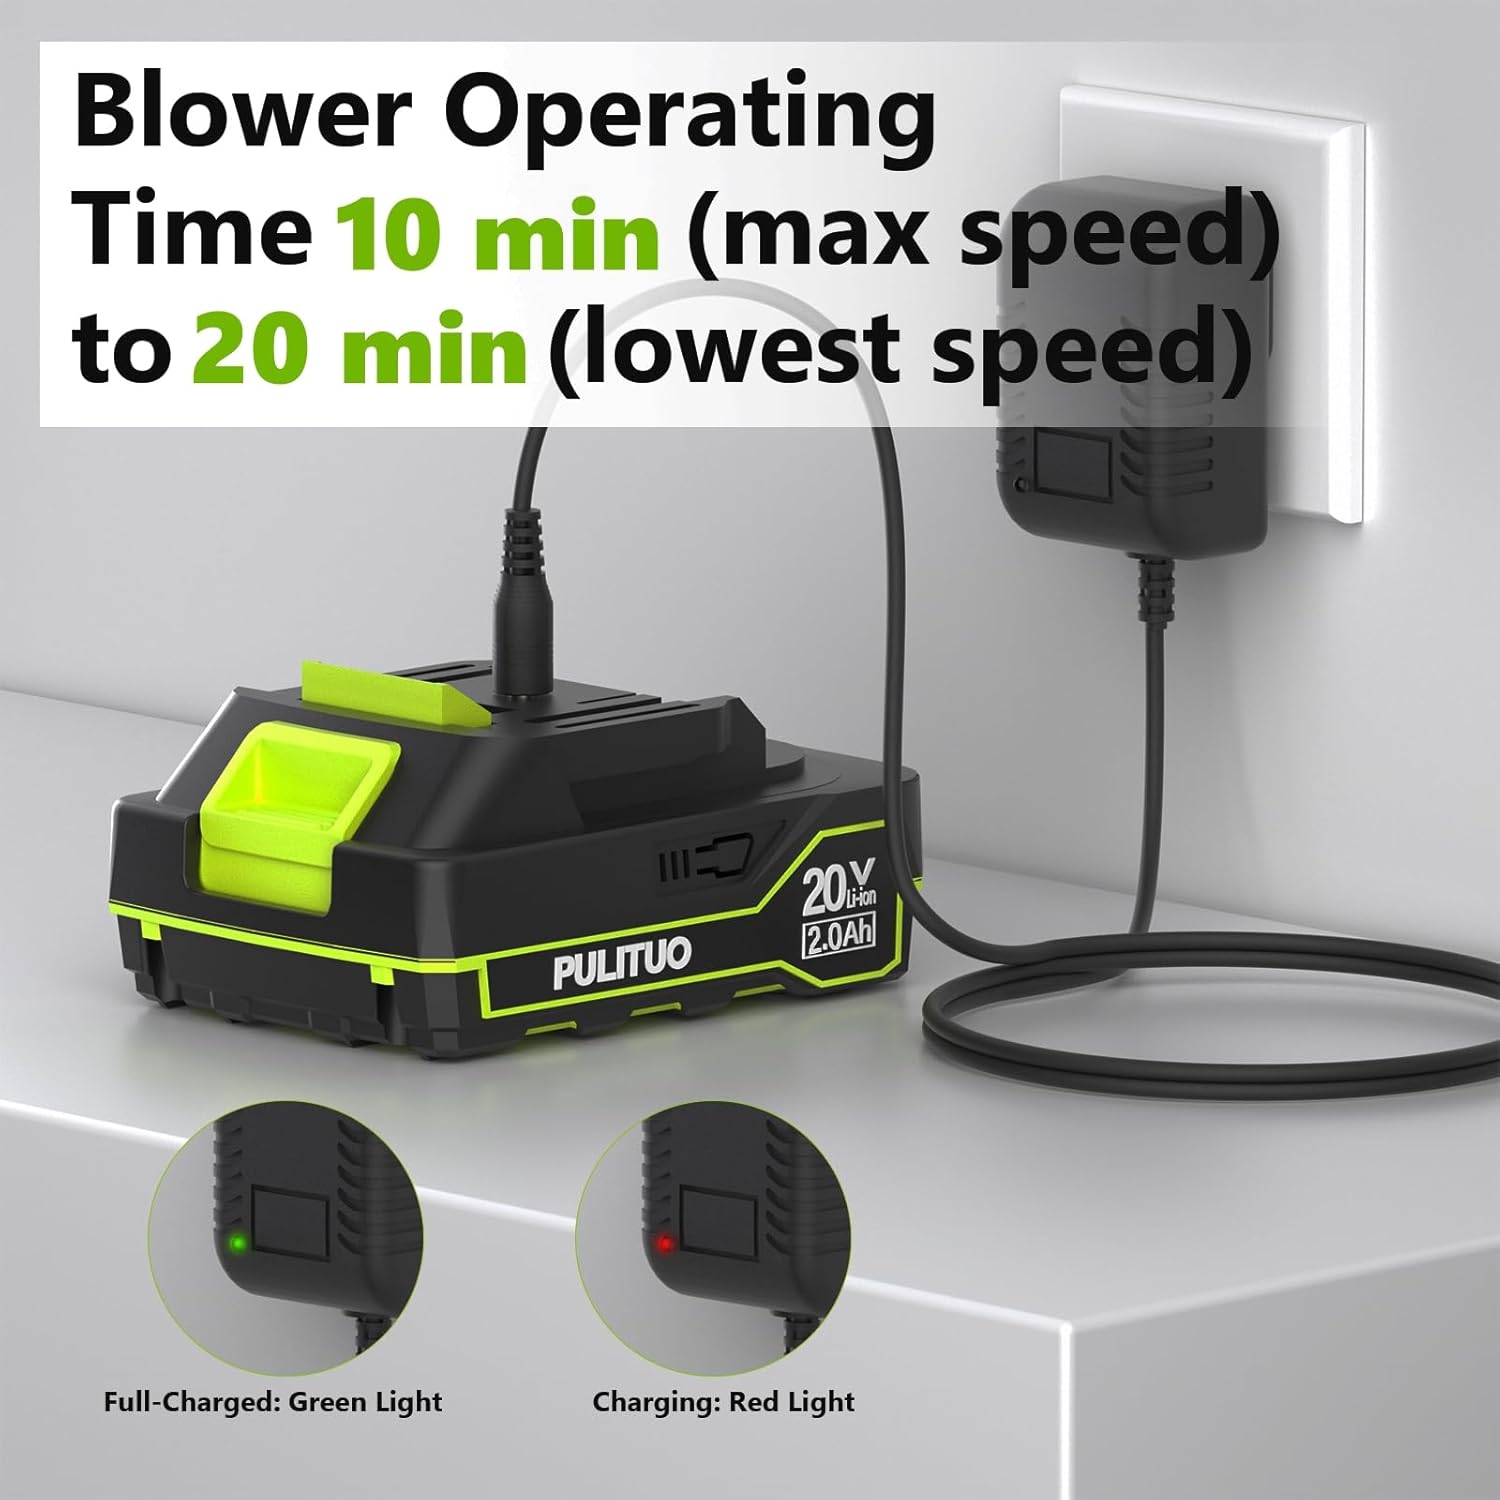
Image 6.1: Battery charging process with indicator lights.
7. Operating Instructions
Once assembled and charged, your leaf blower is ready for use.
- Power On: Press the power button to start the blower.
- Adjust Speed: Use the speed control buttons (labeled 1, 2, 3) to select the desired airflow.
- Level 1 (90 MPH): Suitable for light dust and debris.
- Level 2 (120 MPH): Ideal for sweeping leaves and grass clippings.
- Level 3 (150 MPH): For heavier tasks like fluffy snow or dense leaf piles.
- Direct Airflow: Point the nozzle towards the material you wish to move. Use the extension tube for reaching under objects or for more precise control.
- Power Off: Release the power button to stop the blower.

Image 7.1: Speed control settings and their applications.

Image 7.2: Demonstrating short mode for general use and long mode for precise cleaning.
The PULITUO leaf blower is suitable for various tasks including lawn care, dust cleaning, acting as a BBQ helper, snow blowing, and as a car dryer.

Image 7.3: Examples of widespread use for the leaf blower.
8. Maintenance
Regular maintenance ensures the longevity and optimal performance of your leaf blower.
- Cleaning: Disconnect the battery before cleaning. Wipe the exterior of the blower with a damp cloth. Do not use harsh chemicals or abrasive cleaners. Ensure air vents are clear of debris.
- Battery Care: Store the battery in a cool, dry place away from direct sunlight and extreme temperatures. Do not store fully discharged batteries for extended periods.
- Storage: When not in use, store the leaf blower in a dry, secure location out of reach of children. Detach the battery for long-term storage.
9. Troubleshooting
Refer to this section for common issues and their solutions.
| Problem | Possible Cause | Solution |
|---|---|---|
| Blower does not start | Battery not inserted correctly Battery is discharged | Ensure battery is fully seated Charge the battery |
| Reduced blowing power | Battery is low Air intake/outlet obstructed | Recharge the battery Clear any obstructions from the air vents or nozzle |
| Blower overheats | Continuous heavy use Blocked air vents | Allow the blower to cool down Ensure air vents are clear |
10. Specifications
| Feature | Detail |
|---|---|
| Brand | PULITUO |
| Power Source | Battery Powered |
| Voltage | 20 Volts |
| Form Factor | Handheld |
| Special Features | Adjustable Speed, Lightweight, Portable, Rechargeable, Turbo |
| Item Weight | 3.4 Pounds |
| Material | Plastic |
| Maximum Air Speed | 150 MPH |
| Maximum Air Volume | 180 CFM |
| Maximum Motor Speed | 17000 RPM |
| Product Dimensions | 38"L x 7"W x 7"H |
| Batteries Required | 2 Lithium Ion batteries (1 included) |
11. Warranty and Support
Your PULITUO leaf blower is backed by a 12-month warranty. This warranty covers defects in materials and workmanship under normal use.
For technical support, warranty claims, or any questions regarding your product, please contact PULITUO customer service. Refer to the contact information provided with your purchase documentation or visit the official PULITUO website for assistance.