Lazellz AP10CR1W, AP12CR1G, AP12CR2G, AP08CR2W
Air Conditioner AC Window Kit User Manual
Model Numbers: AP10CR1W, AP12CR1G, AP12CR2G, AP08CR2W
Brand: Lazellz
Introduction
This manual provides detailed instructions for the proper setup, operation, and maintenance of your Lazellz Air Conditioner AC Window Kit. This kit is designed to facilitate the exhaust of hot air from your portable air conditioner unit to the outside, ensuring efficient cooling of your indoor space. It is compatible with Hisense AC models AP10CR1W, AP12CR1G, AP12CR2G, and AP08CR2W.
The kit includes:
- One (1) Appliance Adapter to affix the exhaust hose to the back of your AC unit.
- One (1) Exhaust Hose, expandable from 12 inches to approximately 5 feet.
- One (1) Window Adapter that connects the hose to the window slider.
- One (1) Window Slider / Plate, expandable from approximately 26-1/2 inches to 52 inches.
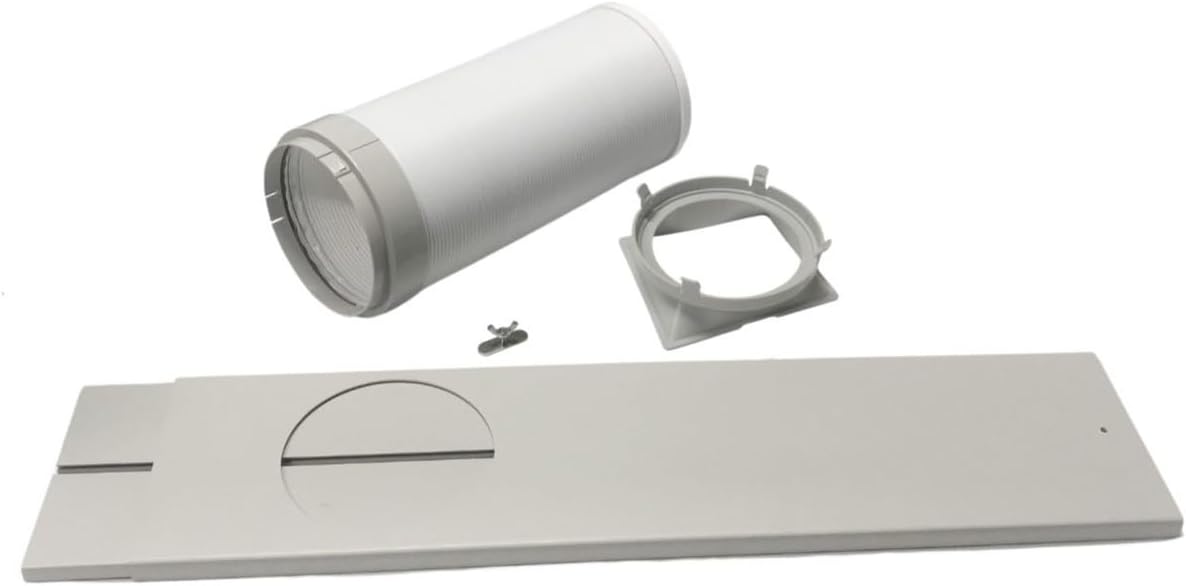
Figure 1: Overview of the Lazellz AC Window Kit components. Shown are the expandable exhaust hose, the appliance adapter, the window adapter, and the adjustable window slider panel.
Setup and Installation
Follow these steps to properly install your AC window kit and ensure efficient operation of your air conditioner.
Window Slider Installation
The window slider is designed to fit various window sizes. Adjust its length to securely fit your window opening.

Figure 2: Step-by-step instructions for adjusting and securing the window slider.
- Identify Window Slider Components: Locate the main window slider panel and the included fastener (often a wing nut or screw). The image shows the window slider and a small fastener.
- Adjust the Length: Hold the window slider with both hands. Slide the adjustable section to extend or retract the panel until it fits snugly within your window frame. Ensure the opening for the exhaust hose is positioned correctly.
- Fasten the Slider: Once the desired length is achieved, use the provided fastener (e.g., wing nut) to secure the adjustable sections together. This prevents the slider from collapsing or extending unintentionally. The image demonstrates fastening a wing nut to lock the slider in place.
- Ready for Installation: The window slider is now prepared to be placed into your window opening.
Exhaust Hose and Adapter Connection
- Attach Appliance Adapter: Connect the appliance adapter to the exhaust outlet on the back of your portable AC unit. Ensure it is securely twisted or clicked into place.
- Connect Exhaust Hose to Appliance Adapter: Extend the exhaust hose to the required length (up to 5 feet). Attach one end of the exhaust hose to the appliance adapter. Twist clockwise to secure the hose to the adapter.
- Connect Window Adapter to Exhaust Hose: Attach the other end of the exhaust hose to the window adapter. Twist clockwise to secure the hose to the window adapter.
- Insert Window Adapter into Slider: Insert the window adapter, with the hose attached, into the circular opening of the installed window slider. Ensure it is firmly seated to prevent air leakage.
Operating Guidelines
Once installed, the AC window kit operates passively by directing hot air out of your window. Proper sealing is key to efficient cooling.
- Ensure Tight Seal: Verify that the window slider is tightly fitted in the window frame and that there are no gaps around the edges. Use foam seals or weatherstripping if necessary to prevent air infiltration.
- Check Hose Connections: Periodically inspect the connections between the AC unit, appliance adapter, exhaust hose, and window adapter to ensure they remain secure and free of leaks.
- Avoid Kinks: Ensure the exhaust hose is not kinked or sharply bent, as this can restrict airflow and reduce the efficiency of your AC unit.
Maintenance
Regular maintenance of your window kit will prolong its lifespan and ensure optimal performance of your air conditioner.
- Cleaning:
Wipe down the window slider and adapters with a damp cloth to remove dust and grime. For stubborn dirt, a mild soap solution can be used. Ensure all parts are dry before reassembly or storage.
- Inspection:
Before each season of use, inspect the exhaust hose for any cracks, tears, or damage. Check the adapters for any signs of wear or breakage. Replace any damaged components immediately to maintain efficiency.
- Storage:
When not in use, detach the kit components, clean them, and store them in a cool, dry place away from direct sunlight to prevent material degradation.
Troubleshooting
If you encounter issues with your AC window kit, refer to the following common problems and solutions.
| Problem | Possible Cause | Solution |
|---|---|---|
| Poor cooling performance of AC unit. | Air leakage around window slider or hose connections. | Ensure window slider is tightly sealed in the window frame. Check all hose and adapter connections for tightness. Use weatherstripping or foam tape to seal gaps. |
| Exhaust hose detaches from AC unit or window adapter. | Improper attachment or loose connection. | Re-attach the hose, ensuring it is twisted clockwise until secure. Avoid pulling or stressing the hose excessively. |
| Hose is kinked or bent. | Improper positioning of AC unit or hose. | Reposition the AC unit or adjust the hose path to ensure a straight and unobstructed airflow. Avoid sharp bends. |
Specifications
| Feature | Detail |
|---|---|
| Brand | Lazellz |
| Compatible AC Models | AP10CR1W, AP12CR1G, AP12CR2G, AP08CR2W |
| Exhaust Hose Length (Collapsed) | 12 inches |
| Exhaust Hose Length (Expanded) | Approximately 5 feet (60 inches) |
| Window Slider Length (Collapsed) | Approximately 26-1/2 inches |
| Window Slider Length (Expanded) | Approximately 52 inches |
| Material Type | PVC/Plastic |
| Color | Off-White |
| Item Weight | 3.2 ounces |
| Product Dimensions | 30 x 8 x 8 inches (packaged) |
Warranty and Support
This product is designed for durability and performance. For specific warranty information or technical support, please refer to the documentation provided with your purchase or contact the manufacturer directly.
Manufacturer: Lazellz
Note: This kit does NOT come with installation instructions from the manufacturer. Please use this manual as a guide.